If you’re currently using Unbounce to build and host your landing pages, then using a multi step form for your Unbounce page is an extremely effective way to boost conversions, AND get more data about your leads too.
In fact, many Unbounce customers come to us asking about how to create a multi step forms in unbounce.
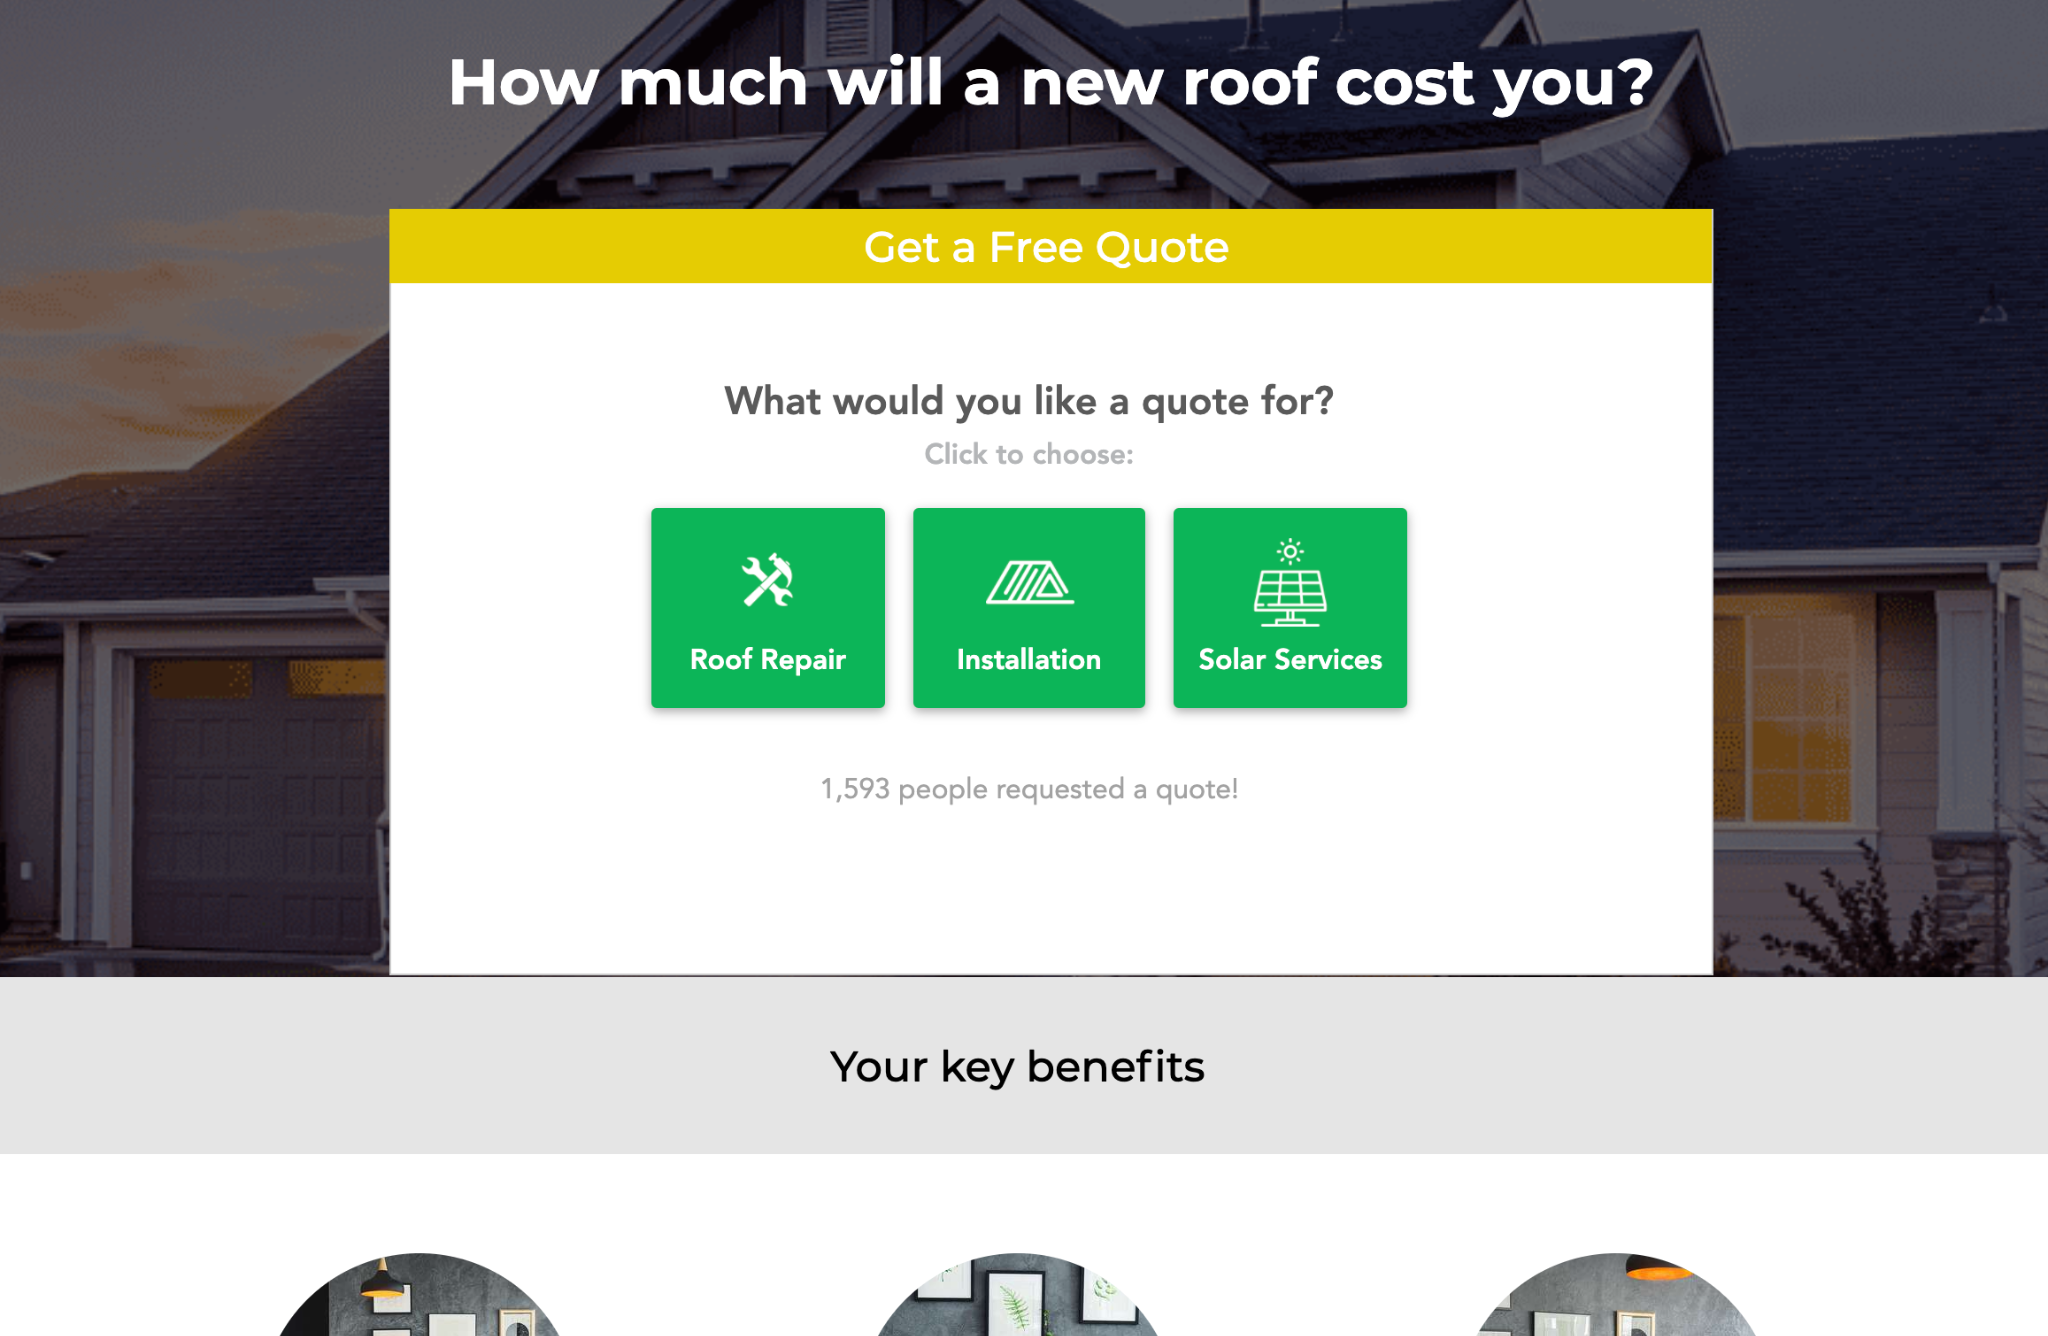
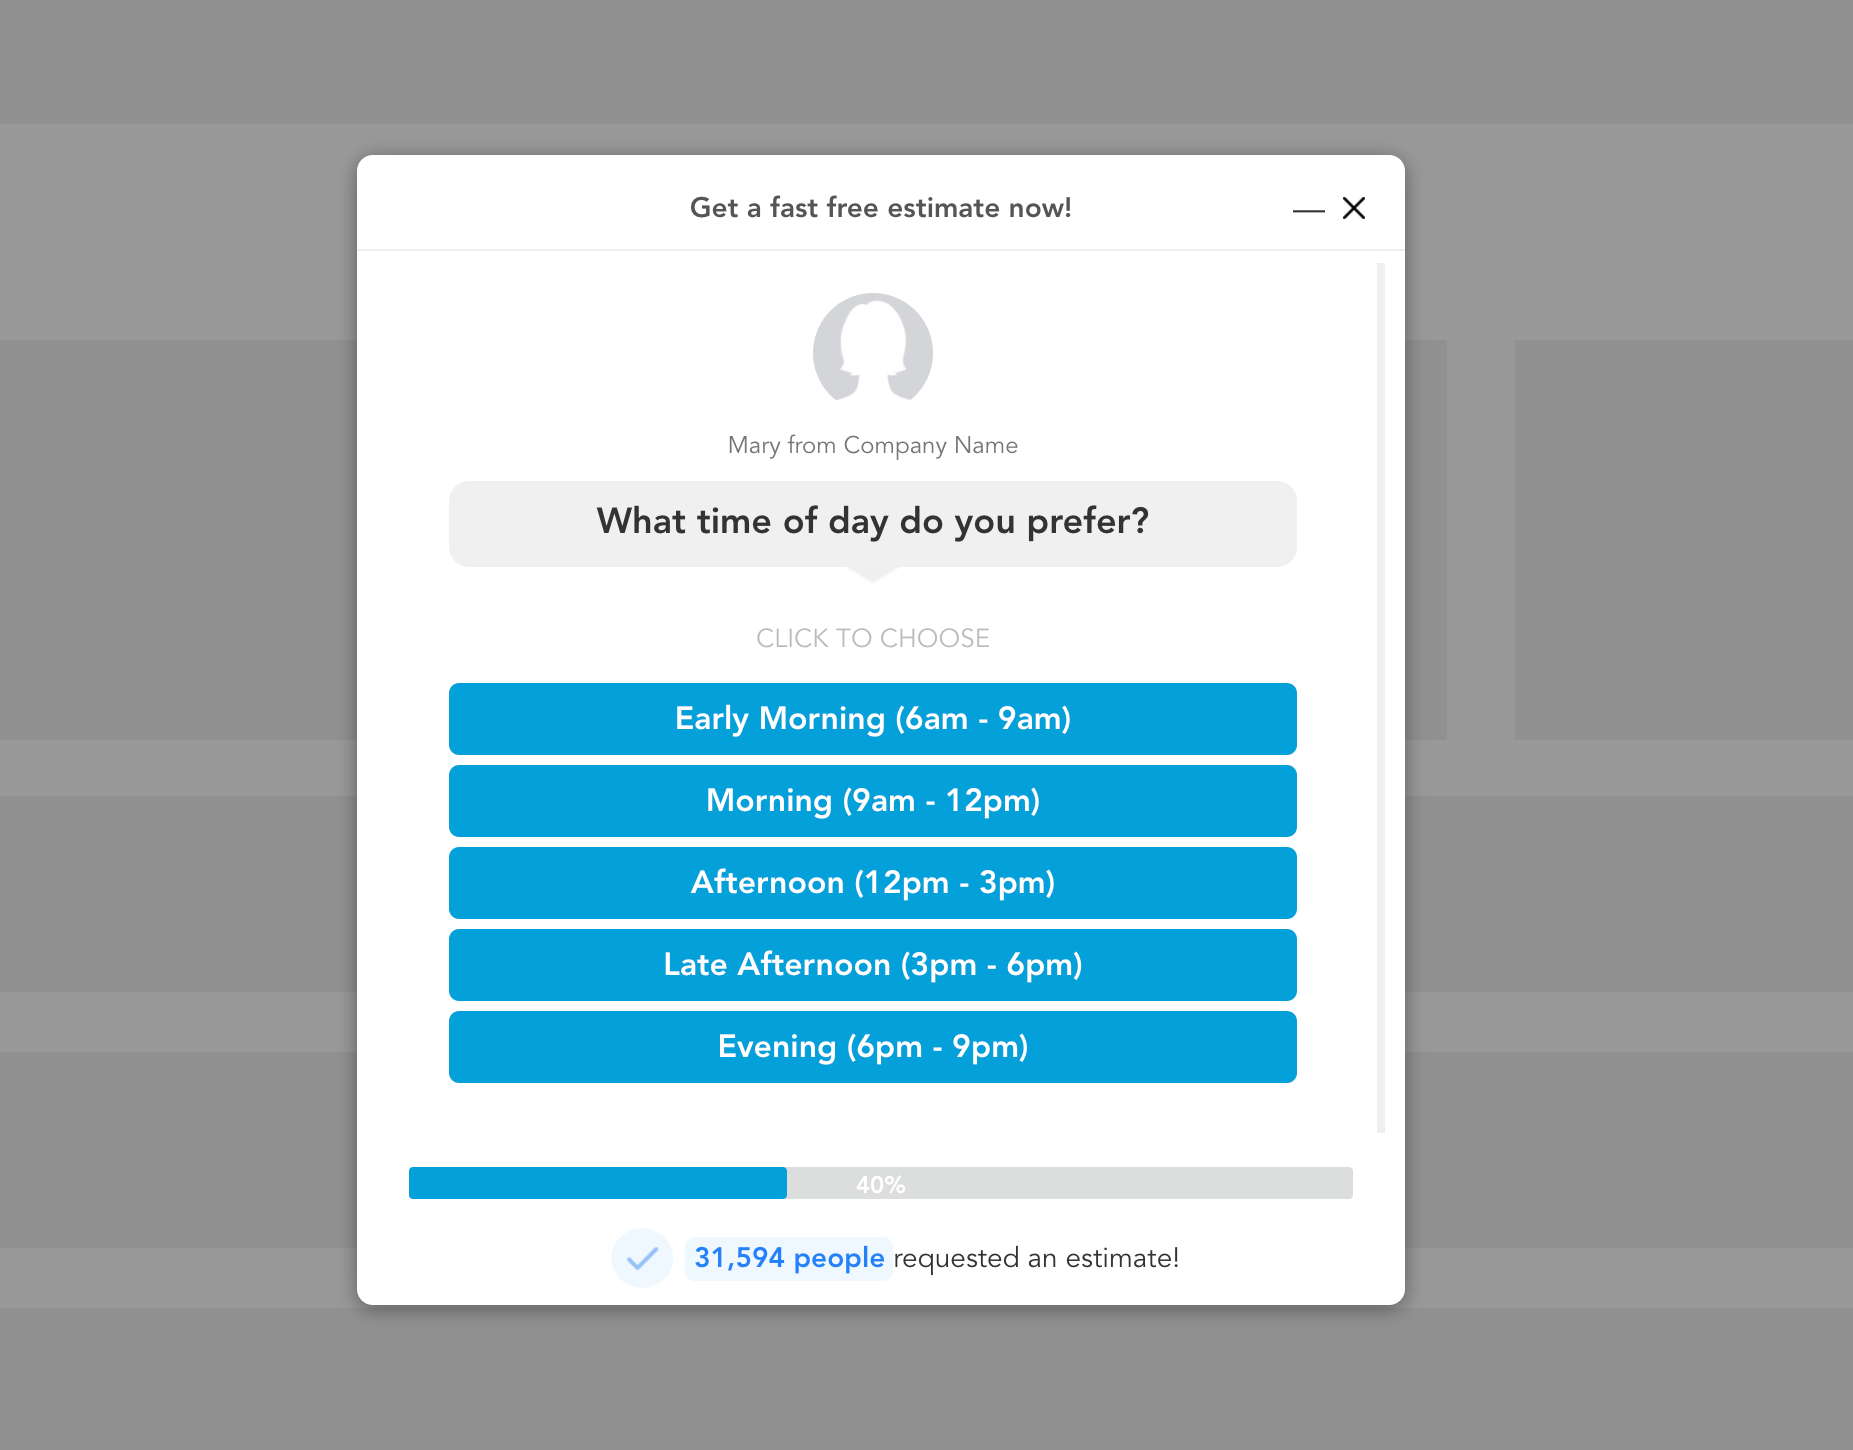
For example, I’m talking about a multi step form like this:

You can see an example here.
In this post, I’m going to take you step-by-step through some of your options for building and optimizing your multi step forms in Unbounce.
Note: If you’re looking for an easy way to create multi step forms for Unbounce you can grab your free trial here » (plus, if you’re building forms for clients you’ll earn 30% recurring commission when you use GetLeadForms).
Ready, let’s go!
Contents:
- 1…… Why use multi step forms on your Unbounce landing pages
- 2…… How to build a multi step form in Unbounce using Javascript
- 3…… How to build a multi step form for Unbounce Using GetLeadForms (no coding needed)
- 4…… How to see where users drop-off in your multi step form
- 5…… How to optimize your form to increase conversions with step-based metrics and A/B testing
- 6…… How to earn recurring revenue by building multi step forms with GetLeadForms for clients
Unbounce multi step forms: Why even use them in the first place?
If you’re not familiar with the benefits of multi step forms, the team over at KlientBoost wrote an amazing article on using multi step forms to boost conversions — it’s filled with tons of great insights.
Since you’re reading a post about how to build a multi step form for Unbounce, there’s a good chance that you’re already sold on the benefits of using this type of form on your landing pages.
So, I’ll cut out the fluff and just get straight to the point with this tutorial. Let’s get started.
Two options for how to create a multi step form in Unbounce:
When it comes to building your multi step forms, there are two ways to go about it:
Option #1: The javascript way — medium effort, requires some code, and lacks features.
Option #2: The GetLeadForms way — low effort, no coding or technical skills required, and tons of features.
I’ll touch on both methods — then you can choose what works best for you based on your time and budget.
Option #1: How to build a multi step form in Unbounce using Javascript
Thanks to Unbounce’s thriving community of marketers, the process of building a multi step form in Unbounce has become a bit easier over the years.
Currently, Unbounce doesn’t have a feature that supports multi step form creation (at least not at the time of writing this post).
So, when it comes to building a multi step form on Unbounce, we’ll turn to this tutorial inside of the Unbounce community.
A quick summary of the tutorial linked above:
- Create a standard form in Unbounce
- Create new button elements “Next” and “Previous” so users can click on the buttons to advance or go backwards in the form
- Add some javascript and HTML to your Unbounce page – provided here
All said and done, it shouldn’t take more than 1-2 hours to set up and test your form in Unbounce.
The downside of building multi-step forms inside of Unbounce
Unbounce is an amazing tool for landing pages.
And they provide a number of templates across different industries like legal, mortgage, insurance, and more.
But when it comes to multi-step form creation, it has some downsides.
The primary downside is that you end up with a very basic multi-step form.
If you really want to increase conversions, then you need a way to take your multi step forms to the next level. This is where GetLeadForms comes into play.
Option #2: The EASIER way to build a multi step form for Unbounce (Using GetLeadForms)
Now I’m going to show you how to build one of these interactive, multi step forms using GetLeadForms.
GetLeadForms makes it faster and easier to get a multi step form on your Unbounce landing page, there’s no coding required, and it’s loaded with features.
You can grab a free trial here.
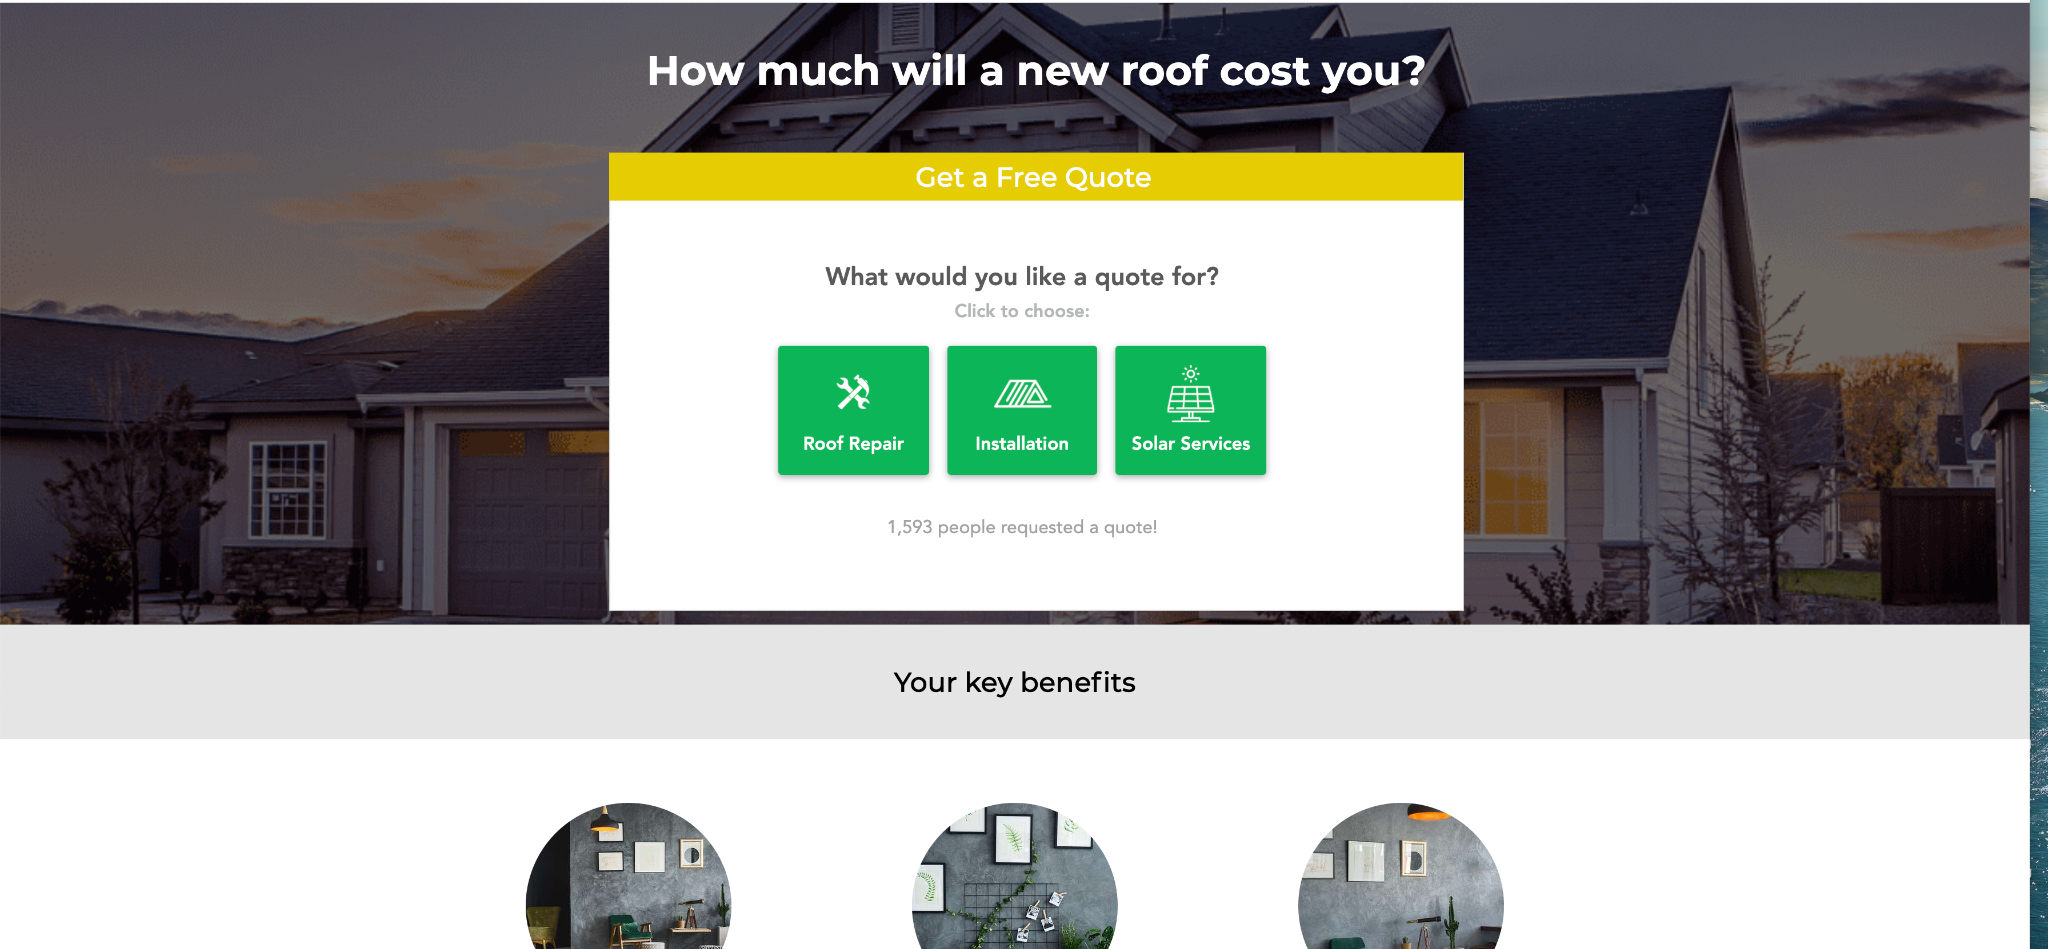
For this example, we’re going to build this exact multi step form for a roofing company and add it to Unbounce.
Short on time?
Here’s the live Unbounce page: http://unbouncepages.com/roofing-template/.
Grab this free template here.
Step #1: Come up with some questions that you’d like to ask
With GetLeadForms, there’s no limit to the type of questions that you can ask.
So, I like to really sit down and put pen to paper.
The two key things to think about are:
- What questions matter most for lead qualification
- What’s the first question to drive the micro-conversion
By micro-conversion, I’m talking about getting someone to answer a very basic question on step #1, to get them engaged and committed to going down your conversion path.
So for this example, here’s what my notes usually look like before I even create a form:
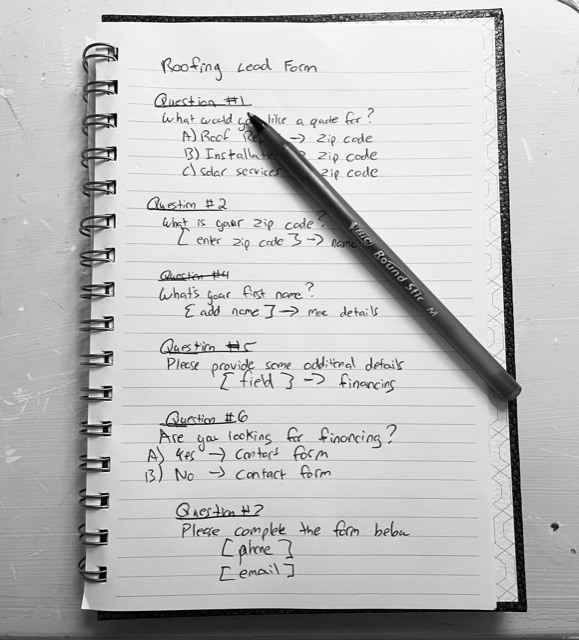
Yep… my handwriting could be better! That’s why I stick to typing 🙂
In the sections below, we’ll turn the notes into an actual multi step lead form using GetLeadForms and we’ll use a template to save time.
Step #2: Start with a template
When it comes to building your multi step form, the easiest way to get started is to use an existing template.
So, before you jump into building your lead form, the next step is to choose a template based on the style form that you’re looking to use.
With GetLeadForms, you have a couple of different styles, all of which are completely customizable.
Style #1: Enhanced LeadForm
This is your standard looking multi step form, but completely customizable. You can grab a template here.
Option #2: Chat Style LeadForm
If you’re looking for something a little different and more personal, the Chat Style form is the way to go.
Our Chat Style design is unique to GetLeadForms. This design takes forms to all new heights by making them look and feel more friendly (something that every form can benefit from]. You can grab the chat style template here.
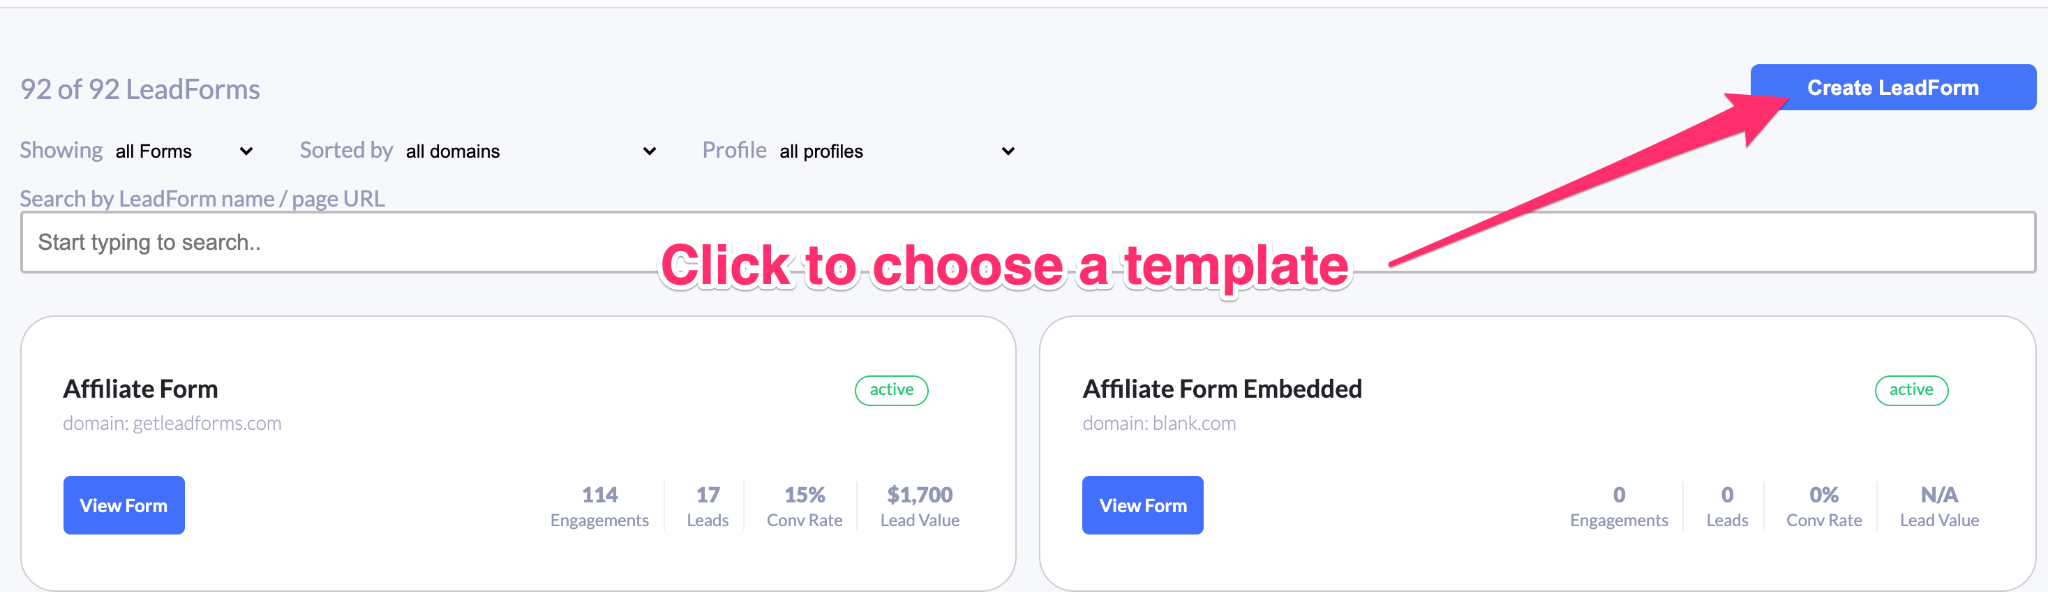
After you log into your account, simply click on the “Create LeadForm” button in the right hand corner of the screen. This will open up the template area.
Next, the template library will appear.
Similar to how Unbounce has templates for landing pages, GetLeadForms provides templates for your forms. This is where you can start from an existing template to speed up the process.
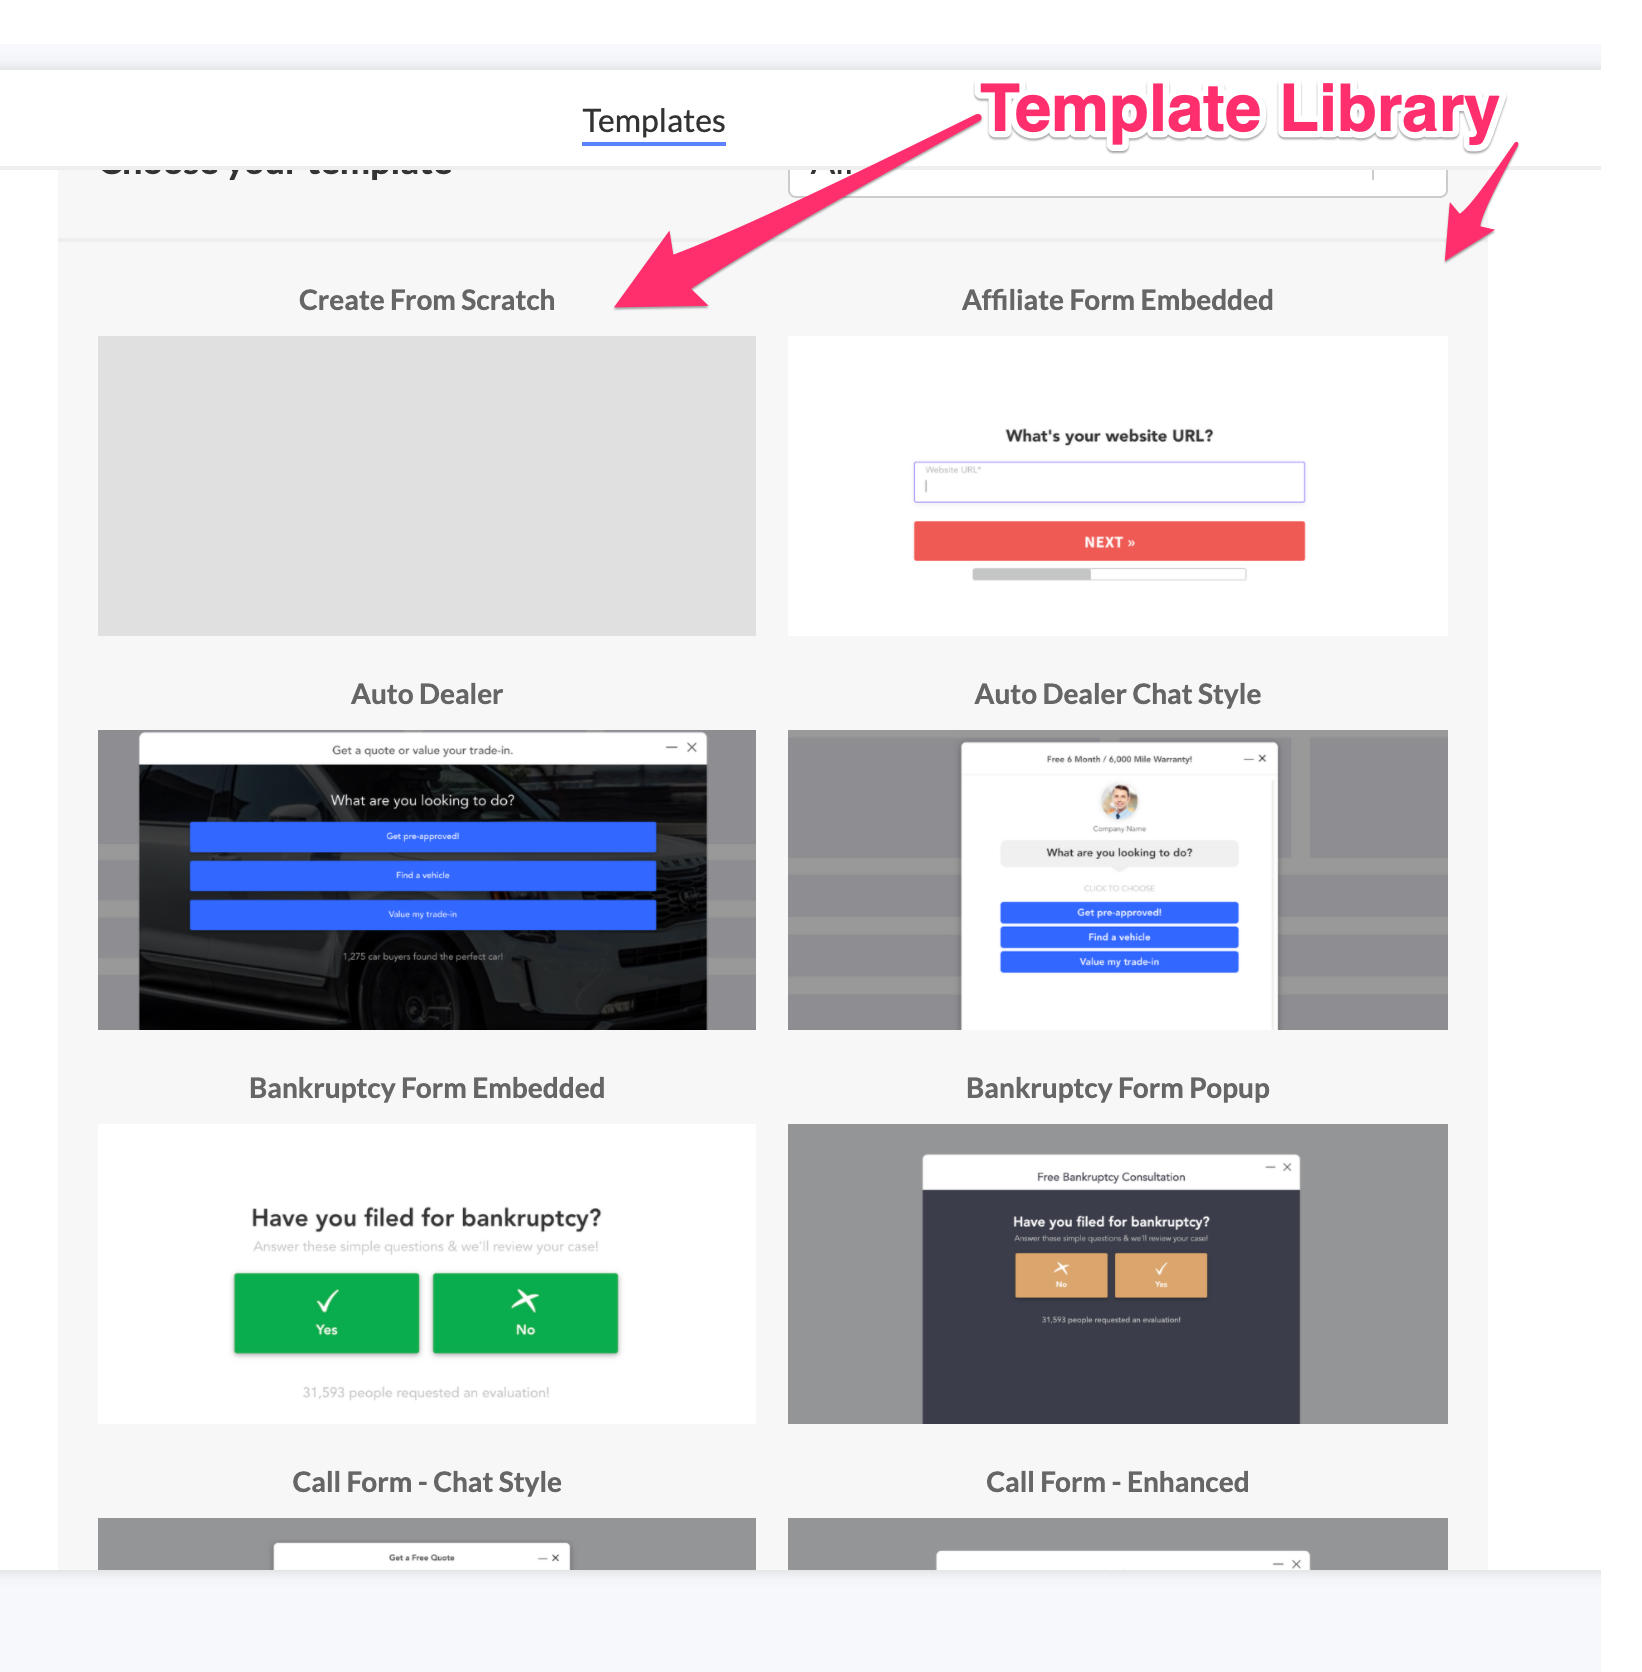
To choose a template, simply click “Choose” — this will load the template right into our form builder for you.
Just like that, 75% of the work is already done. Now all you have to do is customize your lead form to make it your own.
Since we’re building a form for a roofing company in this example, we’ll start with a roofing template.
Step #3: Configure your form’s settings
After you choose your template, the next step is to configure some basic settings.
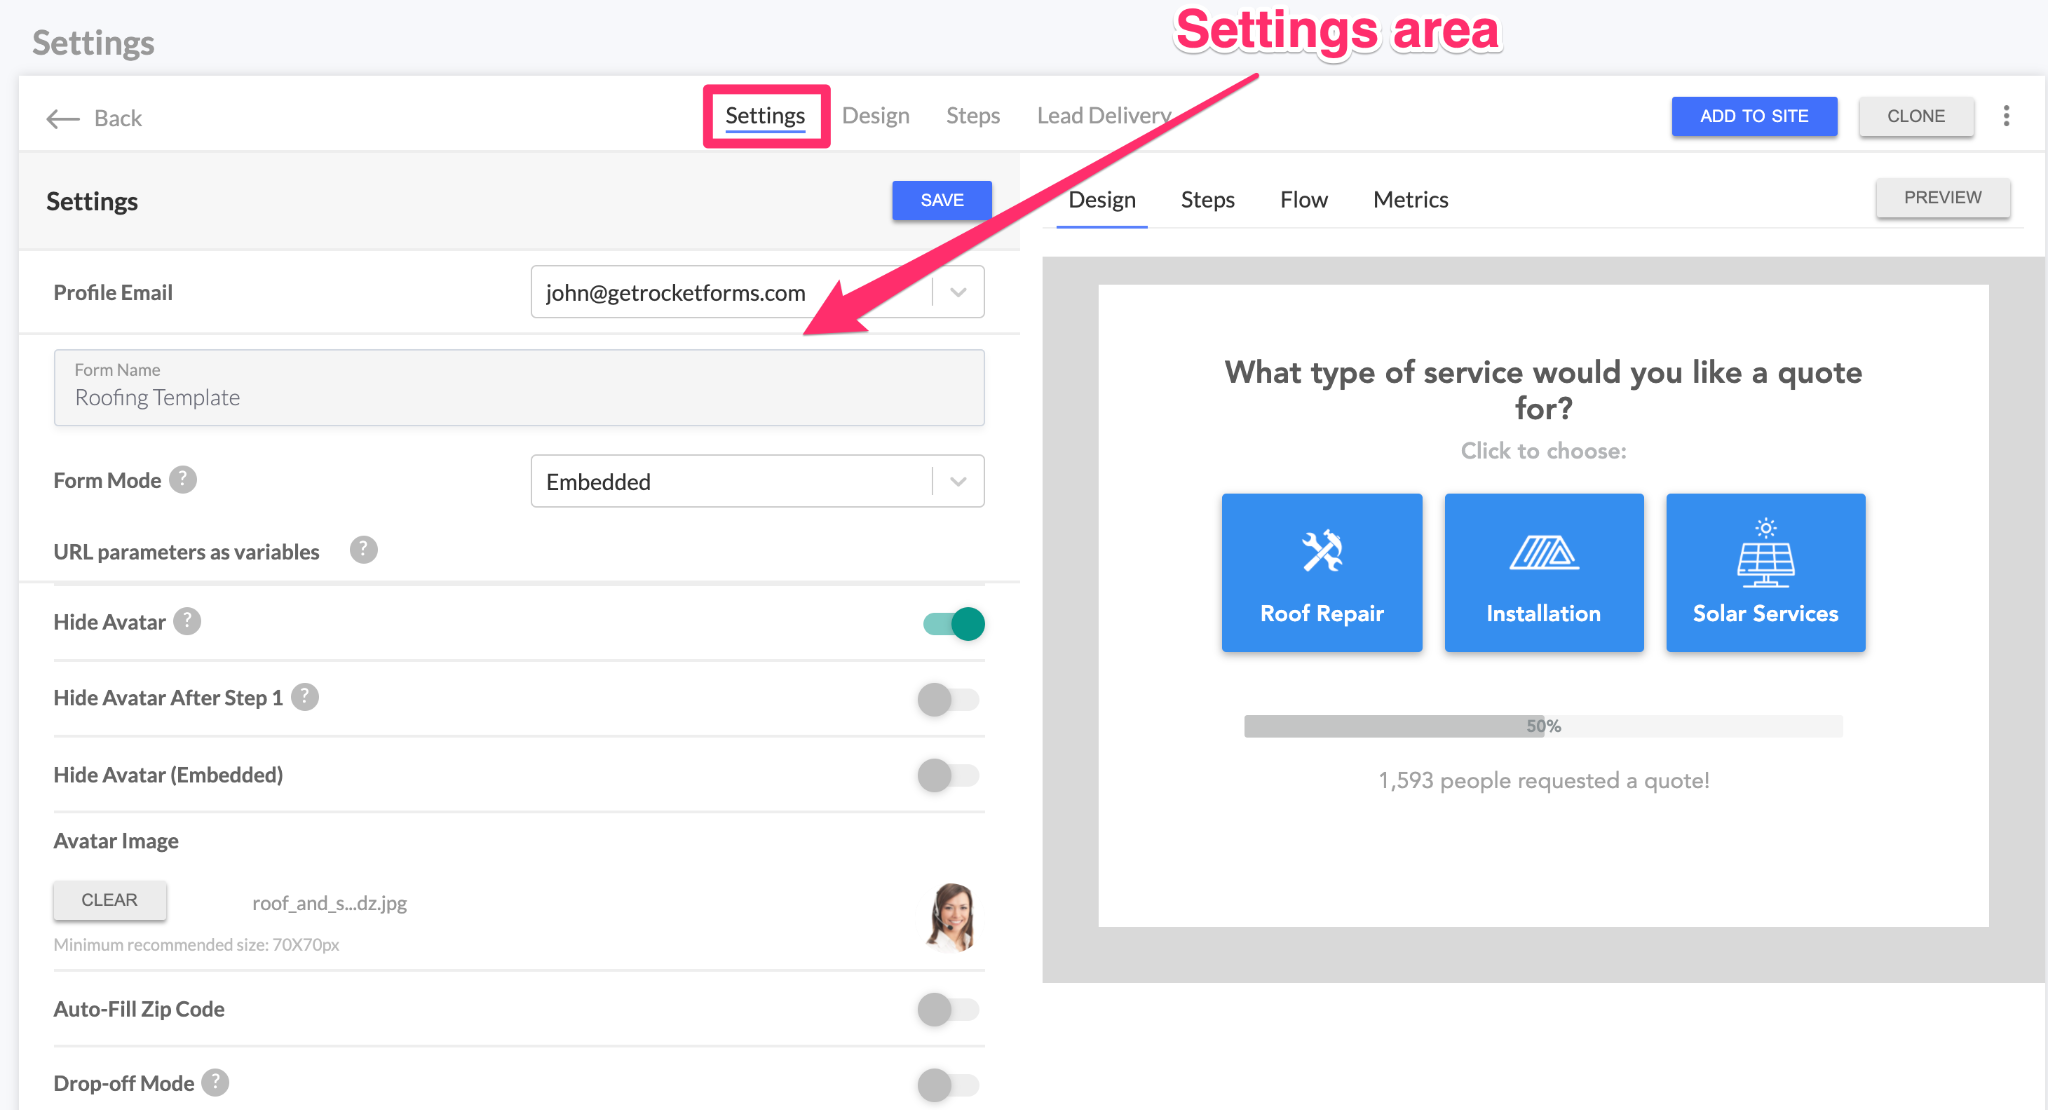
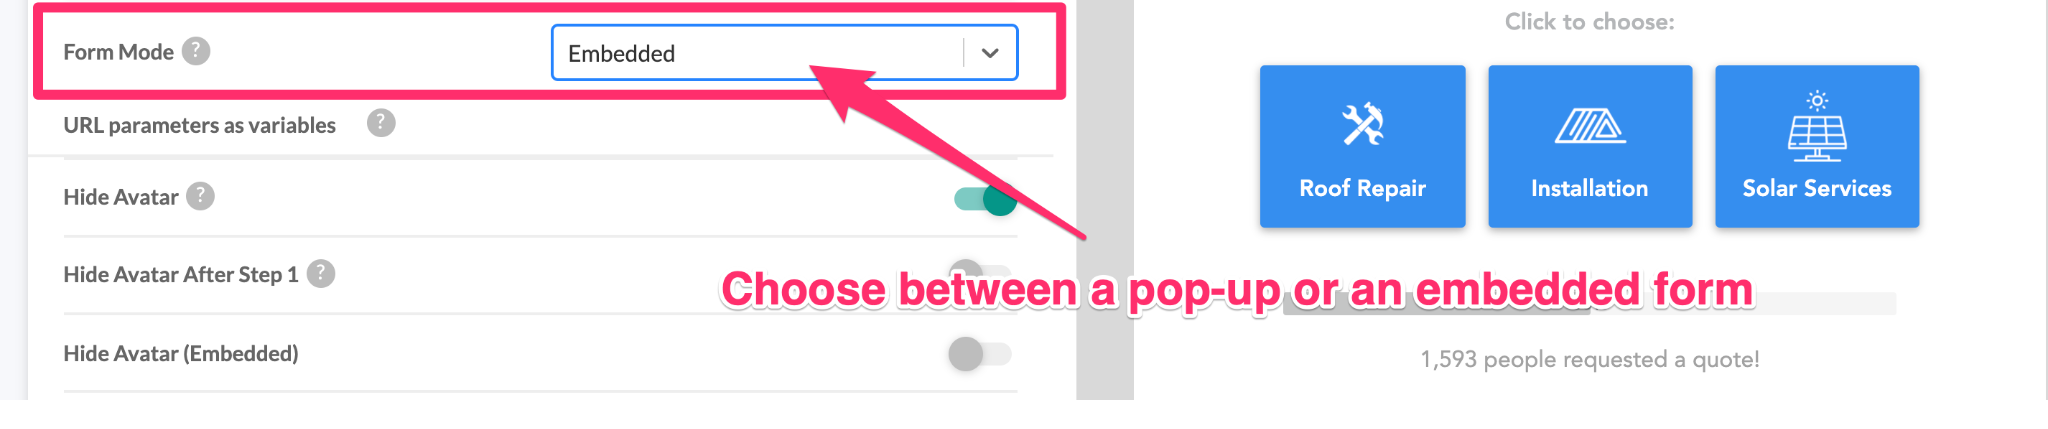
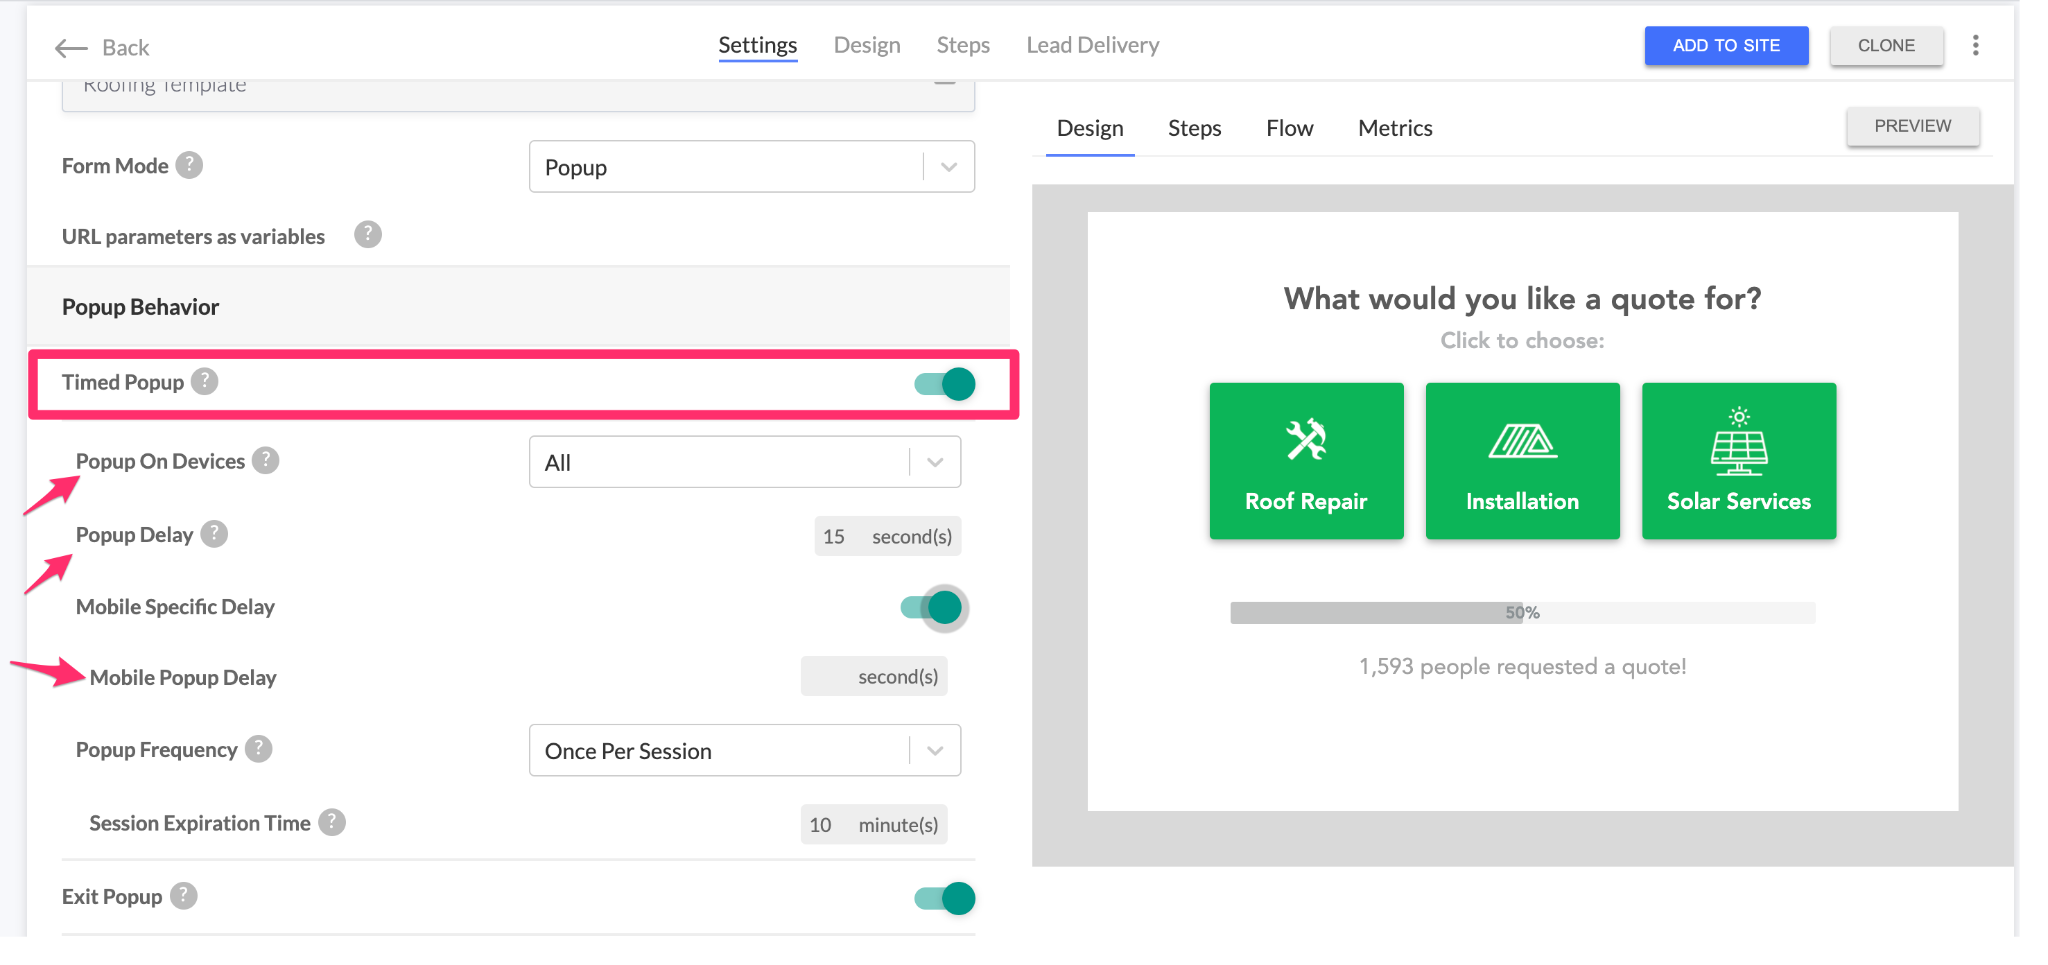
To start — you’ll want to determine if the form is going to be embedded right into your Unbounce landing page, or if it’s going to pop-up either with the click of a button or as a timed-popup.
For this example, we’ll set the form to be embedded.
You also have the ability to adjust some additional settings that you can’t typically set with the standard way of building forms in Unbounce.
This includes:
- Adding Google Analytics
- “Drop-off mode” to collect leads even if they don’t complete your form
- Auto fill zip code
- And more
Step #4: Add your questions and responses to your multi step form
This is where the magic happens.
Remember the list of questions that we brainstormed in Step #1?
Now it’s time to add them as questions to your form.
To do this, jump over to Steps in the upper Navigation of the builder, then click on Steps again below that.
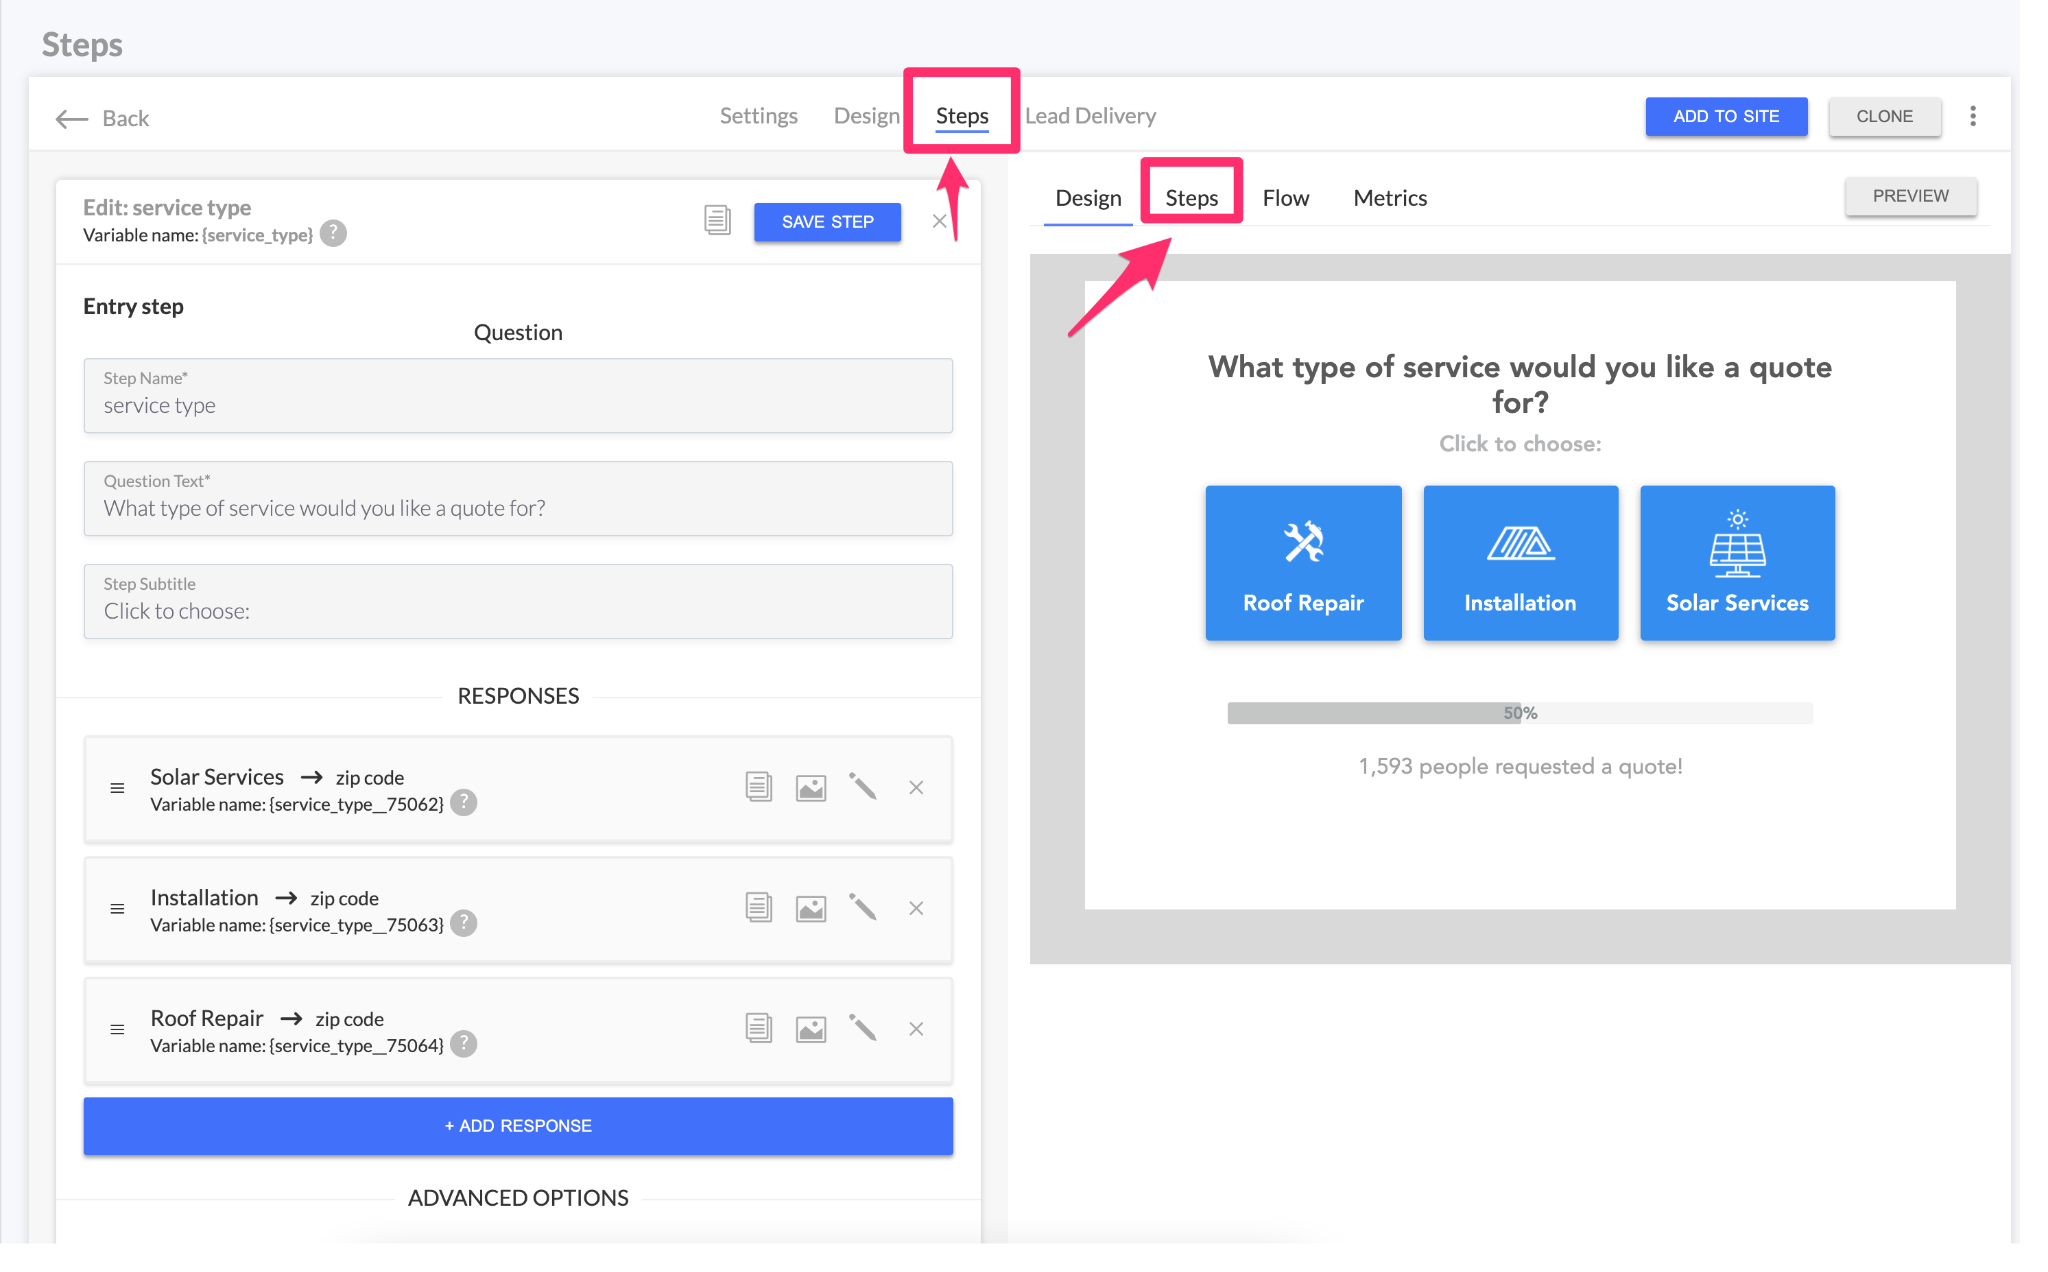
The great thing about starting from a template is that you already have a number of steps set up for you. So all you have to do is modify, add, and remove steps until the form is asking the exact questions that you’d like.
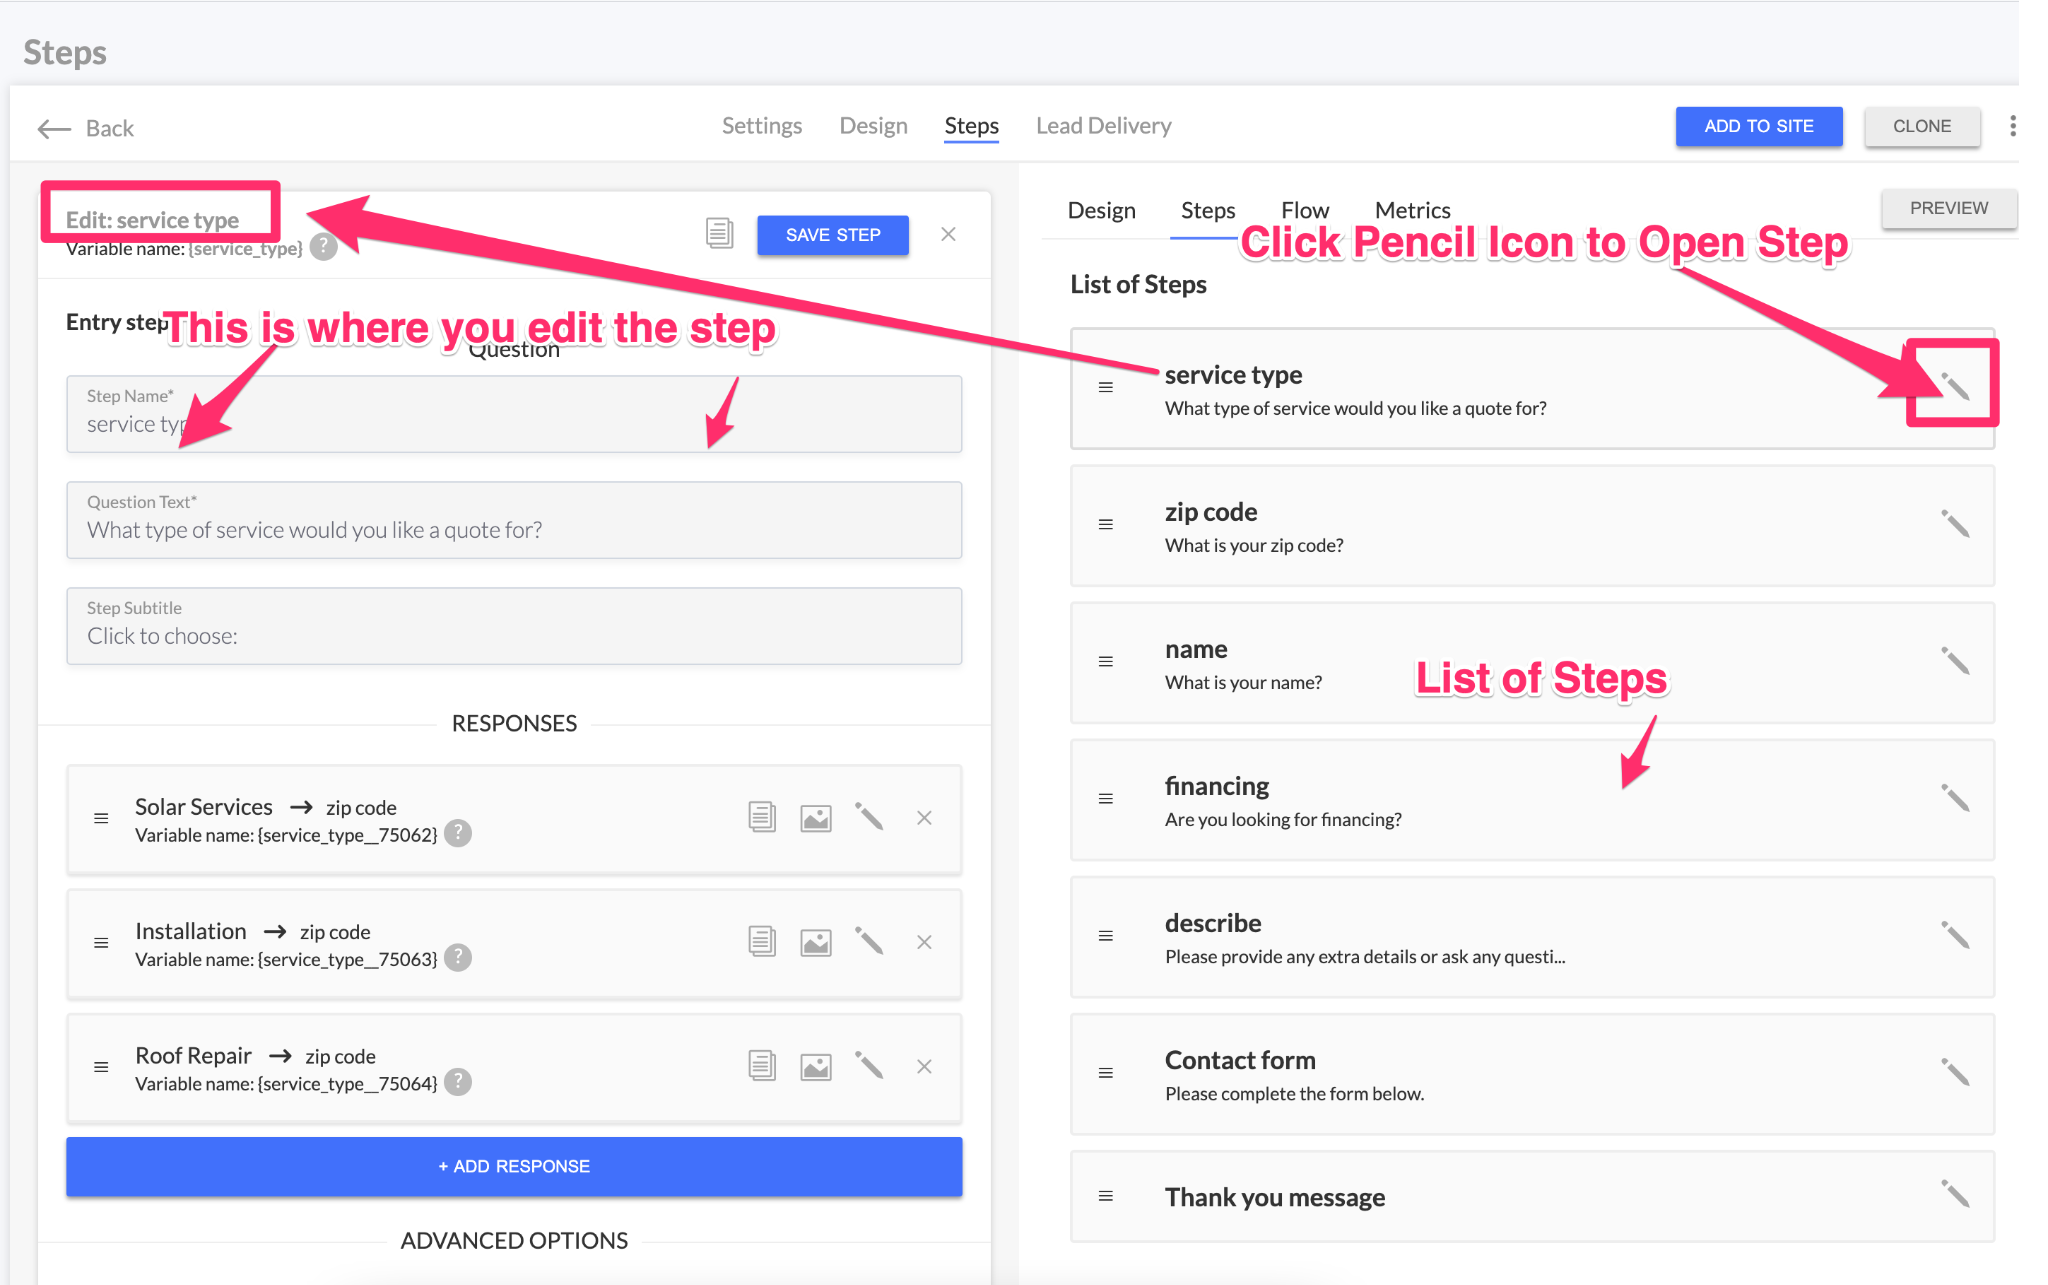
You can access a step in the “List of Steps” section of the form” — just find the name of the step that you’d like to change and click on the pencil icon.
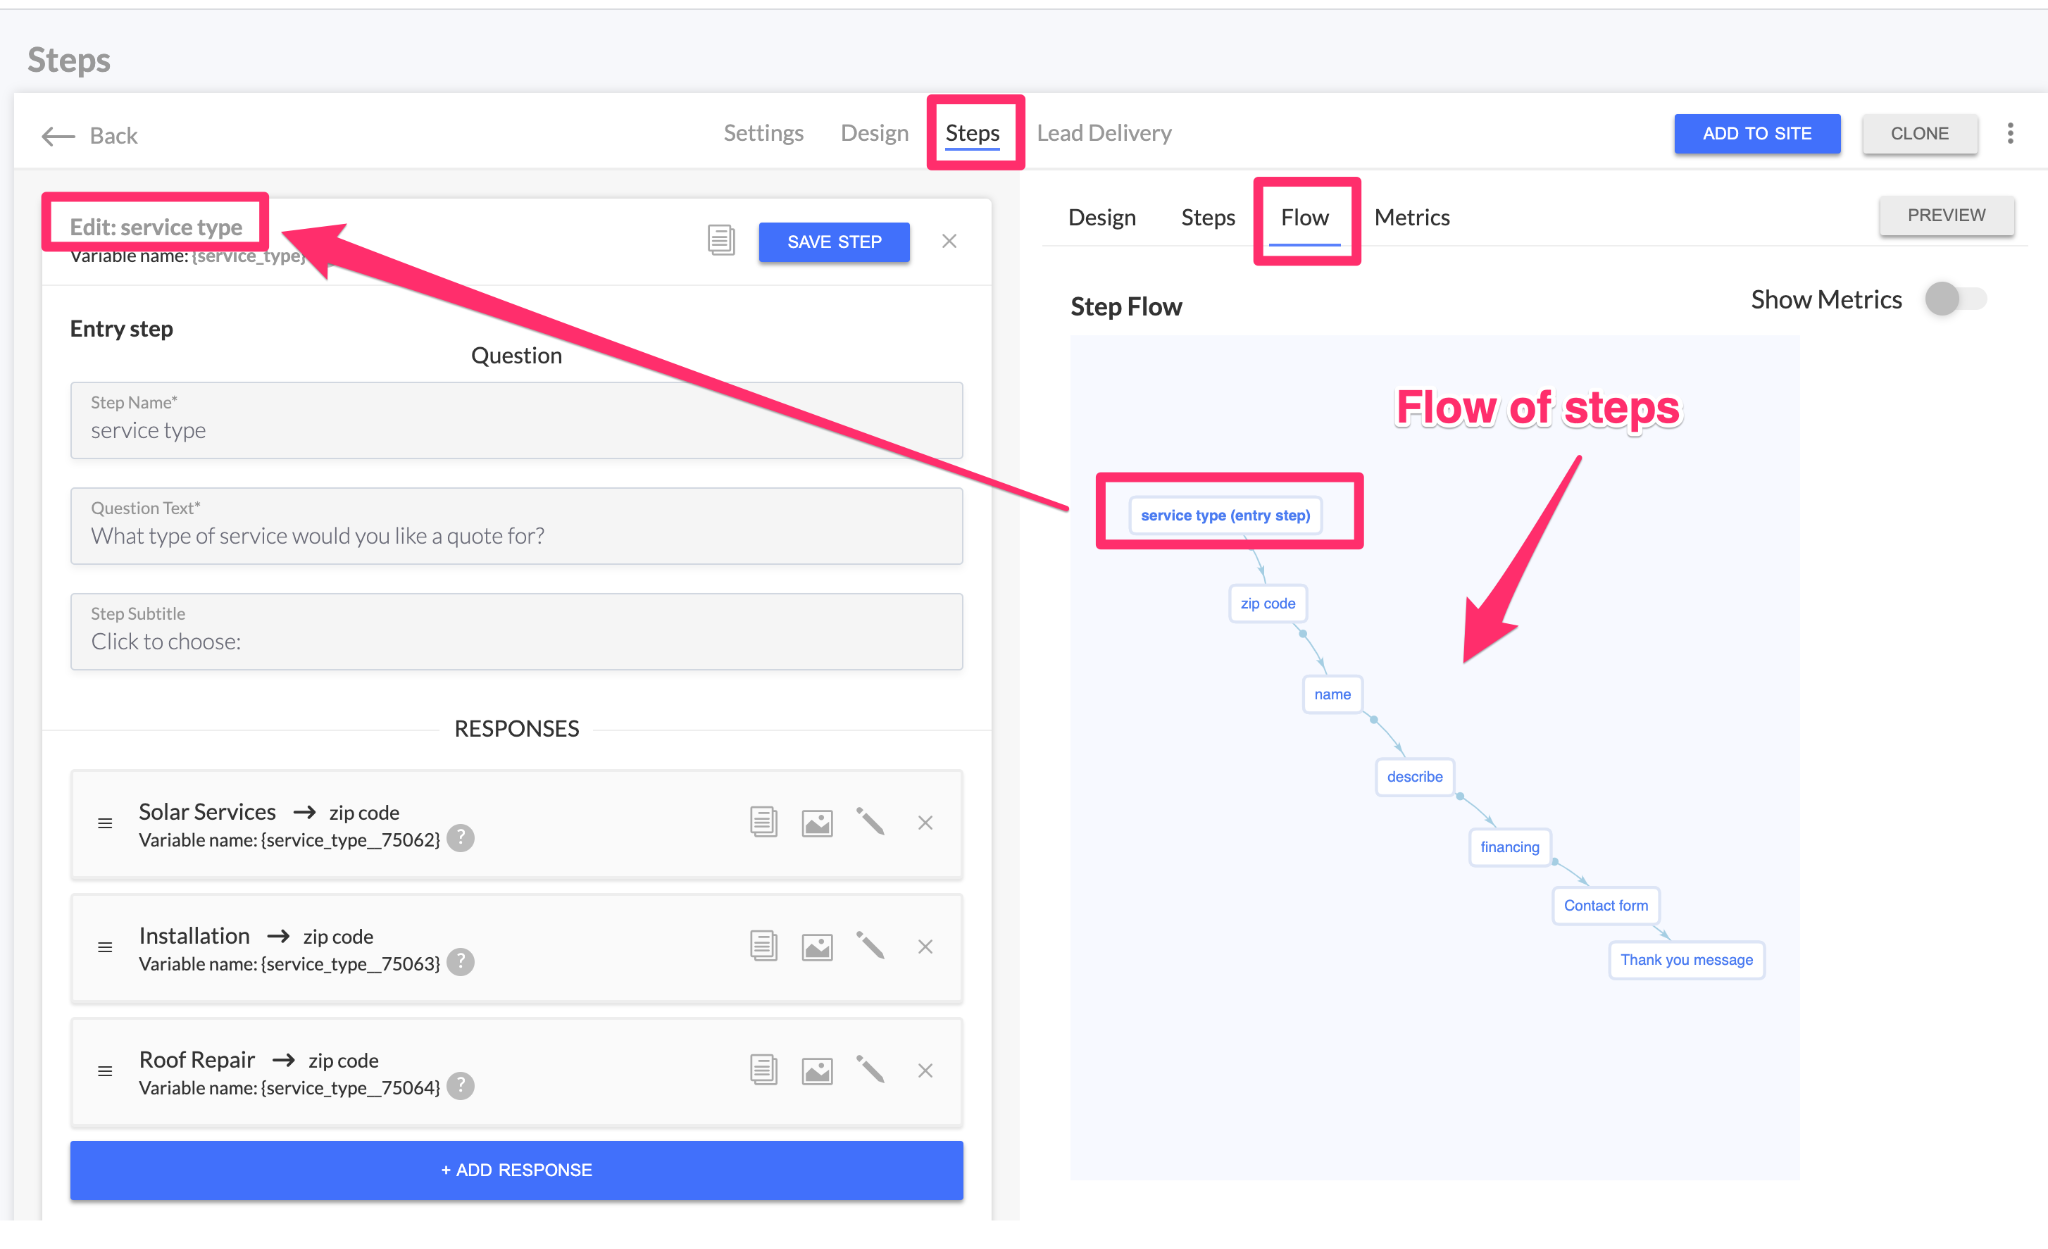
For a more advanced view, you can see a birds eye view of how all of the steps connect within the form using the “Flow” view.
At this point, it’s just a matter of adding all of your questions and responses to the form.
You can add buttons, form fields, range sliders, drop downs and images, without ever having to touch any code.
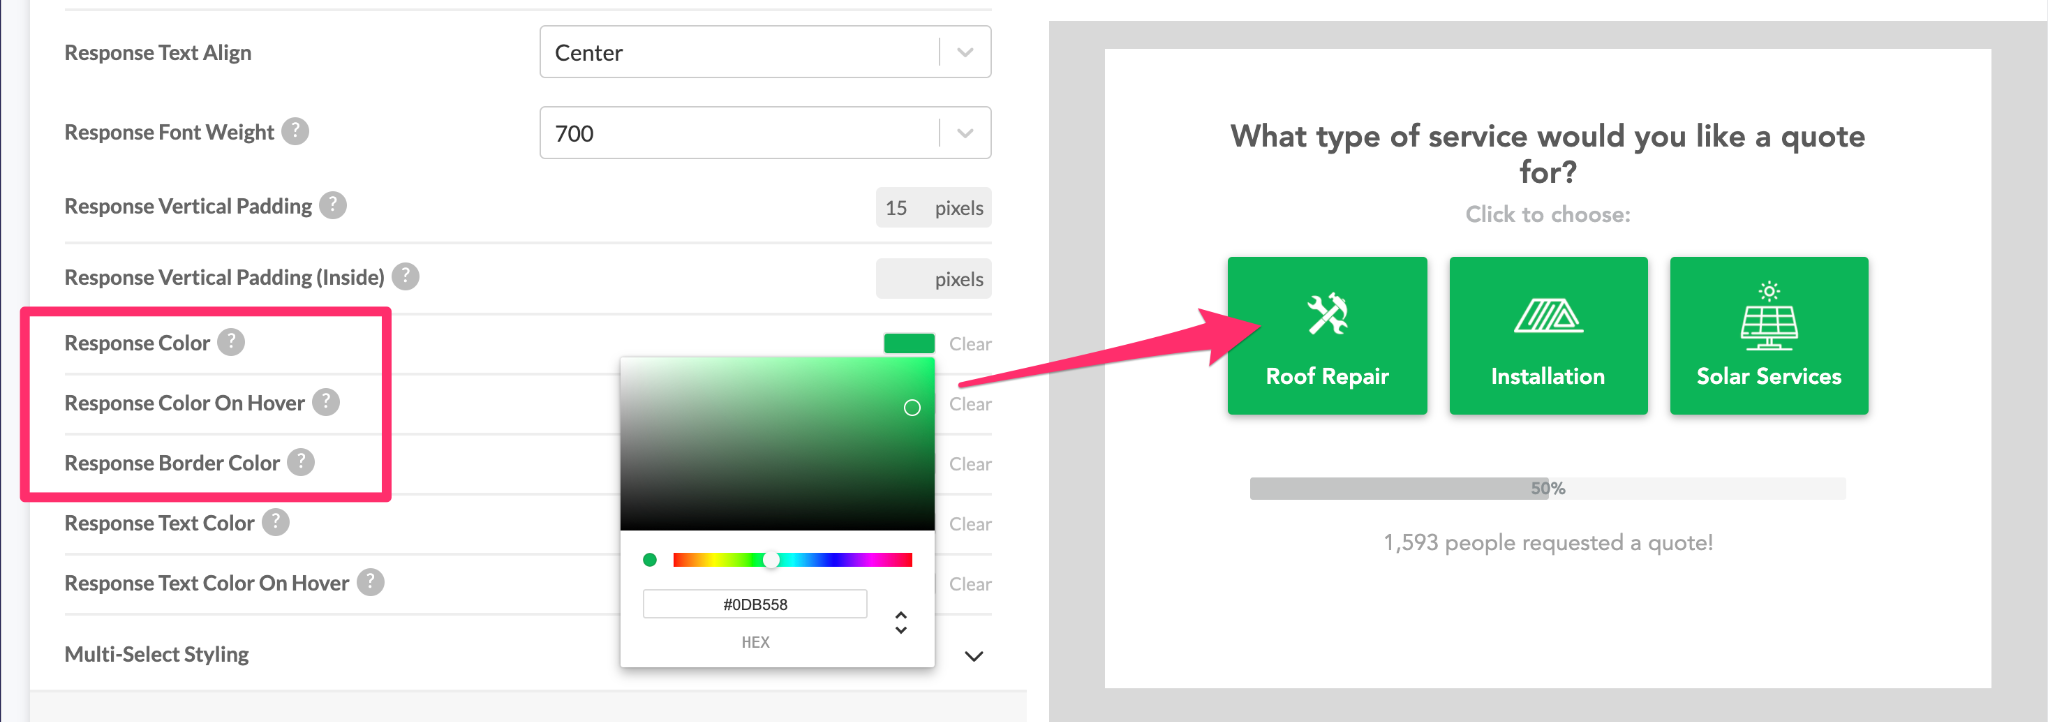
Step #5: Update the design of your form
After all of the questions and responses are setup in your form, the next step is to update the design of the form to match the branding of your landing page.
You can access the design of your form by clicking on “Design” in the navigation bar of the LeadForm Builder.
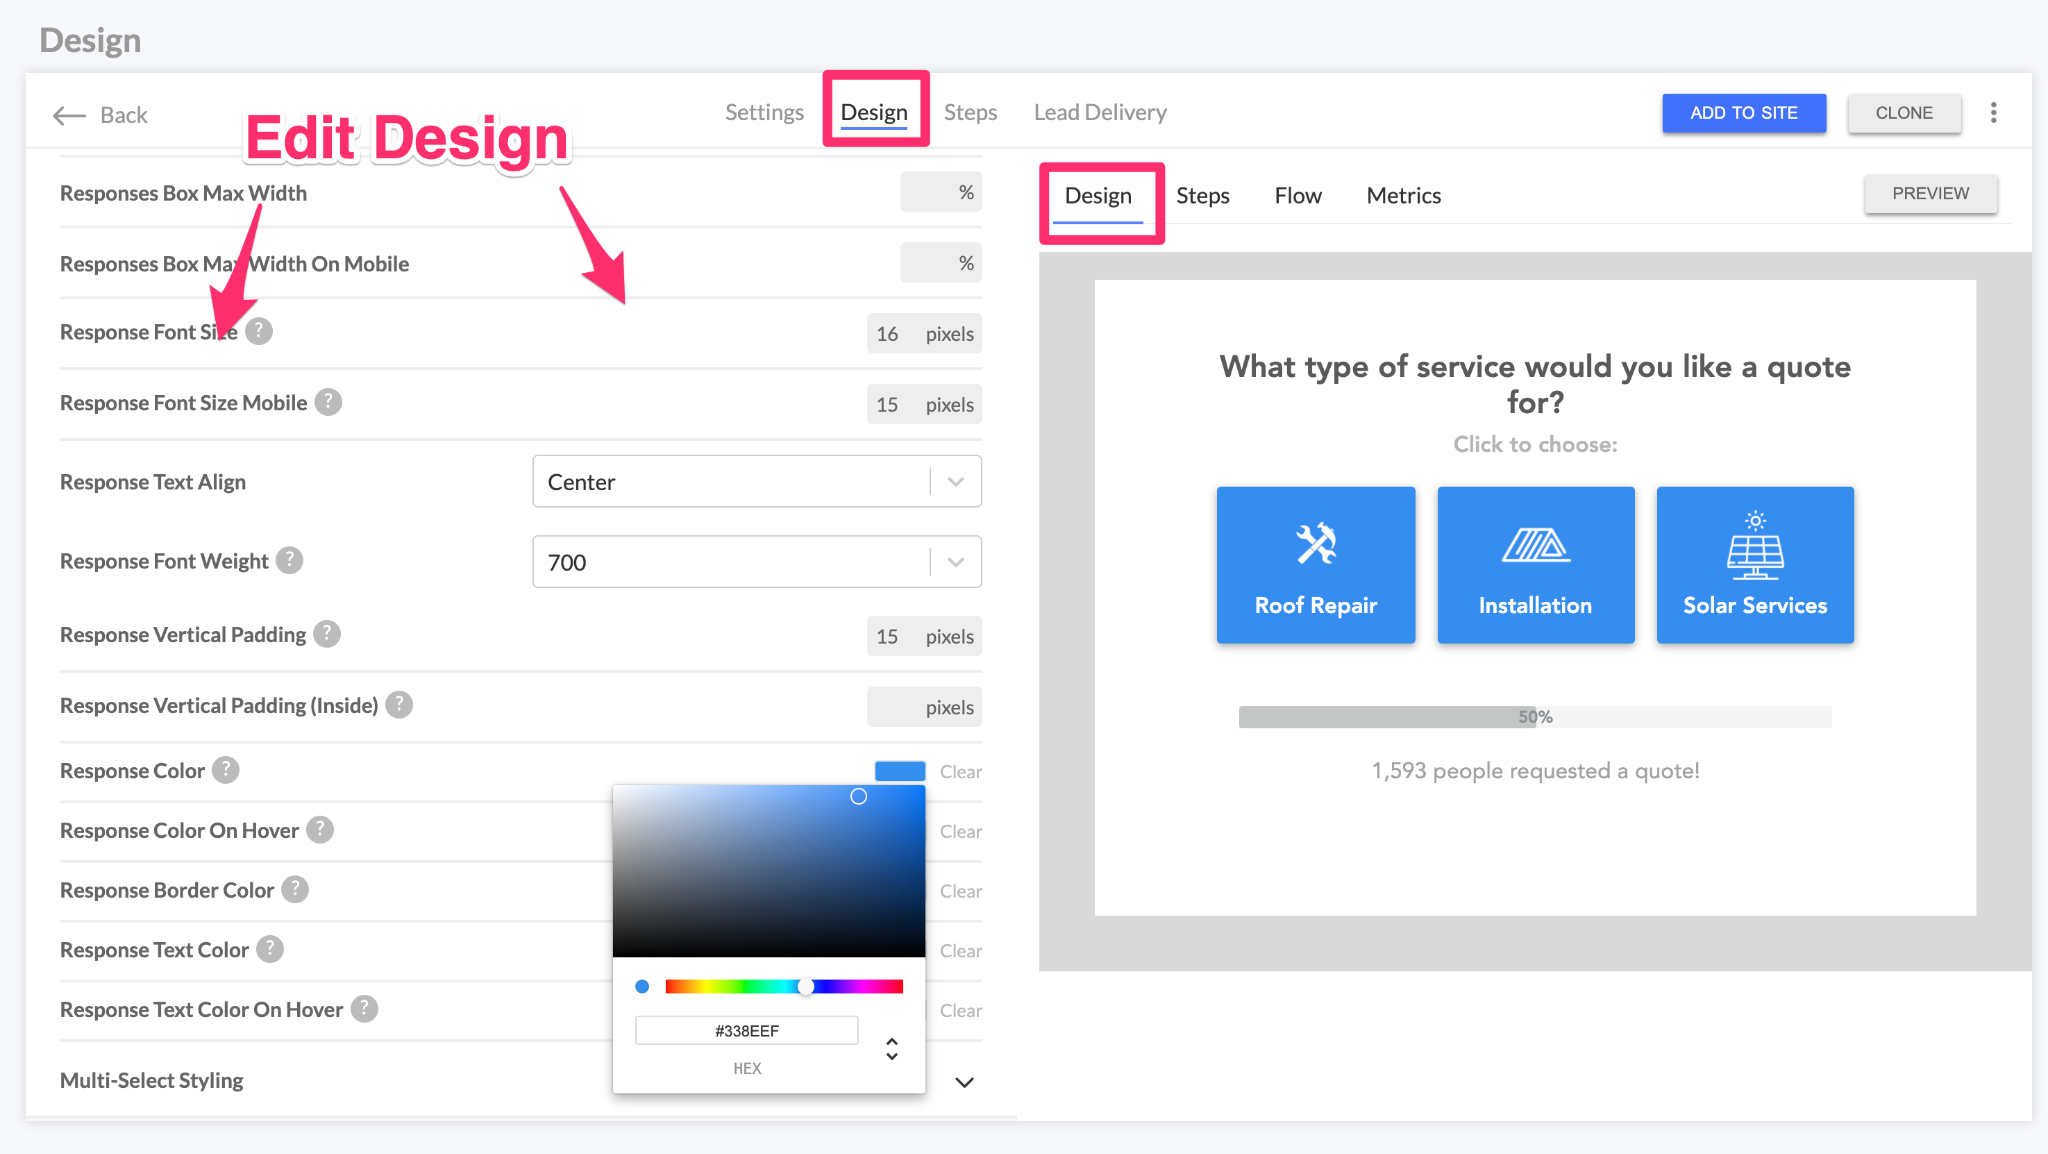
When it comes to the design of your form, you have a ton of options. Here’s a list of some of the items you can change:
- Button color, size, and layout
- Font color and size
- Background color
- Background image
- Top background color and image
- Sub headline color
- Thank you text color
- Social proof color
- Progress bar color
- Back button styling
And you can even switch to the chat style form if you’re looking for something more friendly looking.
For this example, we’re going to keep it simple and go with a white background with green buttons, like this:
Step #6: Tell GetLeadForms where to send your leads
Since we’re going outside of the Unbounce platform to build this form, you can’t rely on the standard Unbounce Lead Notifications and Webhook to send your leads via email and into your CRMs.
But that’s okay, because we’ve got lead notifications, webhooks, and integrations covered as well.
To configure lead delivery for your form, simply click on the “Lead Delivery” tab in the form navigation.
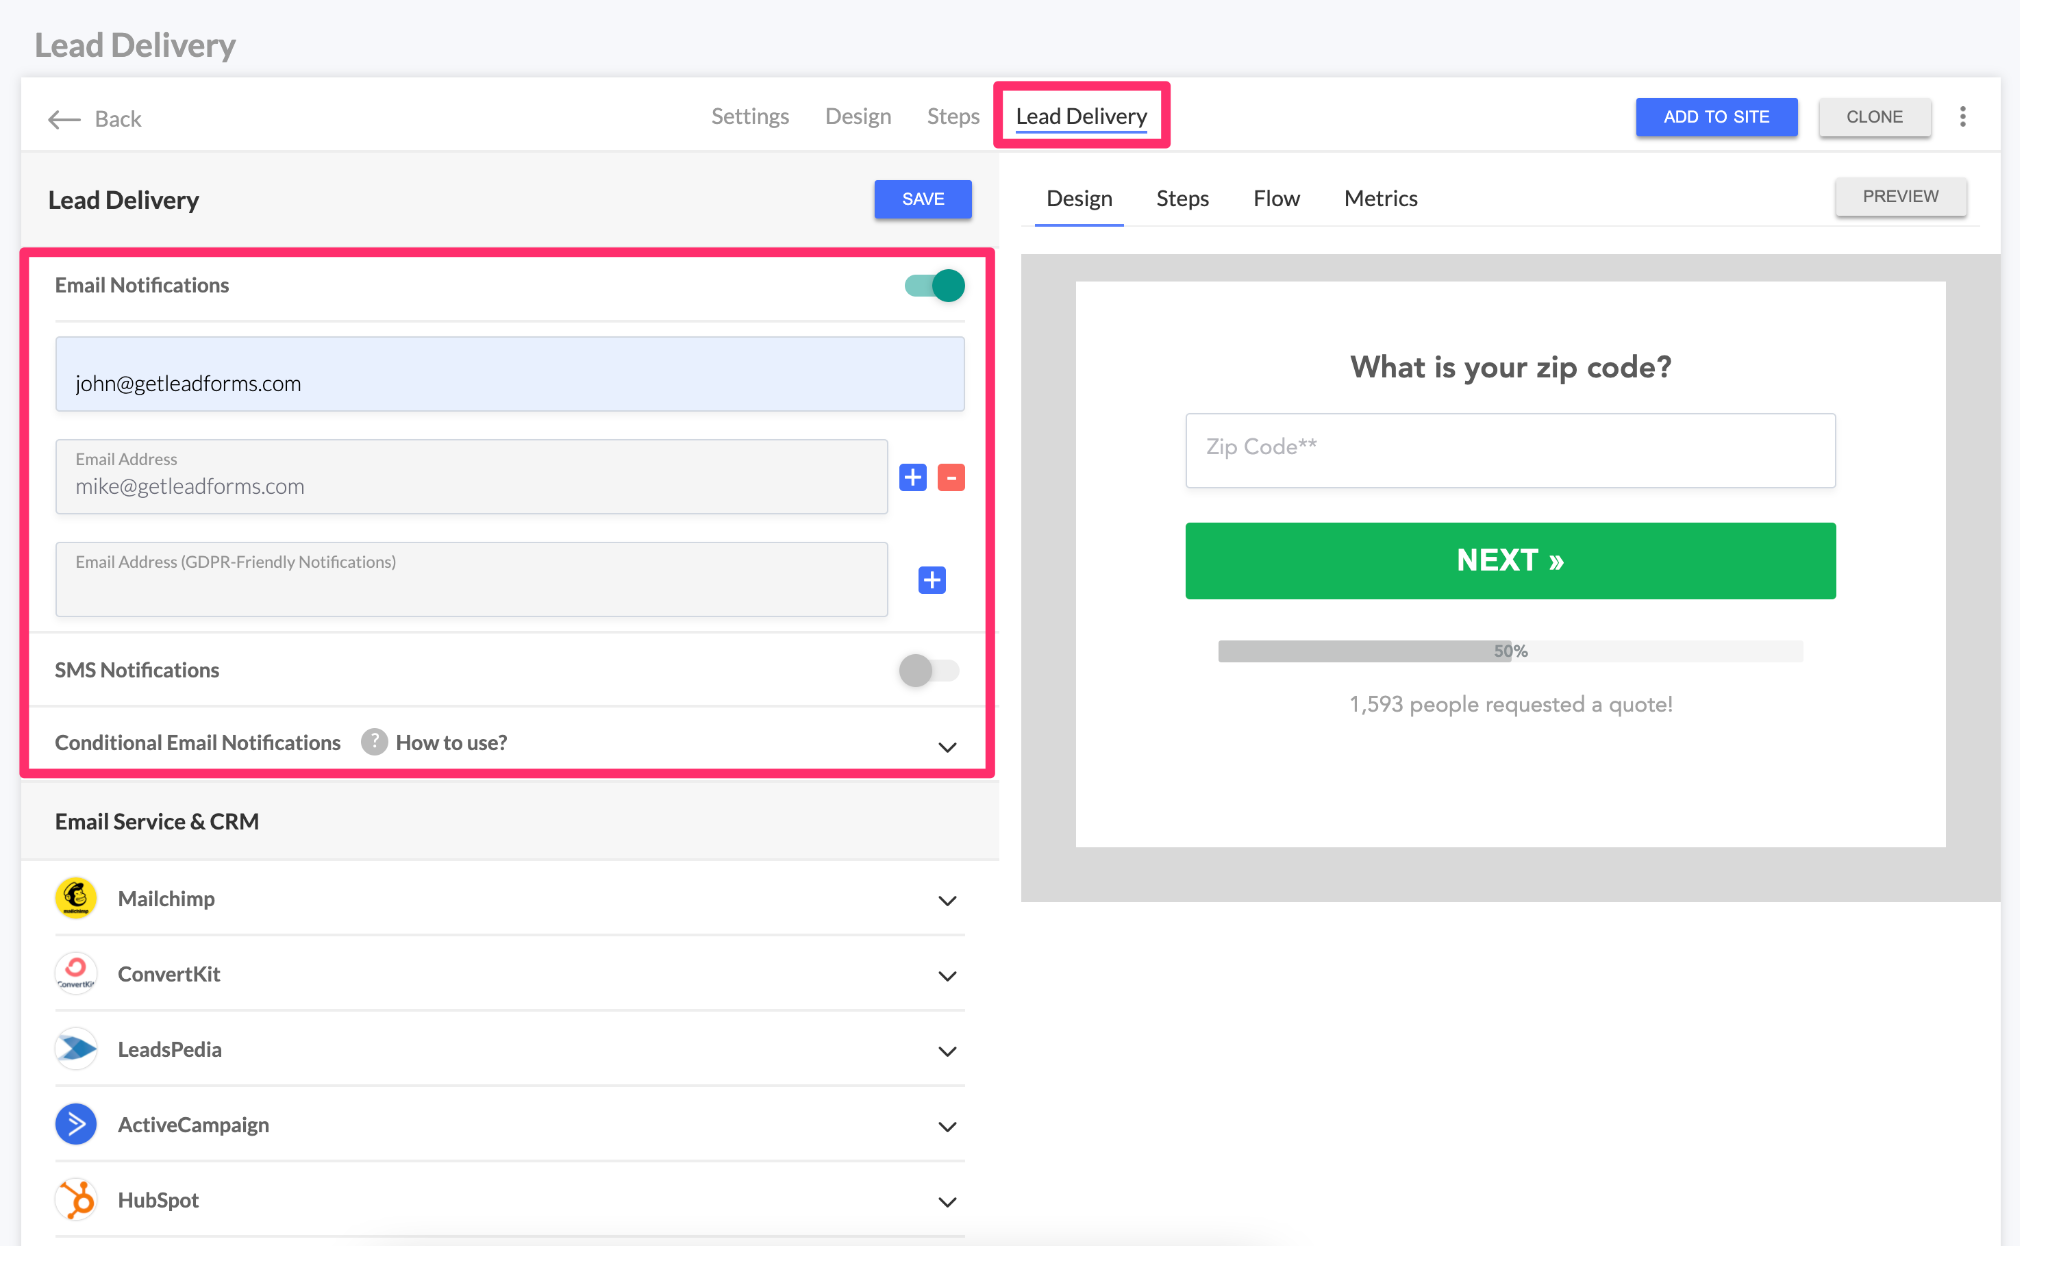
When it comes to lead delivery, you have a number of options.
- Standard email notifications
- Conditional email notifications (more advanced with full control over the email design)
- SMS notifications
Got clients? If you’re building landing pages on behalf of clients, then you can even white-label your lead notifications, so that notifications come from you and not us.
You can also connect your Lead Form with any CRM or email system either using our Webhook, out of the box integrations such as our HubSpot Integration, ActiveCampaign Integration or even our Zapier connection.
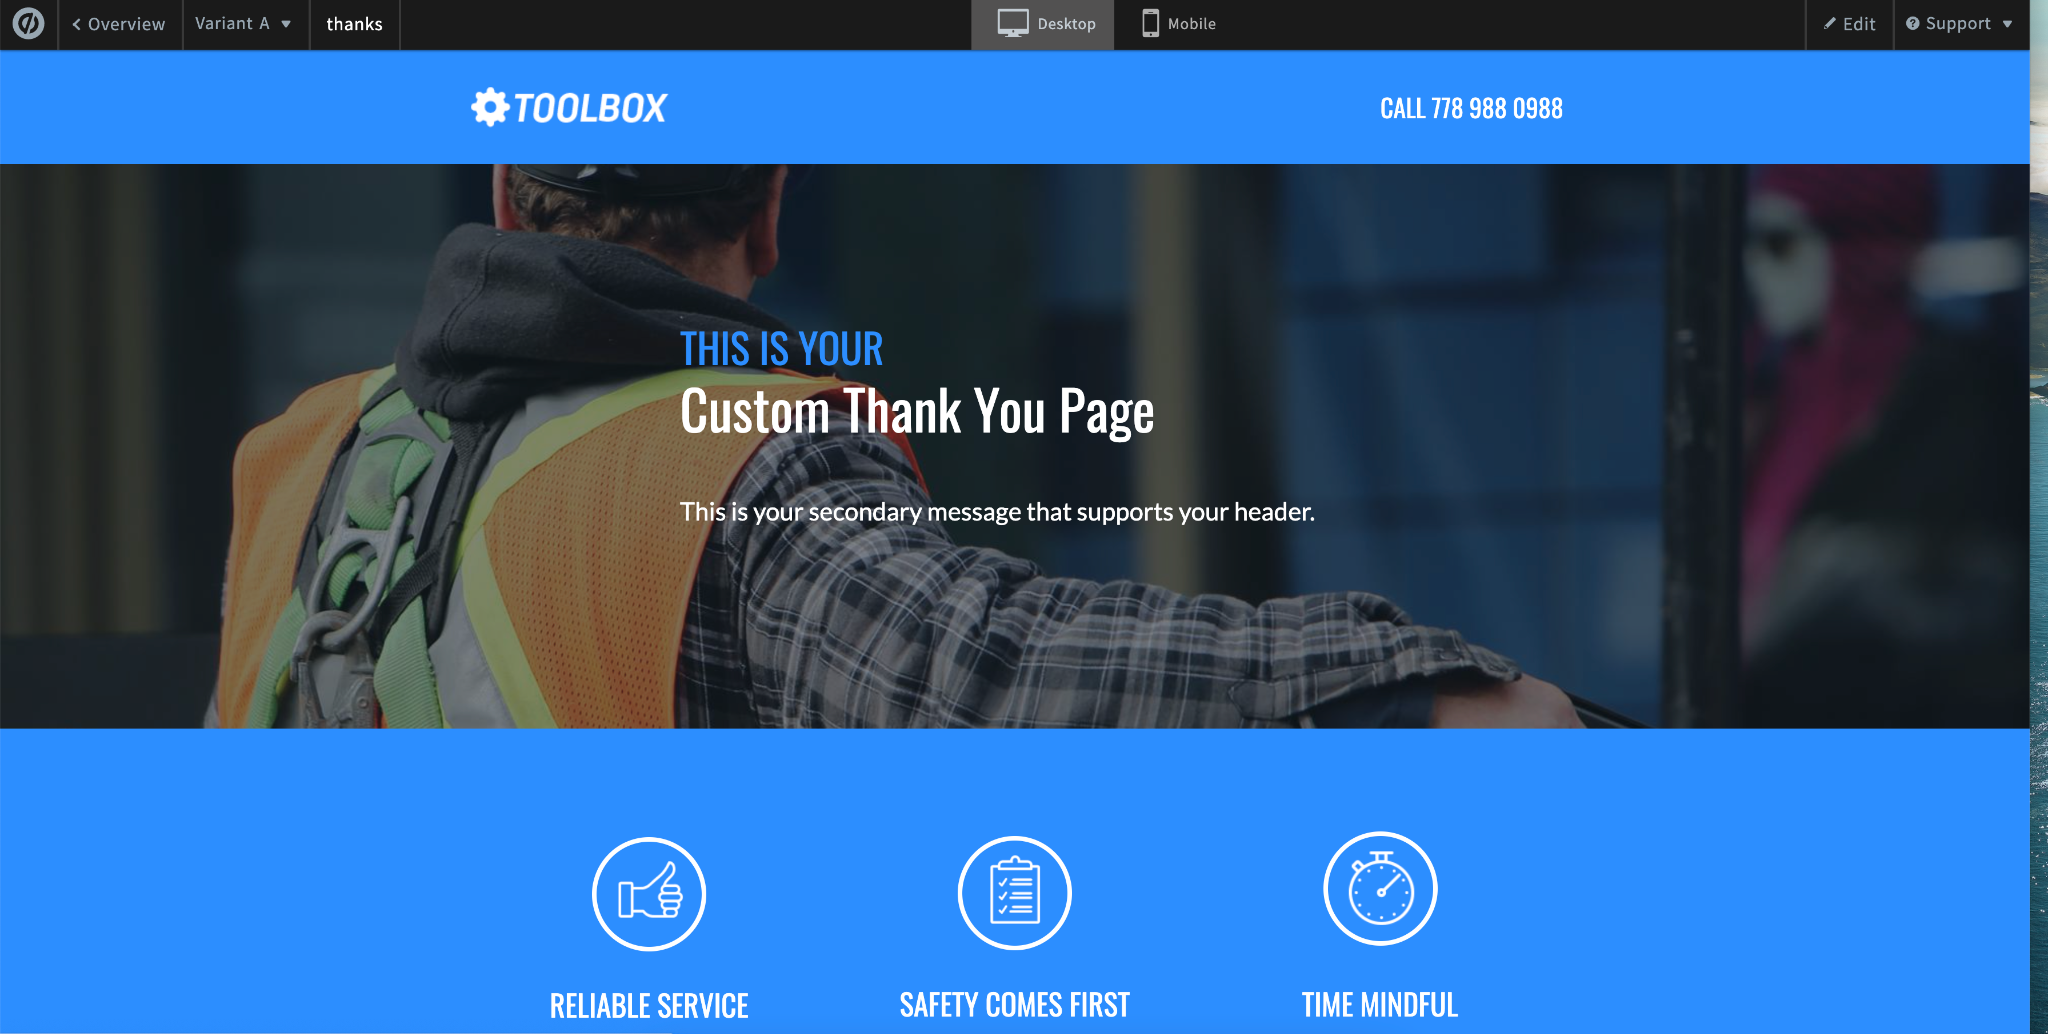
Step #7: Redirect your form to a custom thank you page
Before we add the form to the Unbounce landing page, let’s talk about setting a redirect to a custom Unbounce thank you page.
GetLeadForms provides a ton of out of the box analytics with step-based metrics (we’ll cover this in a moment), but chances are that you may also want to track conversions within Unbounce as well.
The easiest way to track conversions in Unbounce is to set a redirect to a custom thank you page that’s hosted in Unbounce.
After you have your Unbounce thank you page setup, follow the steps below:
- Go to the last step of your form (usually the contact step)
- Open the step and go to “Advanced settings”
- Add a “redirect URL”
- Click Save
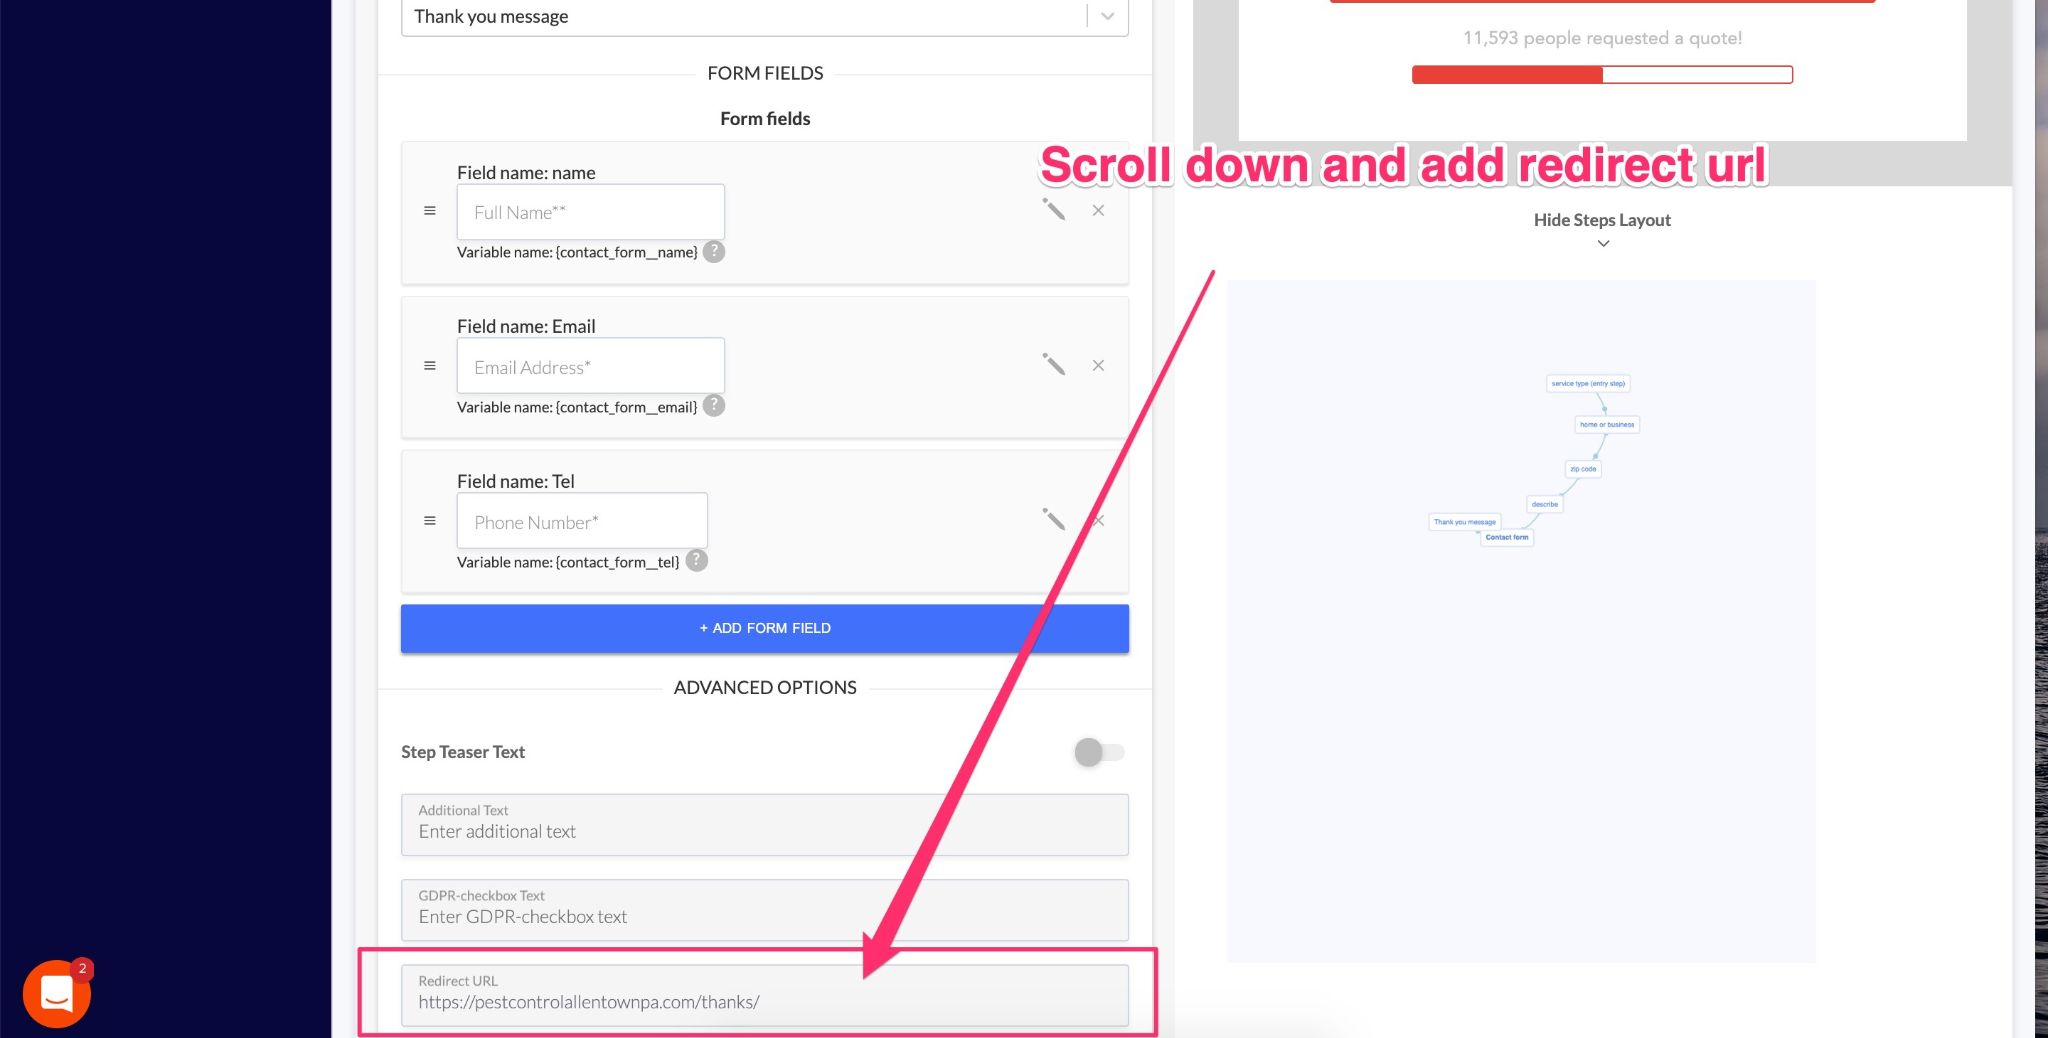
That’s all there is to it!
To test that it worked, click on the “preview” button then go through the process of completing your form. You should get redirected to your thank you page.
Step #8: Add your form to your Unbounce Page
Now it’s time to add your form to your landing page.
Set Your Target URLs
First, you’ll need to tell GetLeadForms which pages you want your form to appear on.
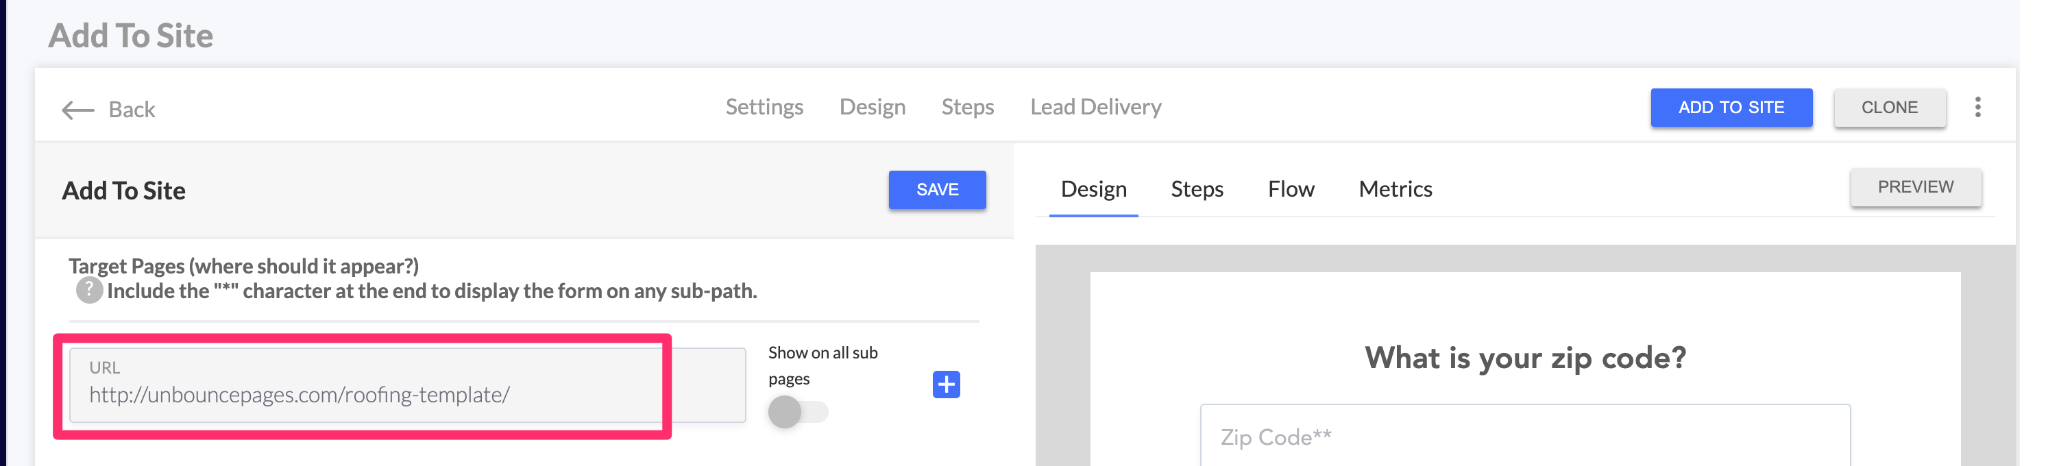
To do this, click on the “Add to Site” button inside of the LeadForm Builder.
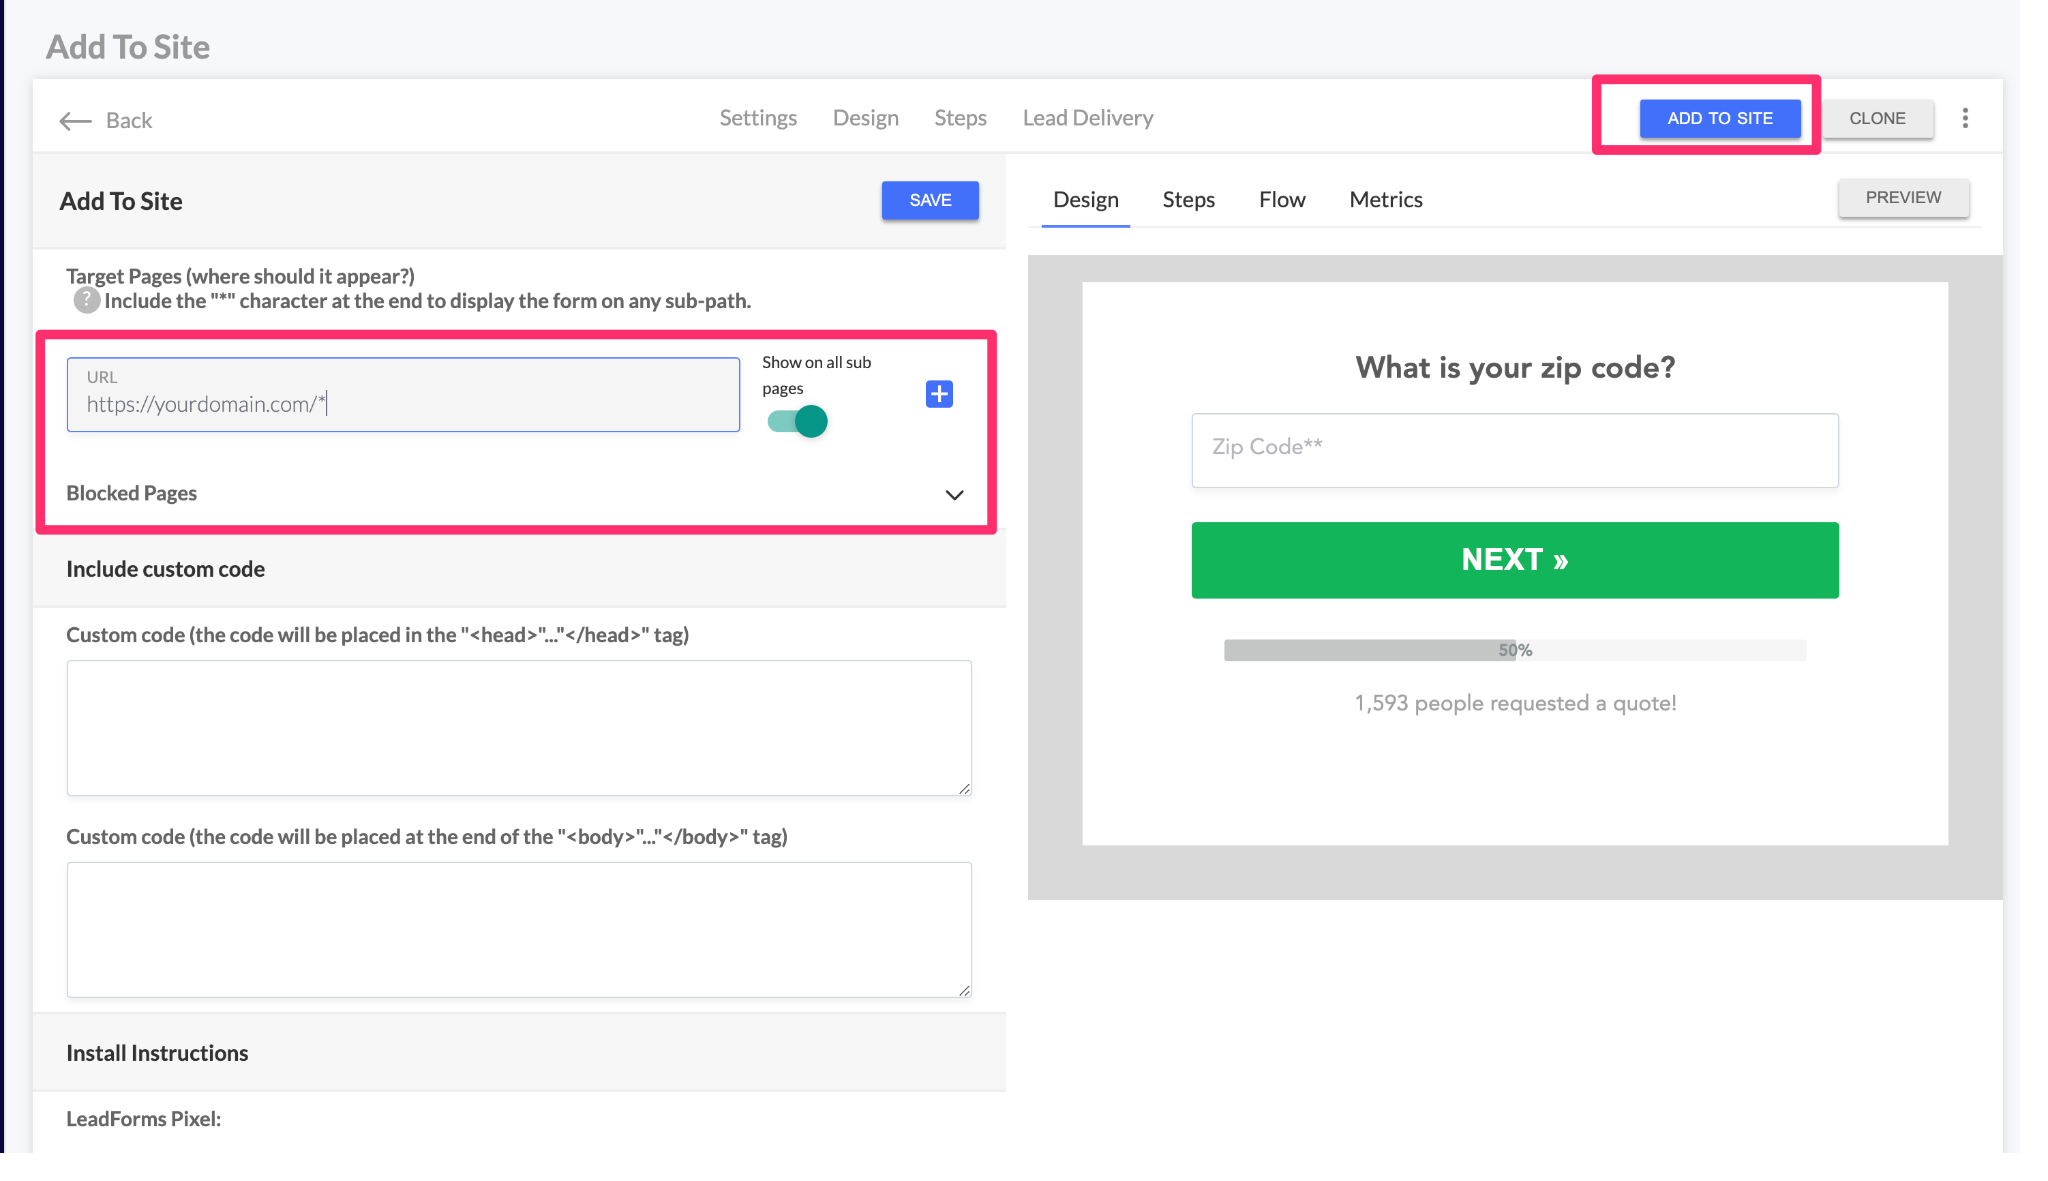
After you reach the “Add to Site” page, grab the final URL(s) of the Unbounce page(s) that you’d like the LeadForm to appear on. Then simply paste each URL into GetLeadForms
To add multiple URLs, simply click the “plus” sign.

If you’re using a pop-up form, then you may want to block the form from appearing on a page, such as your custom thank you page.
To block the form from appearing on a page, simply scroll down to the “Blocked Pages” area and add the URL of the landing page that you’d like to block.
Add the GetLeadForms Script to Unbounce
After you set the target URLs, the next step is to add the GetLeadForms Script to your Unbounce account.
You can copy your GetLeadForms Pixel Script by going to “Add to Site” then scrolling down to “LeadForms Pixel.”
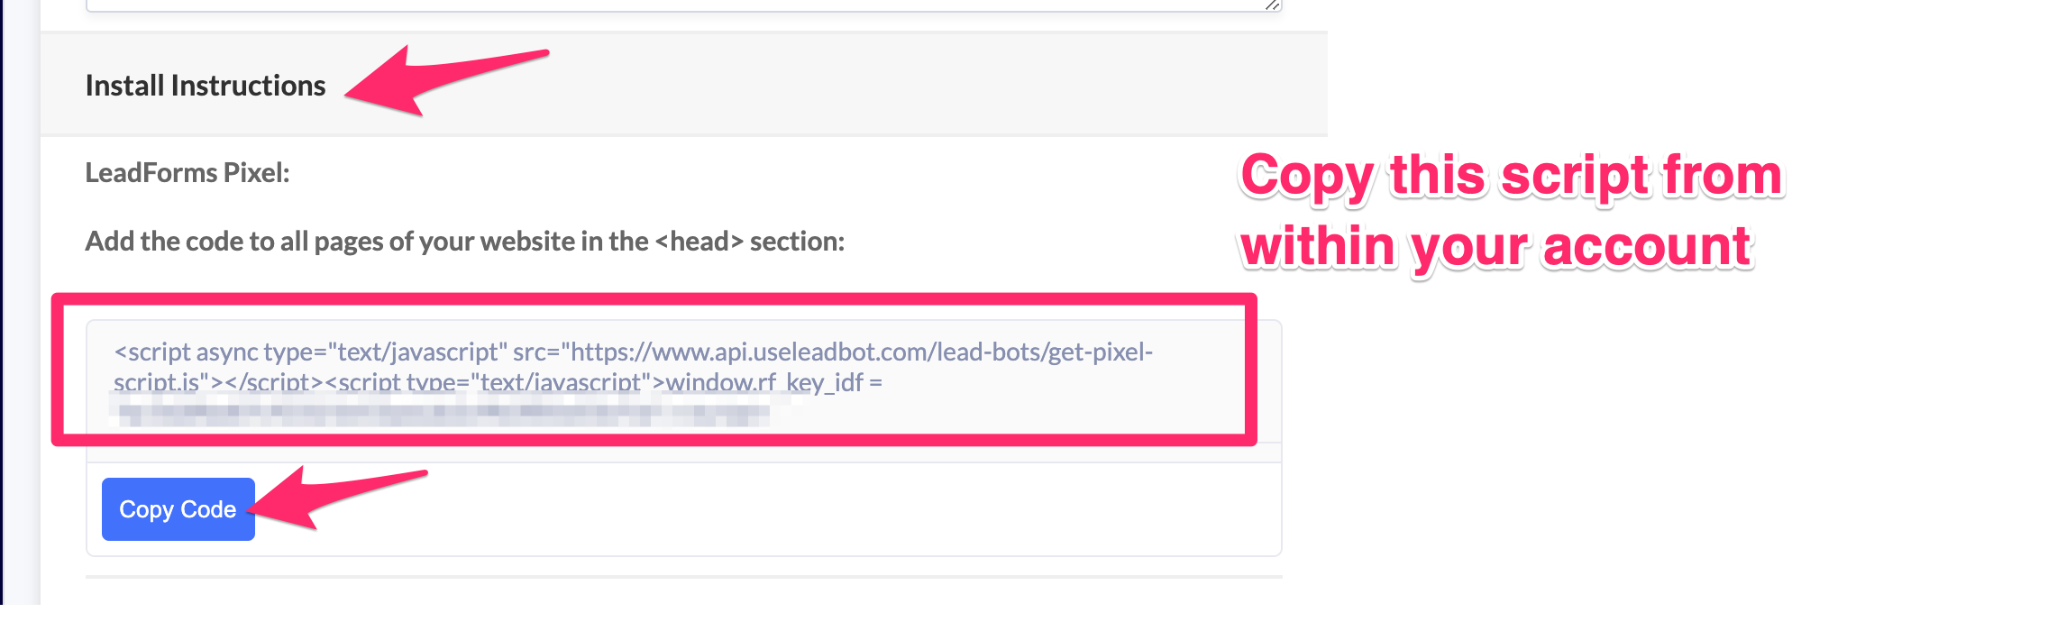
Click the big blue “Copy Code” button, then head on over to your Unbounce account.
Inside of Unbounce, go to Settings -> Script Manager -> Add Script -> Choose a Custom Script
Next, give your custom script a name like “GetLeadForms.”

Click “Add Script Details and set the Placement as “Head” — this will place the GetLeadForms script just below the closing </header> tag.
Make sure to tell Unbounce which landing pages to include script on.
Finally paste the script that you originally copied from GetLeadForms into where it says “paste or type scripts below including <script> tags”… like in the image below:
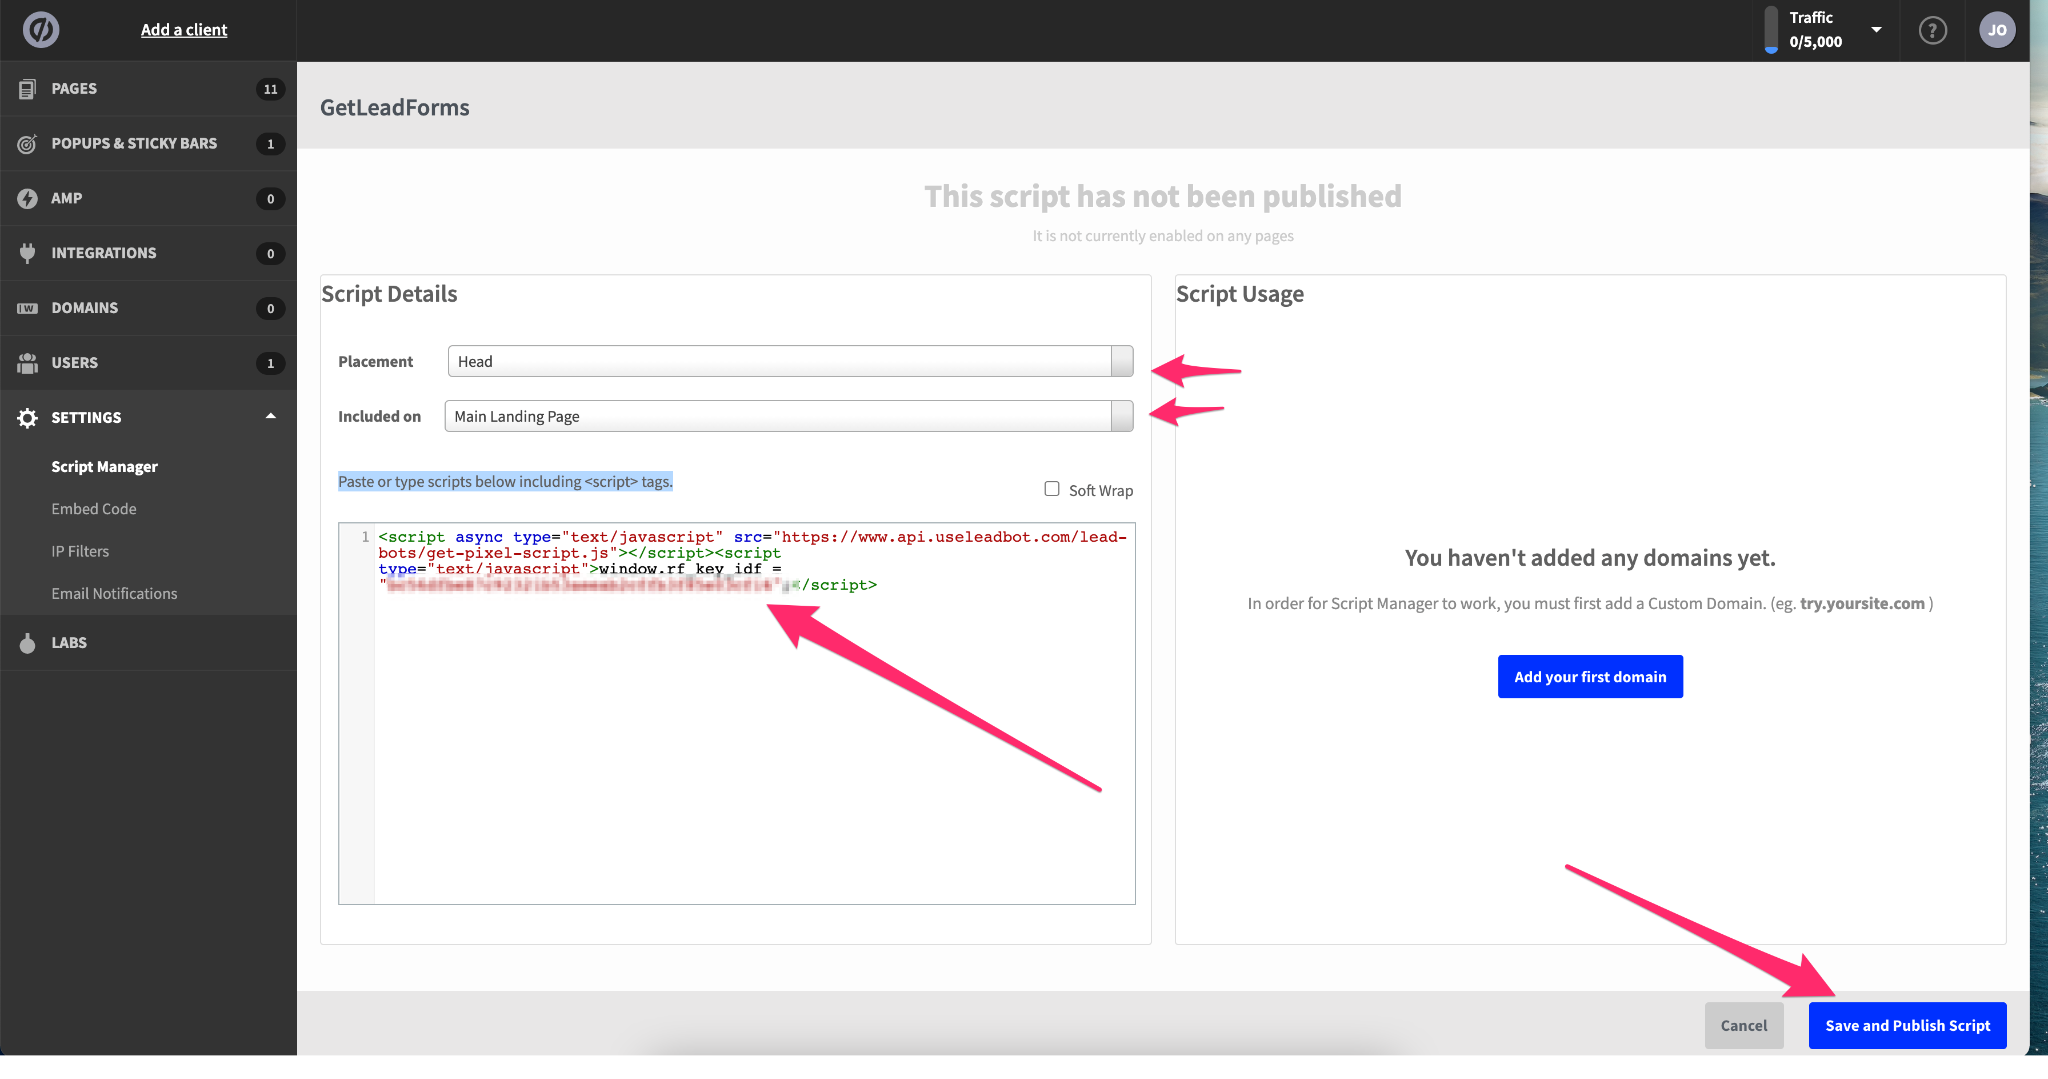
Finally, click Save and Publish script.
If you’re using GetLeadForms as a timed or exit pop-up then that’s all that you need to do.
However, if you’re planning to embed your form into a page, then there’s one more step.
Adding an Embedded LeadForm to Unbounce
After your GetLeadForms script is added to your Unbounce account, all you need to do is copy and paste the “embed code” into the landing page where you’d like your LeadForm to be embedded into.
Note: This step is only necessary if you’re looking to embed the form right into the page.
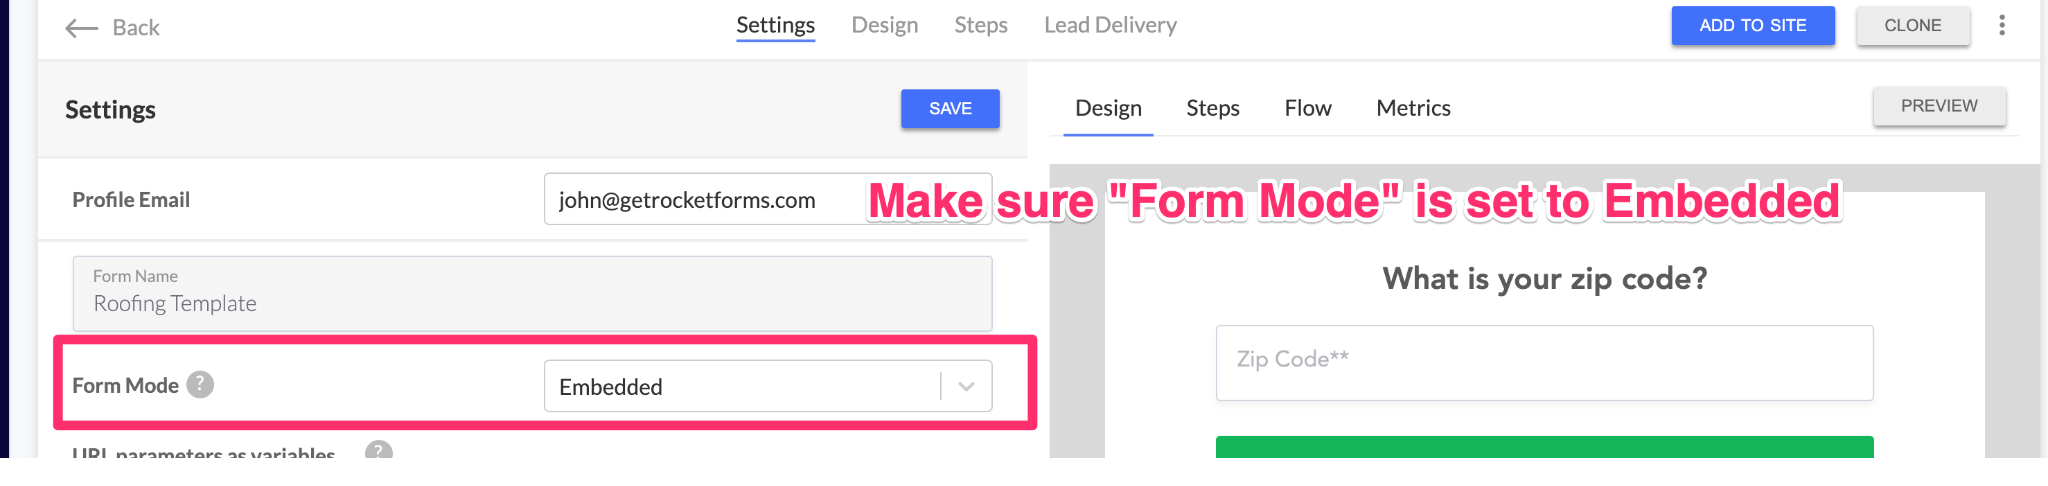
First, inside of GetLeadForms, make sure that your Form Mode is set to either “All” or “Embedded.”
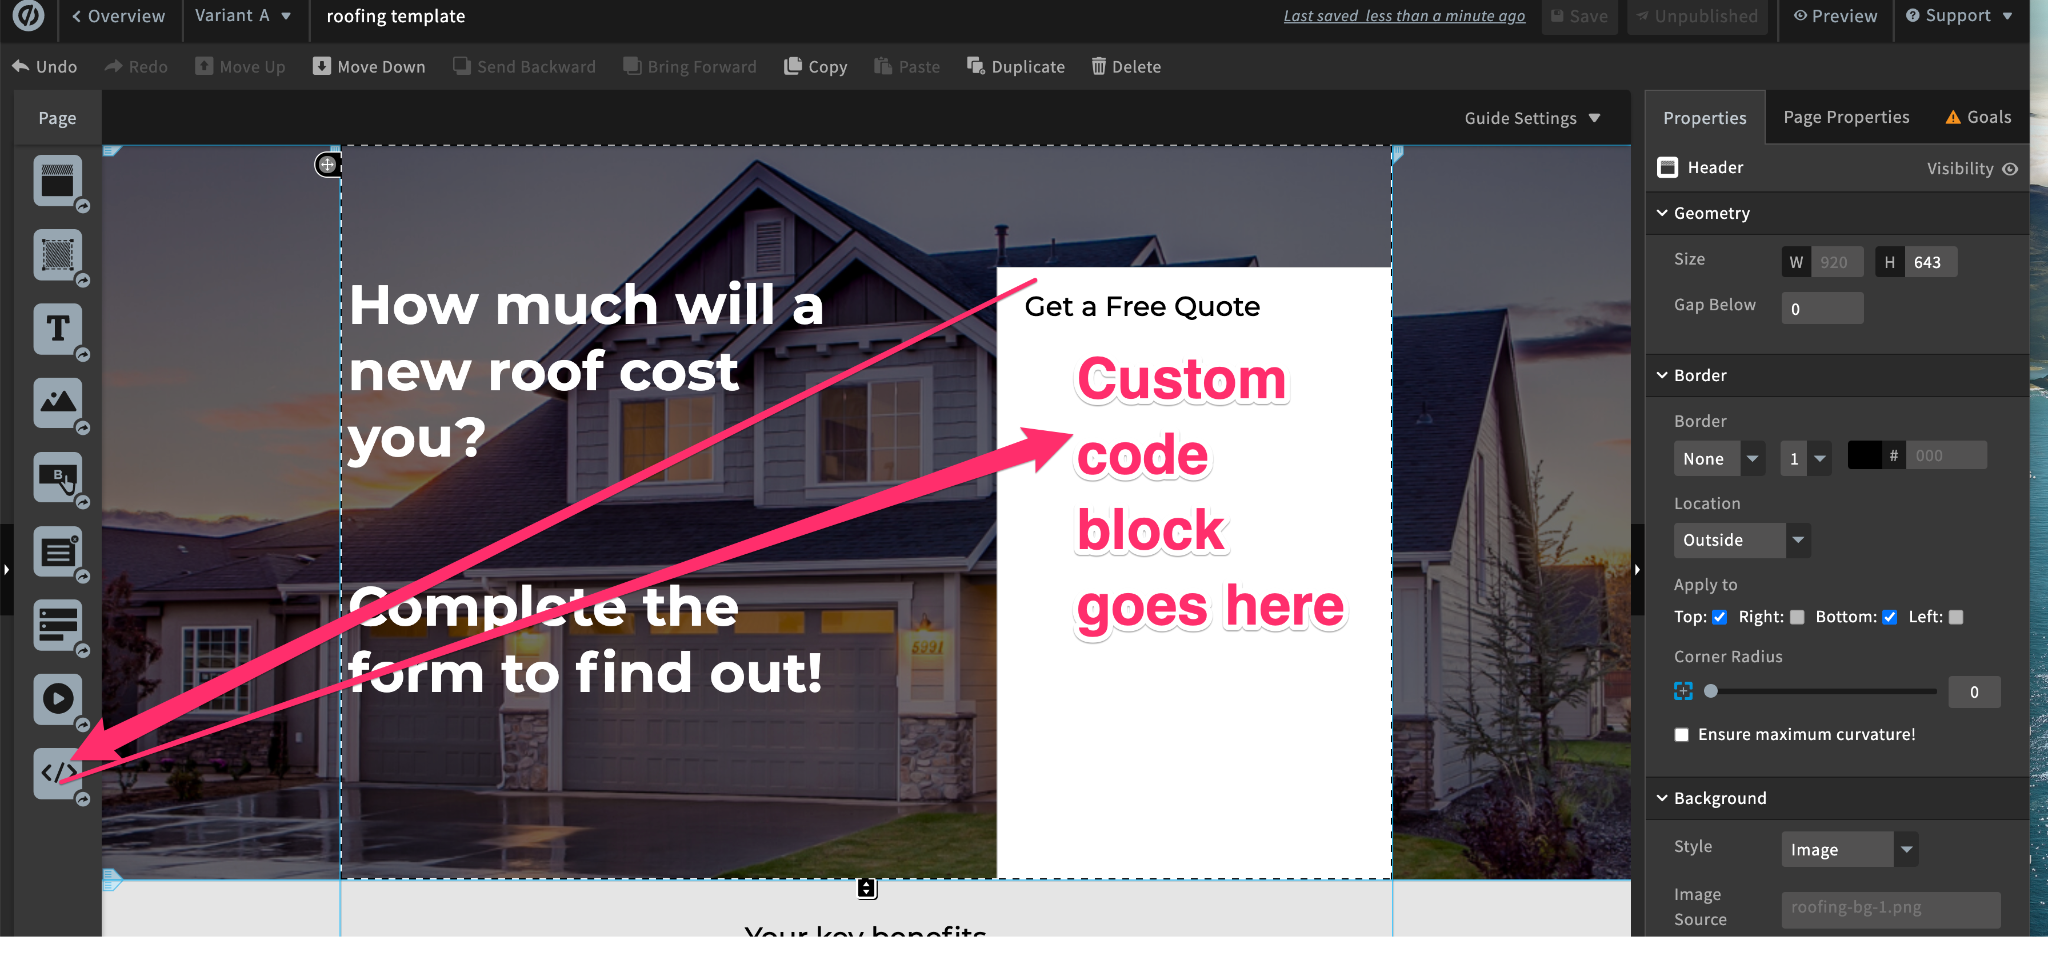
Next, open the landing page where you’d like to embed your form and drag the Custom Code Block to where you’d like your LeadForm to appear.
Inside of GetLeadForms make sure that your Unbounce landing page URL is set as a Target URL.
Then go to “Add to Site” then scroll down to “Embed LeadForm” and copy the embed code.
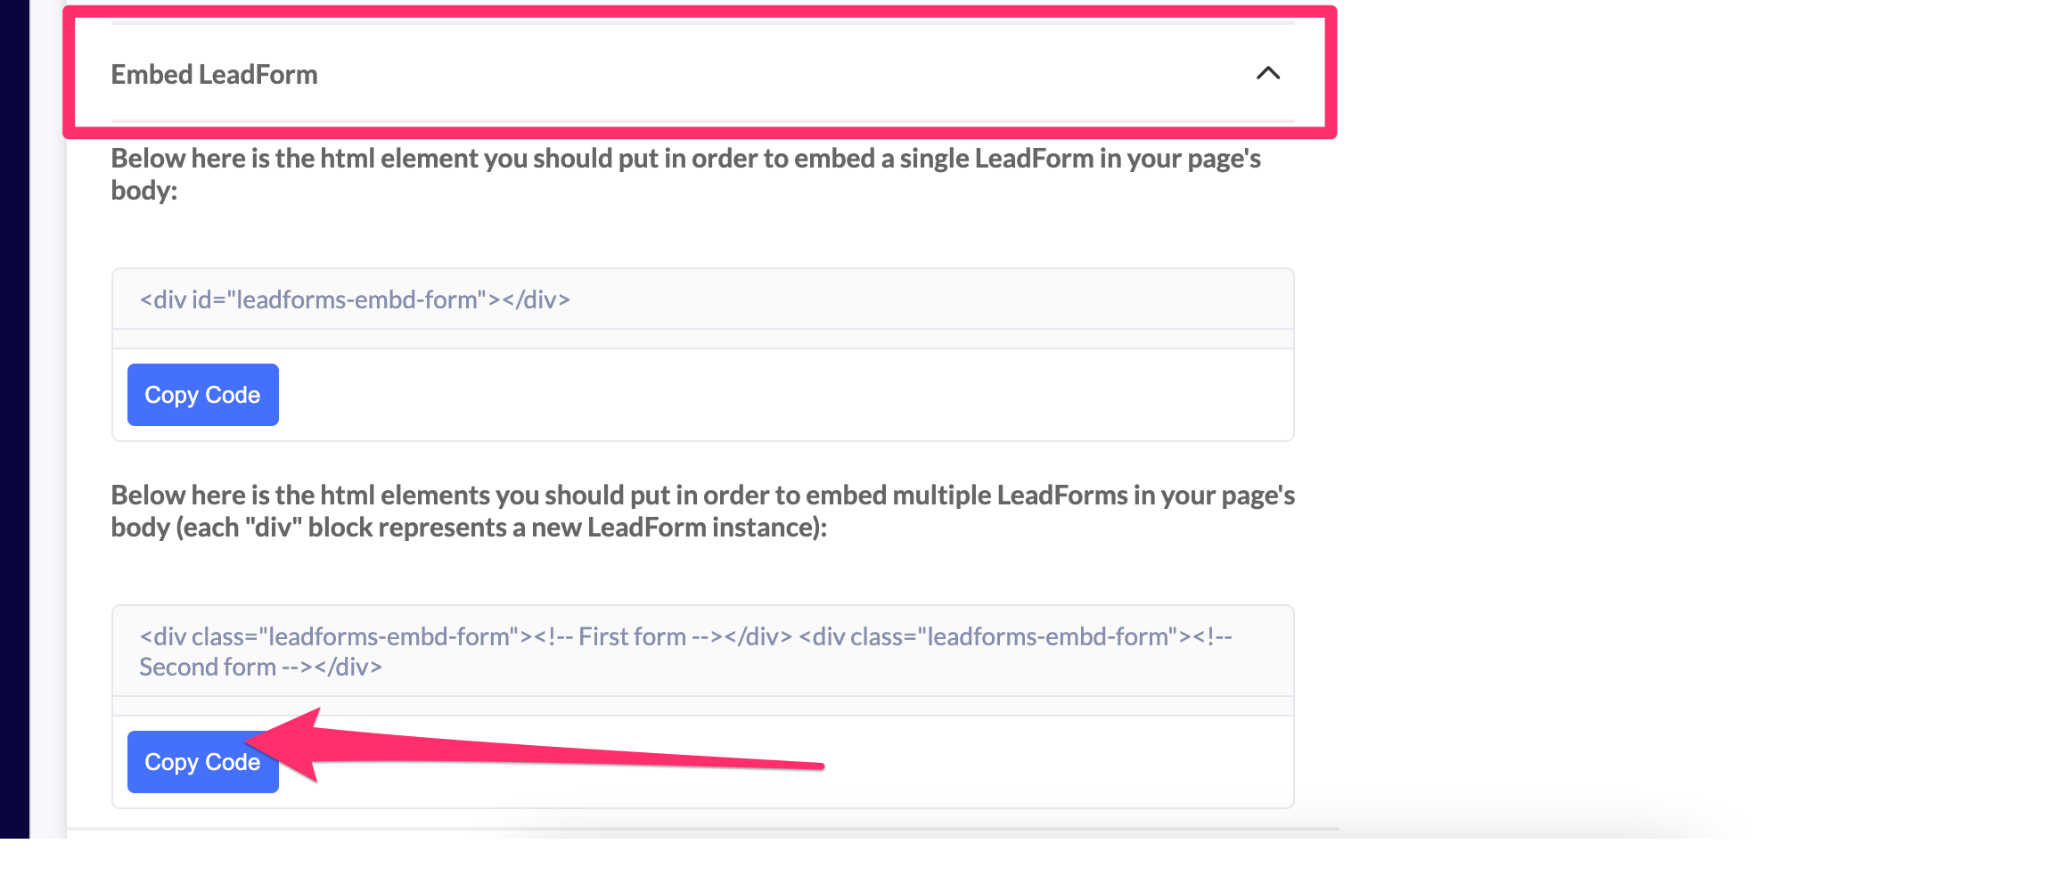
Within Unbounce, paste the embed code into the custom code box that you added to your landing page and click Save Code.

After you click Save, you should end up with something that looks like this:
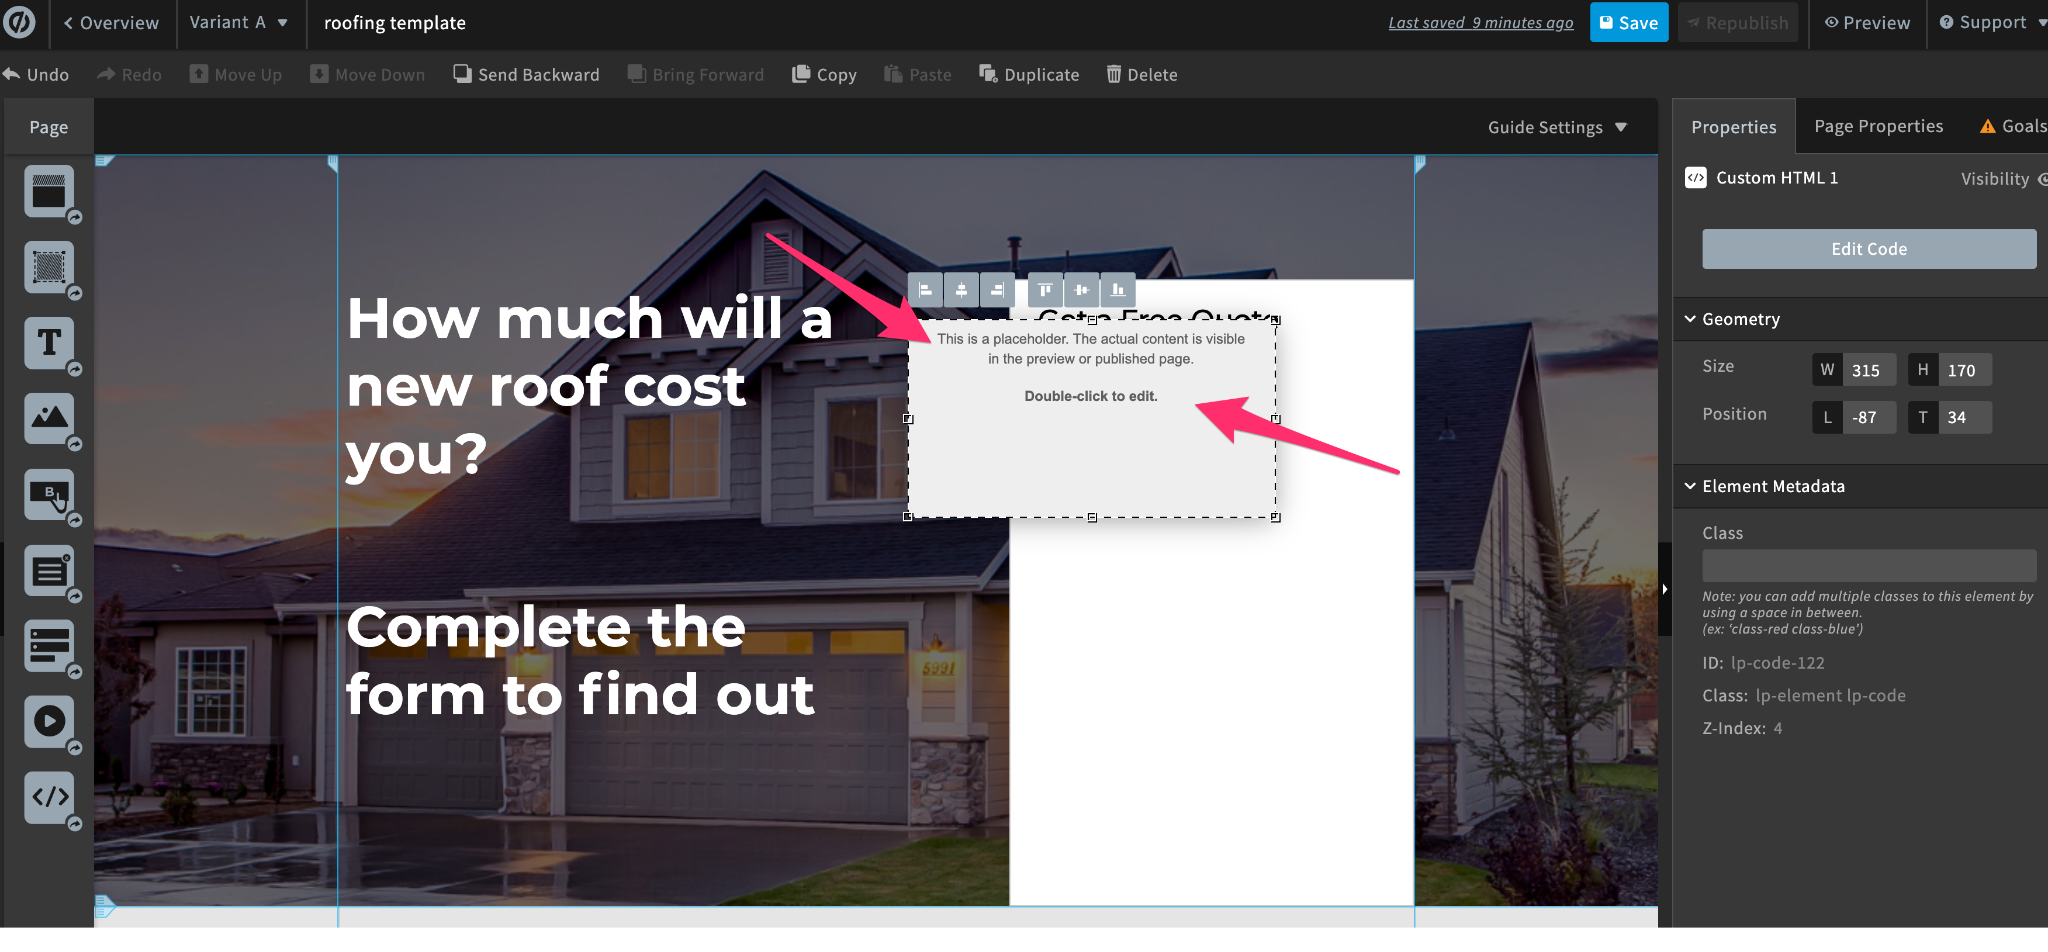
Now you just have to drag the custom code box into the proper area and adjust the size of the box.
To preview the form, click Republish.
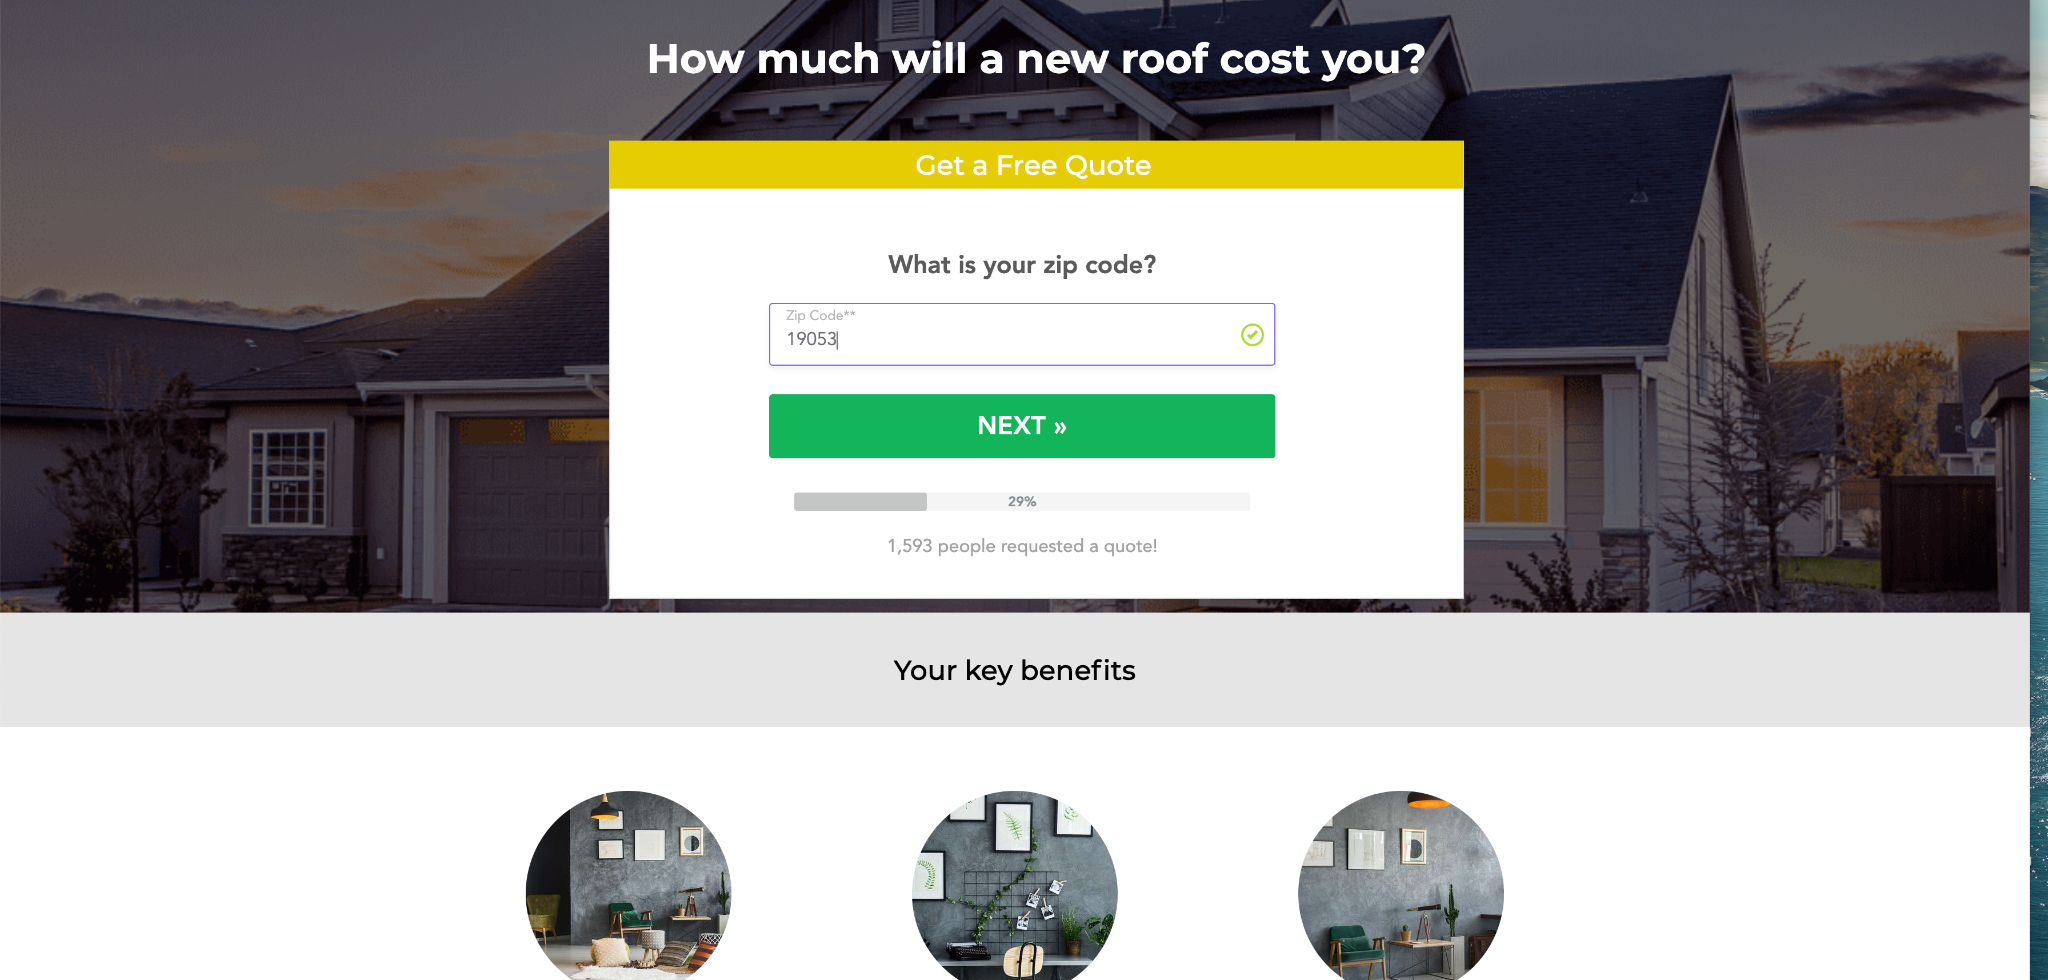
With this form, I had to play around a little with the style and layout. Unbounce’s amazing drag and drop editor makes this really easy to do.
As you can see, I effortlessly set up a nice multi step form in Unbounce, without having to touch any code. Here’s step #2 of my form.
The best part?
Any change that you make will instantly sync up and be reflected in your live page in real time, no need to update any code when you make a change.
Adding a Click-Pop Form to Unbounce
In addition to embedding a form, you can also trigger your form to open with the click of a button. Follow the instructions below.
Inside of Unbounce, drag a new button onto your landing page.
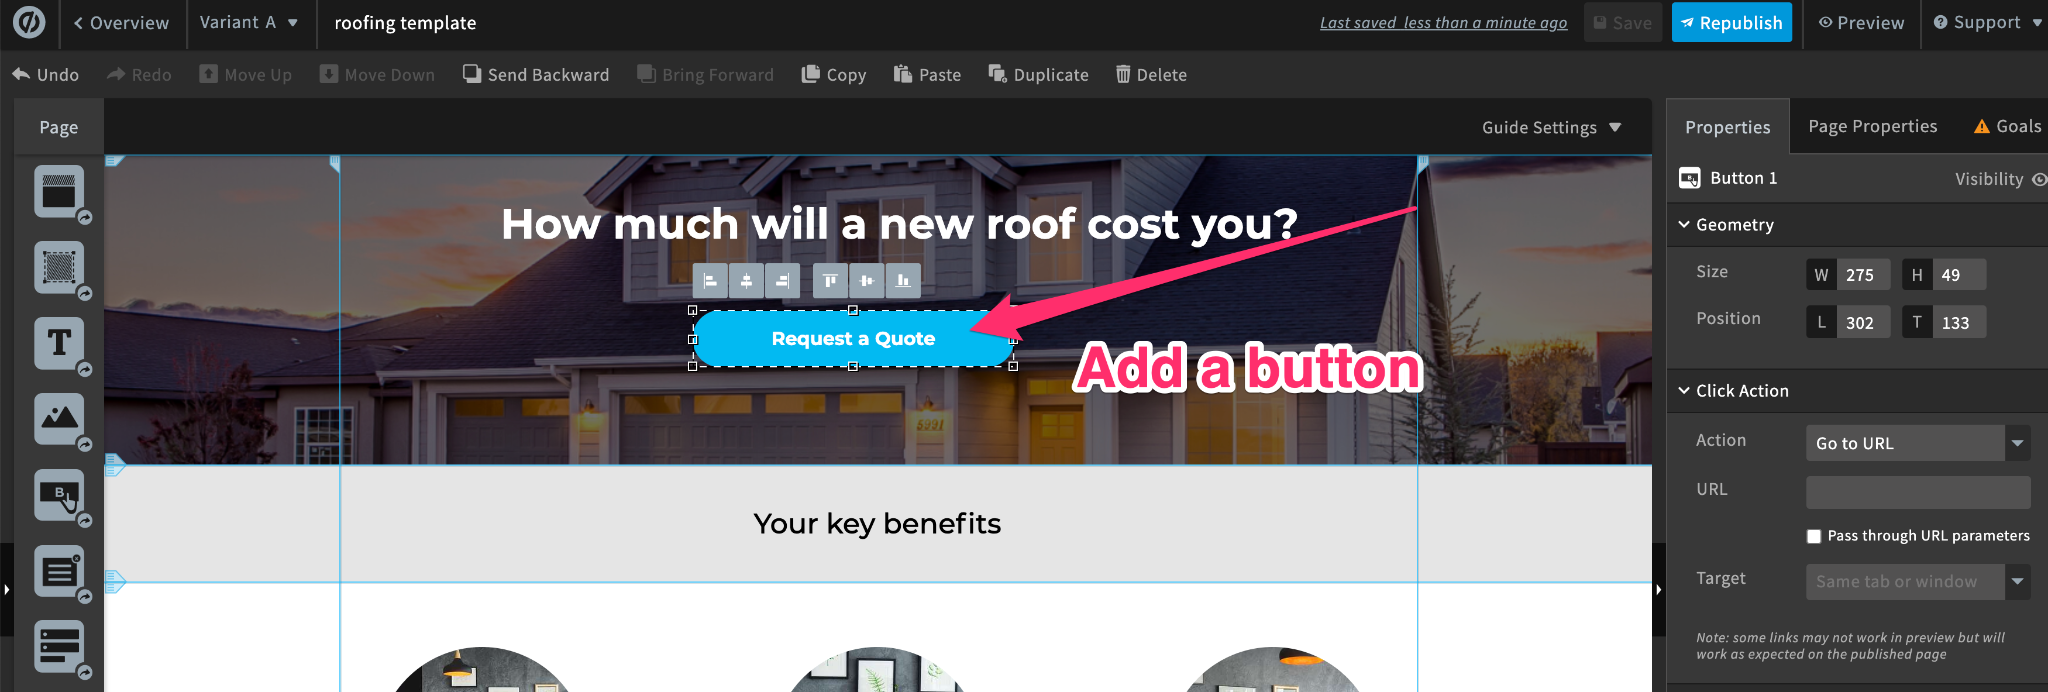
Next set the Target URL for the button as a number sign, like this “#”
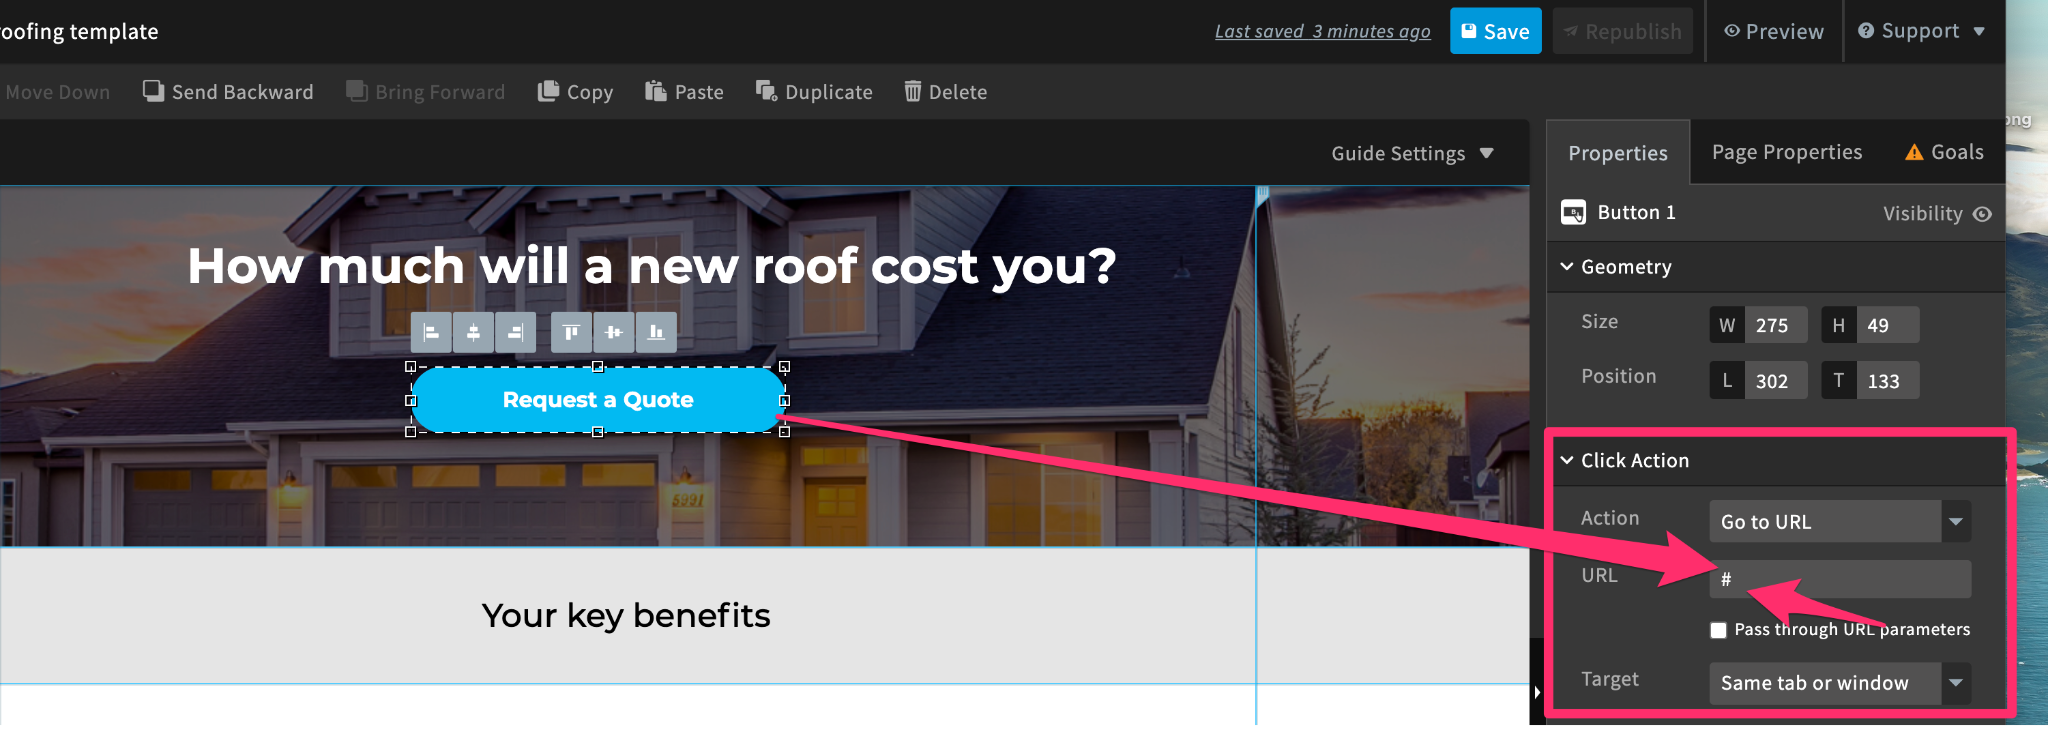
Then simply add the following class to your button: “leadforms-trigger-el”

Click “Save” and then “Republish” and just like that your LeadForm will appear with a click of a button.
Adding an Exit Intent Form to Unbounce
GetLeadForms also comes out of the box with extent intent and timed-popup technology built-in.
For example, if you’d like to add a multi step exit intent pop-up form to your Unbounce page then there’s no additional setup needed on Unbounce’s side after you add your GetLeadForms script to your Unbounce Account.
Just make sure that within the LeadForm builder the form mode is set to “pop-up” or “all” and you have “Exit-popup” enabled.
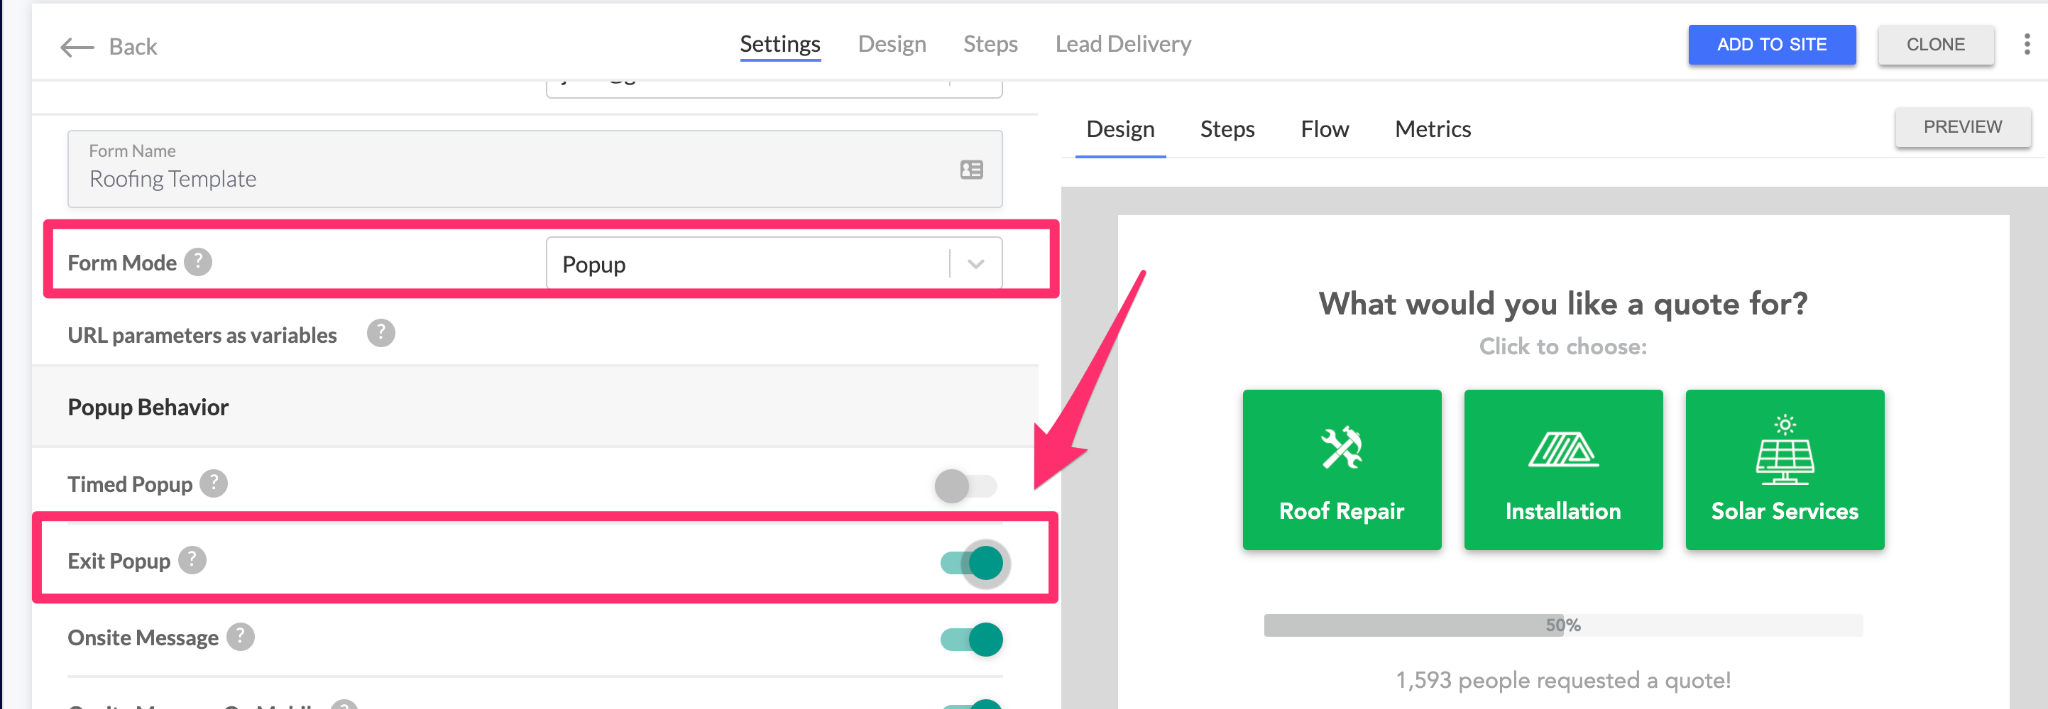
Simply flipping the switch will turn on the exit popup, and it works on both mobile and desktop.
GetLeadForms also offers timed popup functionality, with the ability to segment by desktop and mobile devices.
So if you really wanted to, you could have your form automatically pop-up on desktop devices, but not on mobile devices.
Step #9: Optimize your form with step-based metrics and A/B testing
Using a tool like GetLeadForms not only makes it easy to build multi step forms on Unbounce without code, but it’s even easier to measure and optimize the performance of your forms with our built-in form analytics.
Two of the key analytics features to make note of are Step-Based Metrics and A/B Testing:
Step Based Metrics
The problem that most multi step forms have is that you cannot see the conversion rate or drop-off rate of each step of the form.
So how do you know which steps are hurting your conversion rates and which steps are helping you?
Well, that’s where our Step-Based Metrics come into the picture.
GetLeadForms gives you precise insights into the conversion rate of every step of your form, so you know exactly where prospects are getting stuck.
To see your step based metrics, simply go right into your form and click on the “Metrics” tab:
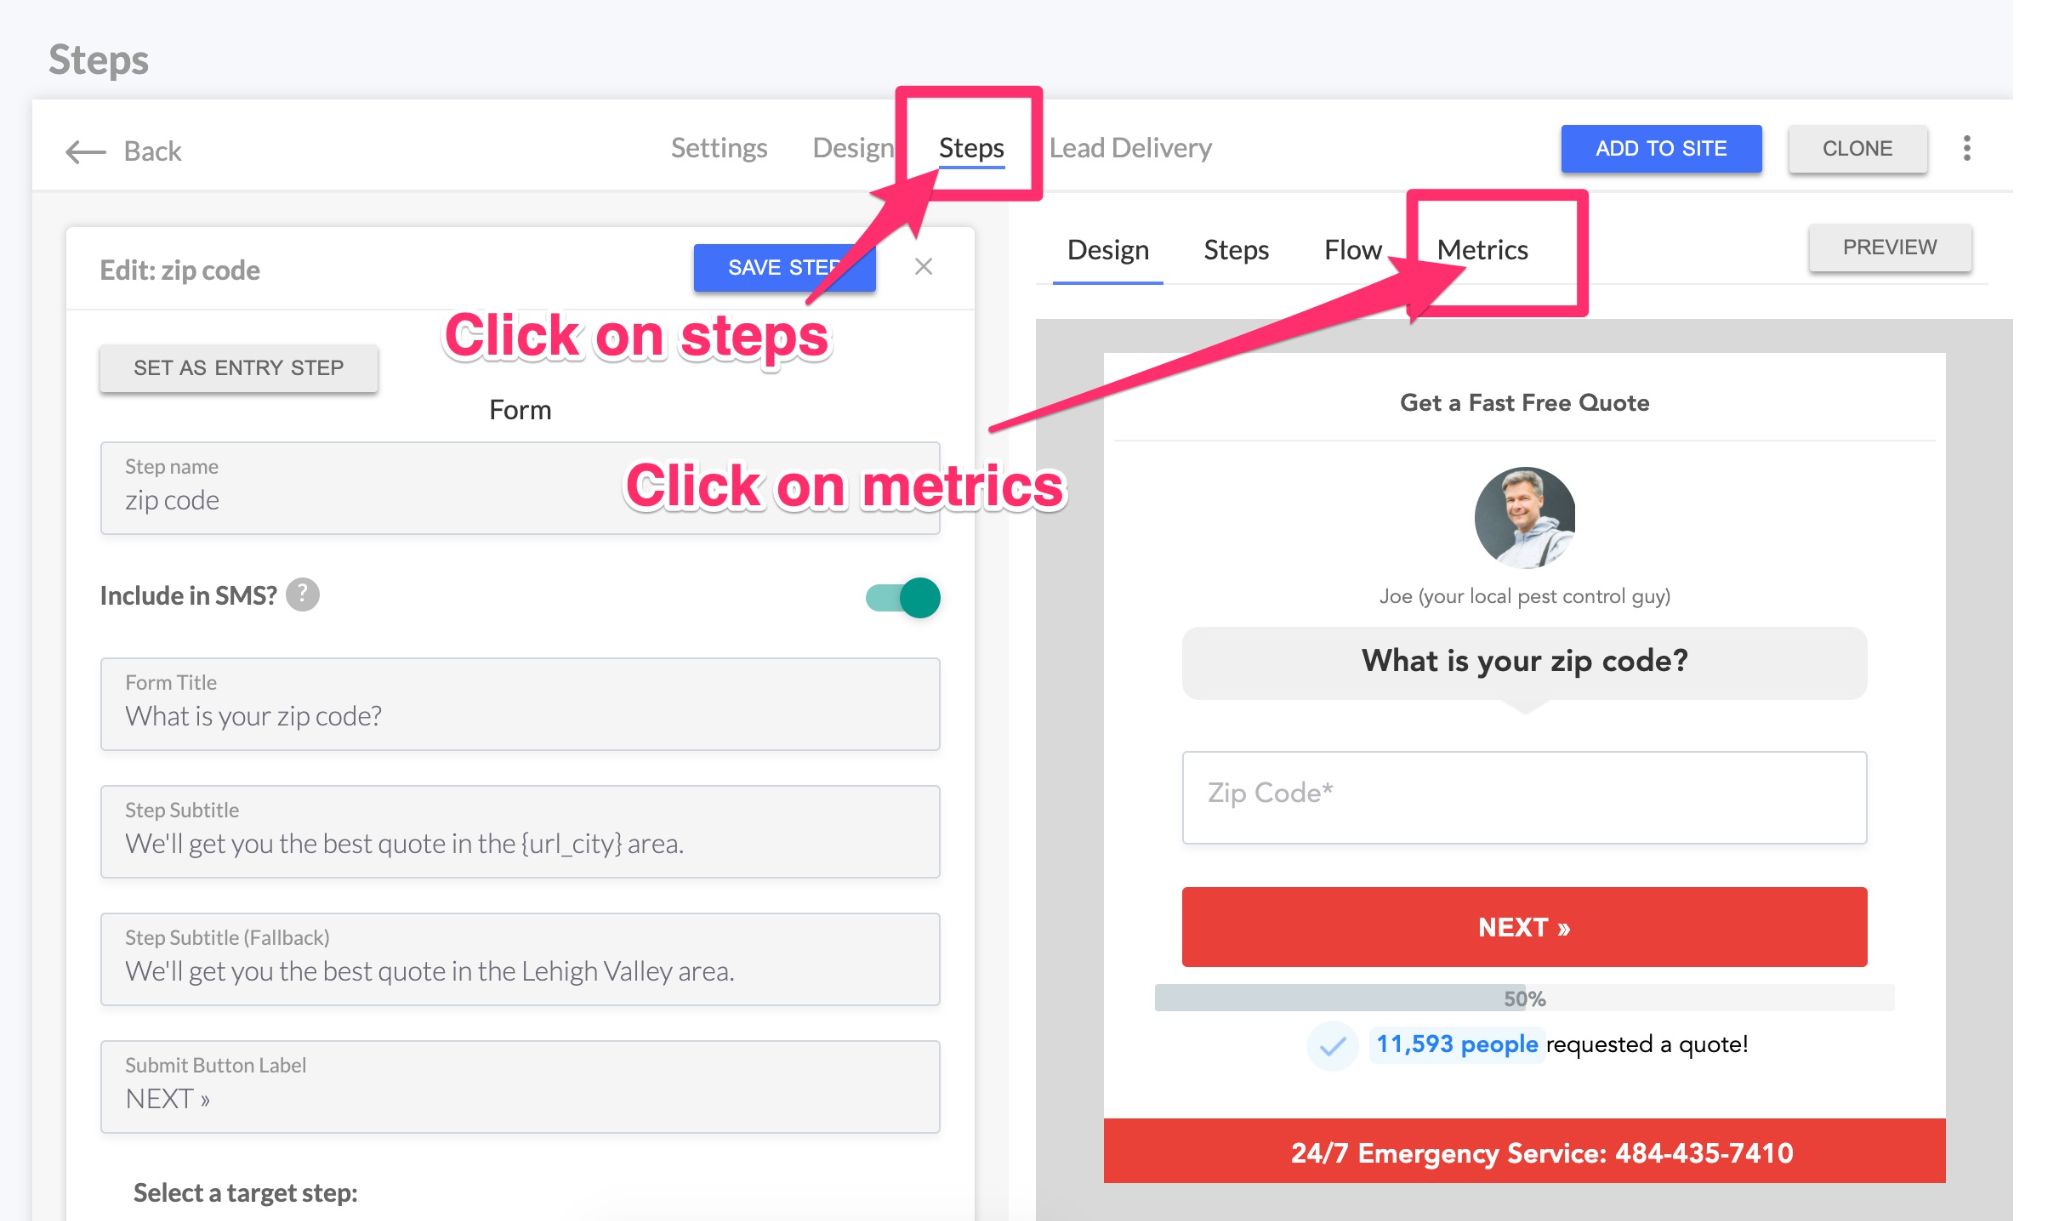
Next, scan down the list taking note of the conversion rate of each step.
When reviewing step based metrics I like to look at the following:
- Steps that have the lowest conversion rates: These are the steps that you want to optimize. For example, if you’re asking the prospect for a budget and you’re using an open-ended form field, try changing this step to a slider instead.
- Steps with highest average duration: If you notice that it’s taking prospects a long time to complete a specific step, then it could be a sign that a step in your form is causing confusion.
For deeper analysis, you can also export your metrics to a CSV to combine with other data.
After you identify exactly where you want to optimize, the next step is to launch an A/B test.
A/B Testing
When it comes to A/B testing and landing page CRO, Unbounce has some of the most powerful testing tools of any landing page builder.
But if you’re building a multi step form outside of Unbounce, it could be more challenging to use their native testing tools.
That’s where the GetLeadForms A/B testing tool can help.
While the Unbounce A/B testing tool works great for landing pages. The GetLeadForms A/B testing tool works great for multi step forms.
To launch an A/B test, simply go to the form that you’re looking to test and click on the A/B test button
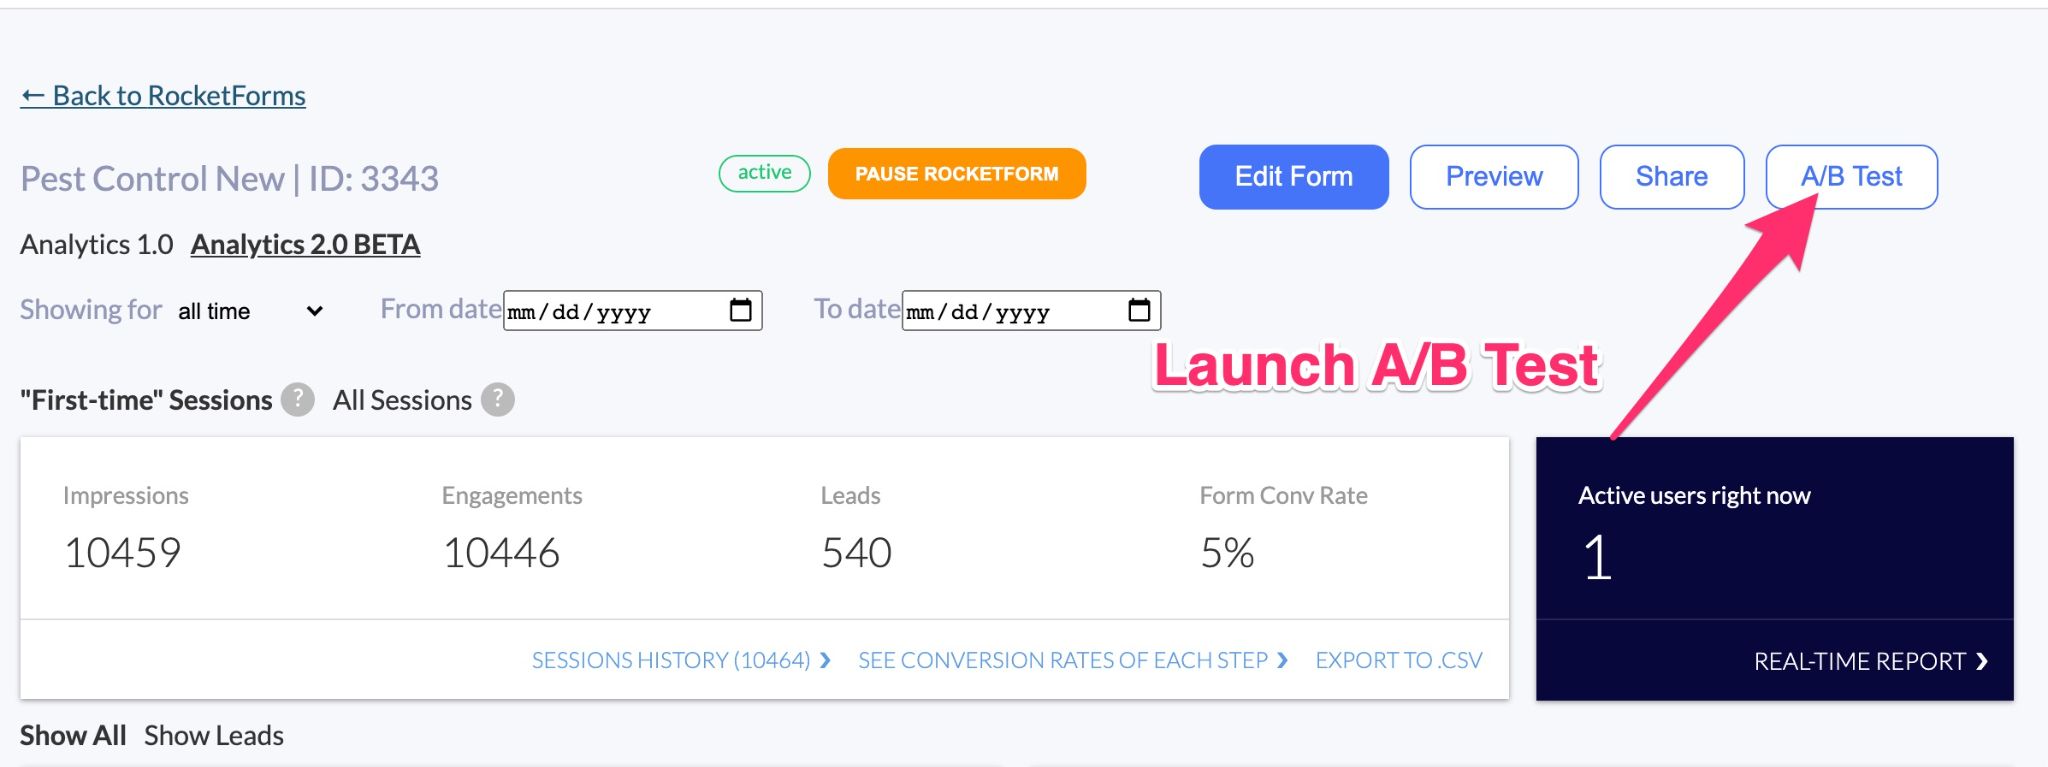
After that, click “Start A/B Test” to create a Variant form within your account.
Next, go through the process of making changes to your variant form.
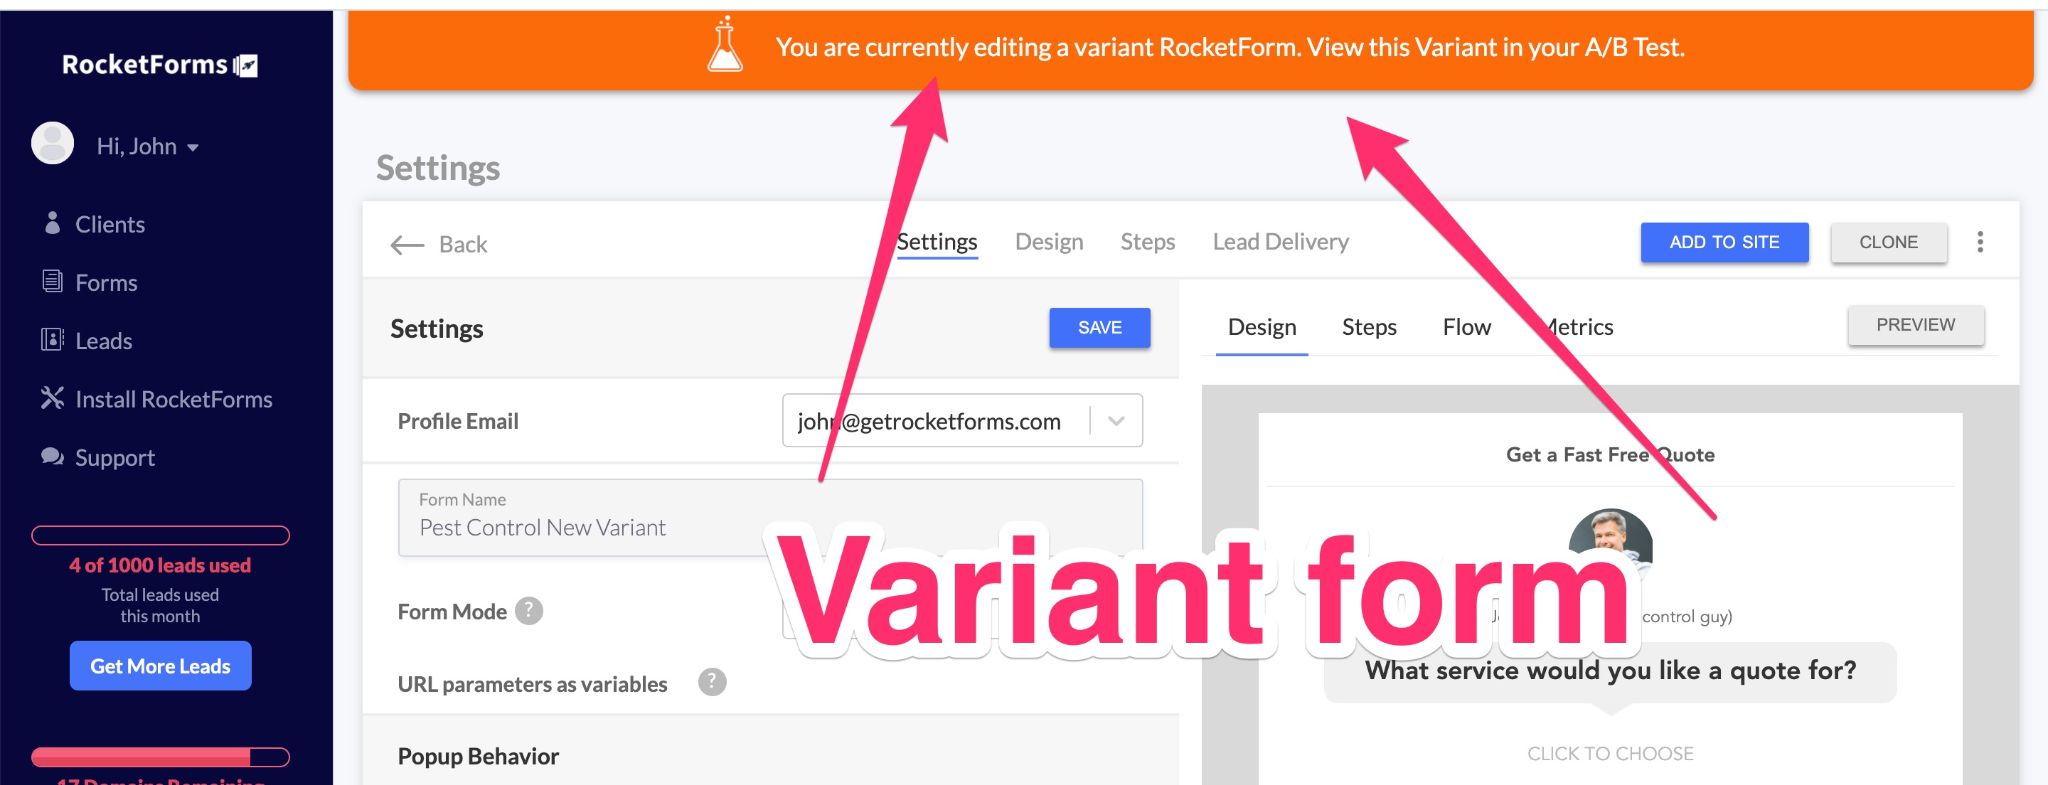
Add some notes, then start your A/B test.
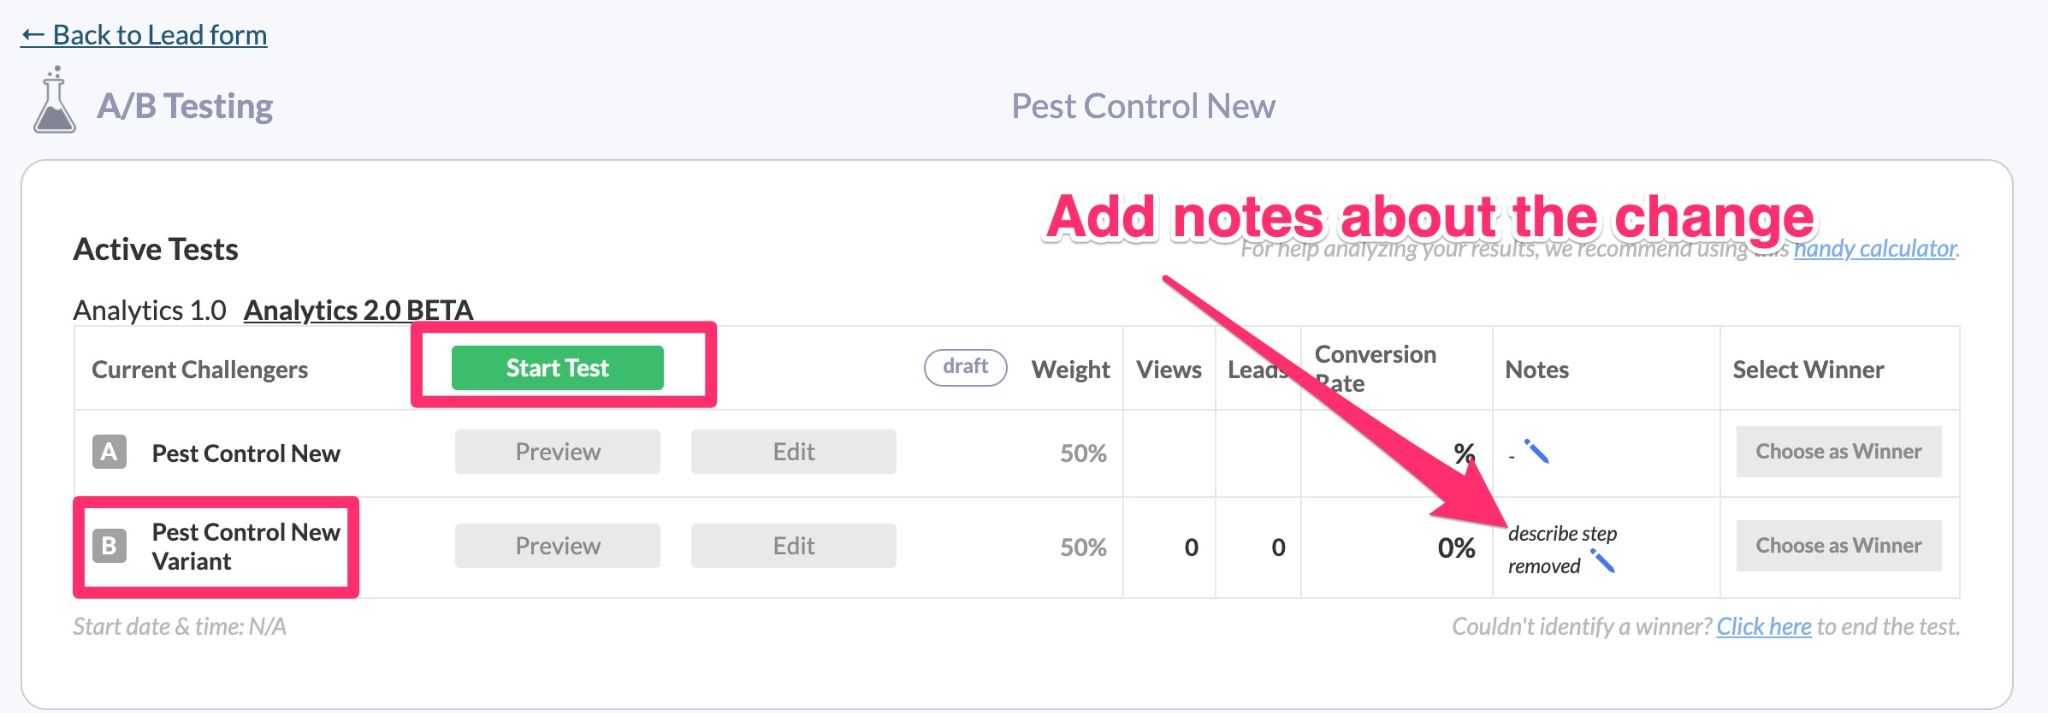
It was through A/B testing that we discovered this little tweak that resulted in a 44% conversion lift on the contact step of one of our customer’s forms.
Increase relevance of your forms with personalization
When I first got into marketing, specifically Google Ads (formally AdWords), one of the concepts that stuck with me was the importance of making the post click experience of the landing page as relevant to the message of the ad as possible.
To accomplish this, one of my favorite Unbounce features is Dynamic Text Replacement.
With Unbounce’s Dynamic Text Replacement feature, you can match the copy in your PPC ads to the copy on your Unbounce landing pages. This increases relevancy and boosts conversions.
Well, guess what?
You can also do this with your forms using our personalization feature.
For example:
Let’s say that someone Google’s Plumbing Repair Service and they click on the ad below:
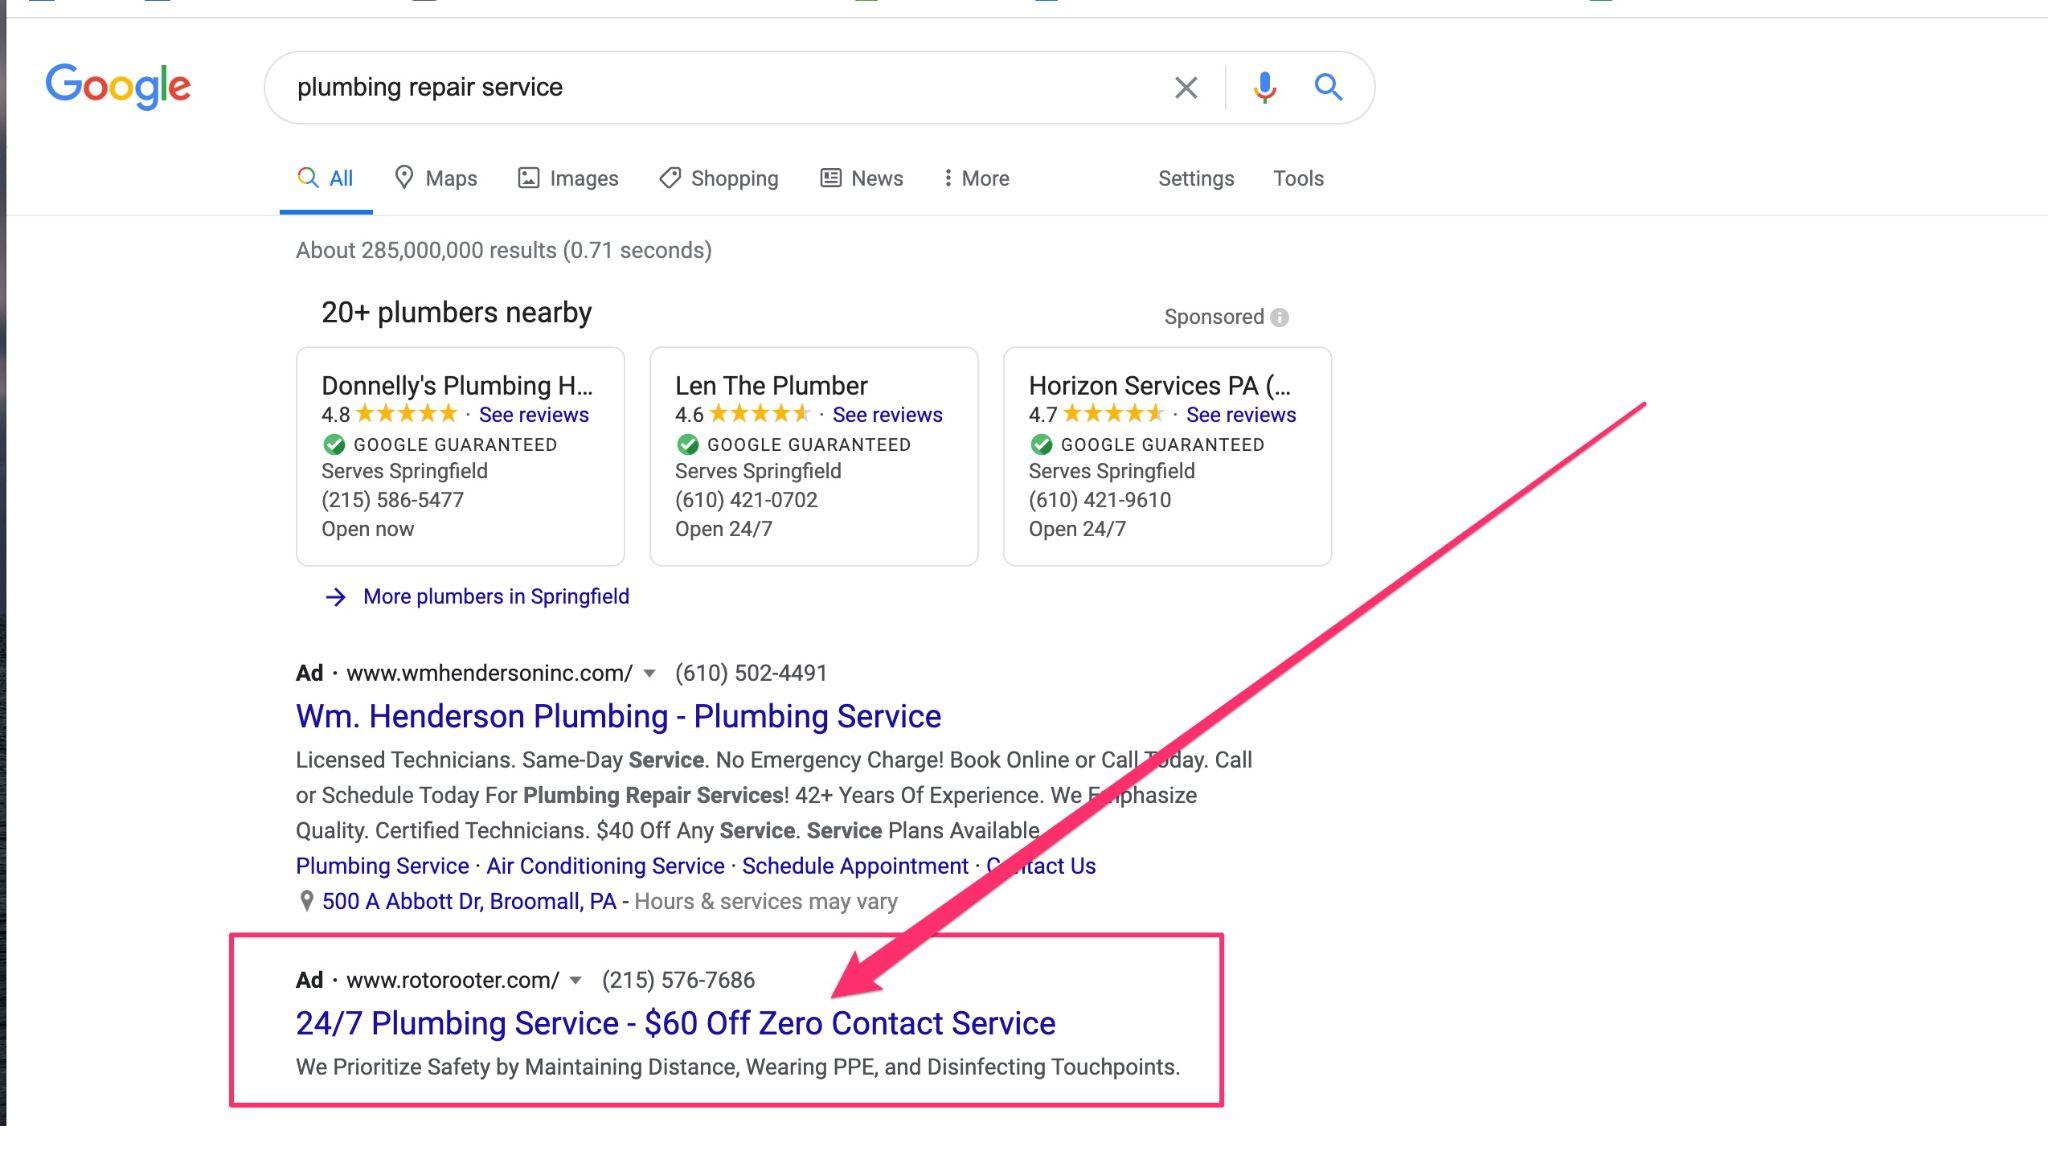
With GetLeadForms, you can match the headline of the form to the headline of the ad, by inserting this variable into the headline area of the form: {url__headline}

The LeadForm will look like this:
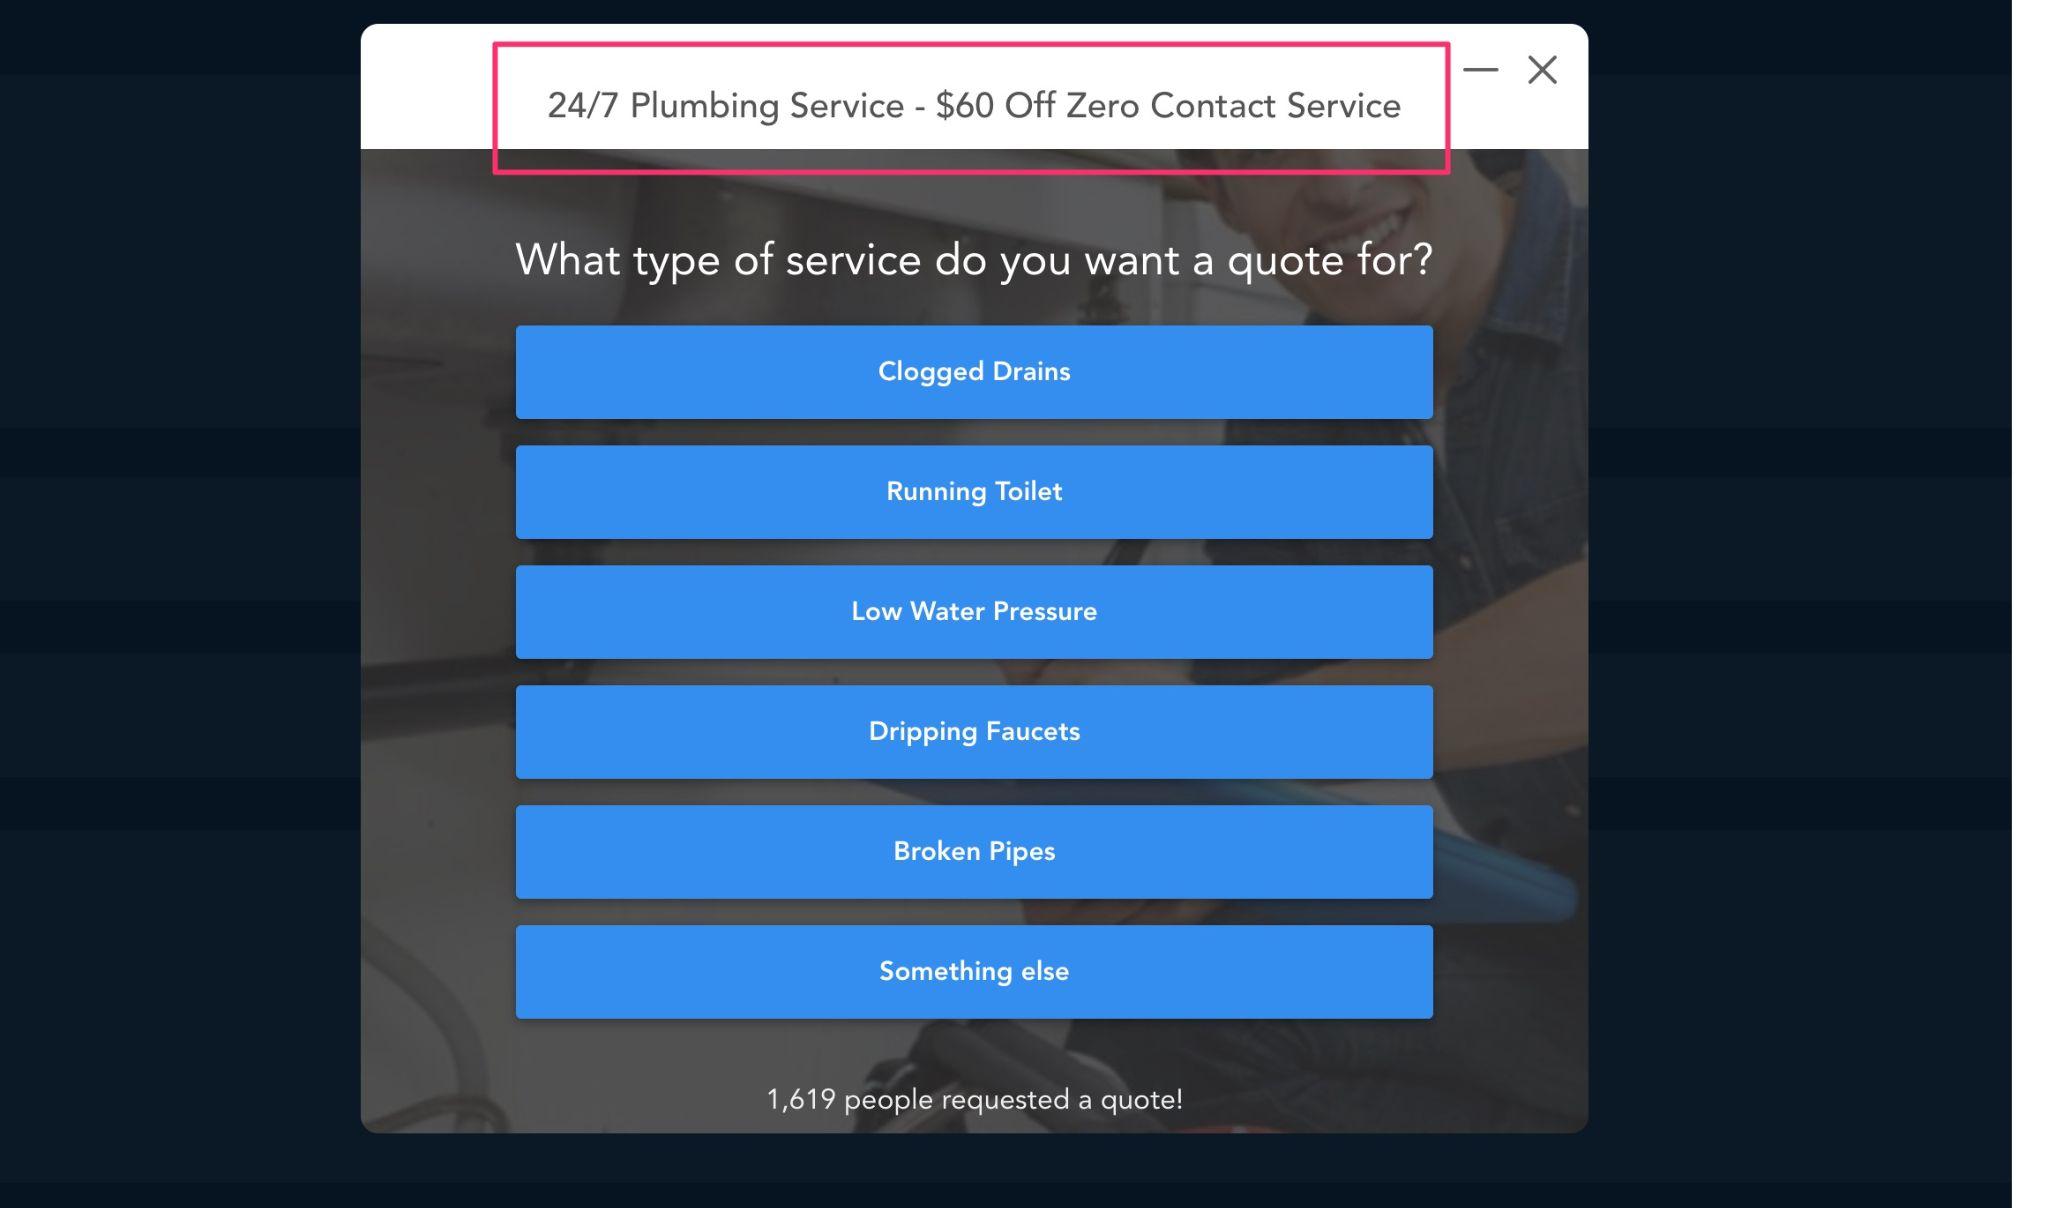
Pretty cool, right?
Already have an Unbounce Form? Boost conversions with our onsite message feature
So what if you already have a high converting form on an Unbounce landing page?
Or, what if you’re using something like a chatbot on Unbounce?
Well, there’s one more feature that I want to tell you about…
We call this the “Onsite Message”.
The onsite message is a tiny lead capture widget that you can add to the bottom right or left side of your landing pages to help engage even more visitors, so you can drive in more conversions.
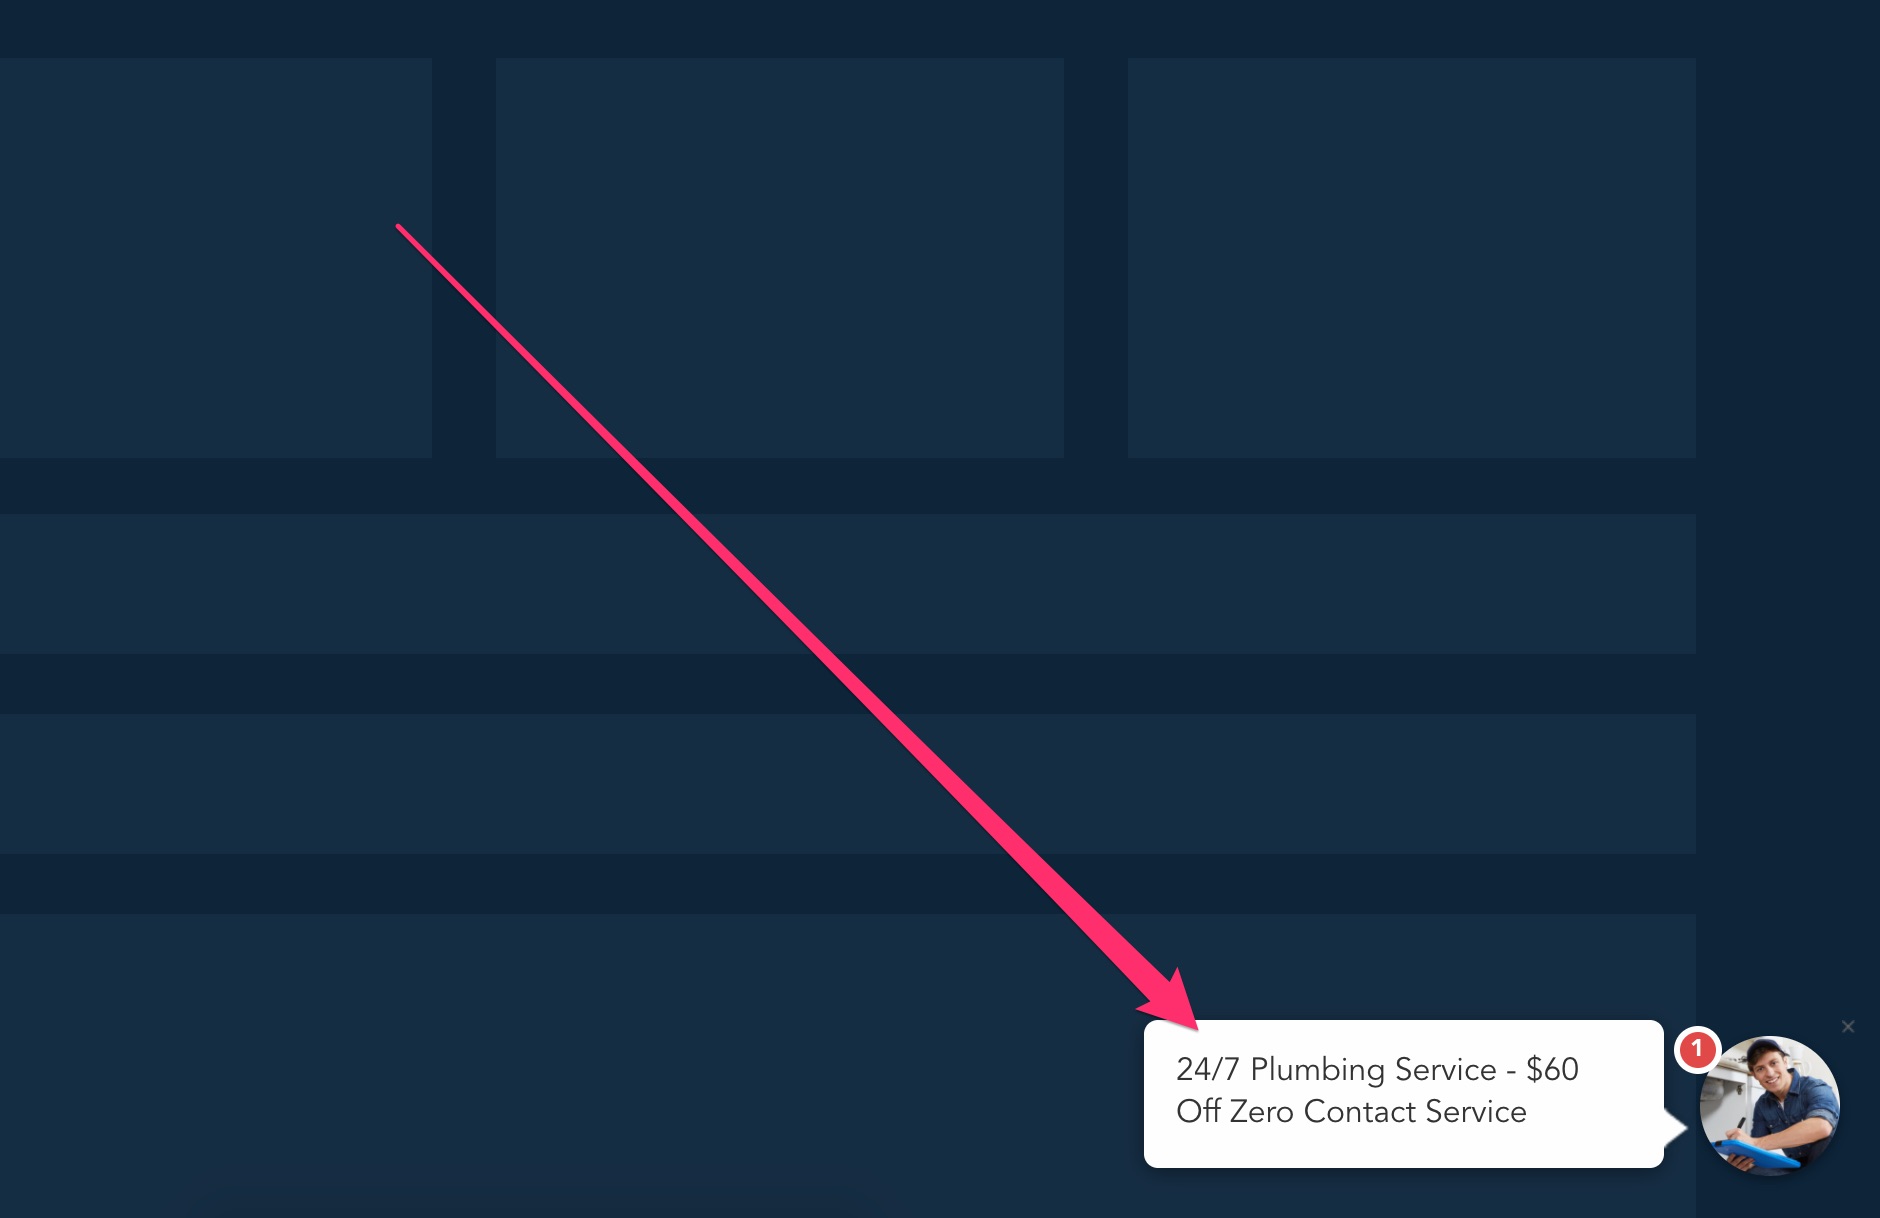
When clicked, it will pop open your LeadForm.
We’ve found that this is an extremely effective way to turn more clicks into leads. It’s also a great alternative to chatbots, which are usually overpriced, glorified forms to begin with.
How to Earn More Revenue By Creating Forms With GetLeadForms
Finally, if you’re building these multi step forms inside of Unbounce for clients, then it’s worth noting that you can earn more revenue by using GetLeadForms.
When you become an agency partner, you’ll earn a 30% recurring commission when you sign up your clients directly to GetLeadForms.
This means that as long as your client keeps paying, you keep getting paid.
This really makes GetLeadForms a no-brainer.
In addition to building better forms for your clients, you can also profit a little in the process.
And you don’t have to stop there. In addition to earning 30% recurring revenue from each subscription, you can also upsell your clients on additional CRO services using our A/B testing tools.
Interested? Apply to our partner program here.
Final Thoughts for Building Unbounce Multi Step Forms
Unbounce is an AMAZING landing page builder that allows you to create high converting landing pages fast.
And with GetLeadForms, you can now build and optimize high converting LeadForms on your Unbounce landing pages.
When it comes to building multi step forms, Unbounce + GetLeadForms are both a match made in heaven.
Here’s what to do next:
- Preview the form that we created in Unbounce
- Start a free trial of GetLeadForms — Start free trial here (no credit card is required)
- Browse templates — See all templates
- Become a partner and earn 30% recurring commission for every client that you refer — apply here