In this post, I’m going to discuss everything that you need to know about building multi step forms for HubSpot.
I’ll start by highlighting why you should create a multi step form in HubSpot.
Then I’ll show how to build a multi step form for HubSpot and how to get your leads into your HubSpot CRM.
First, let’s start with some of the reasons why you should crate a multi step form with HubSpot.
4 Reasons to build multi step forms in HubSpot
What do I mean when I say create multi step form in HubSpot?
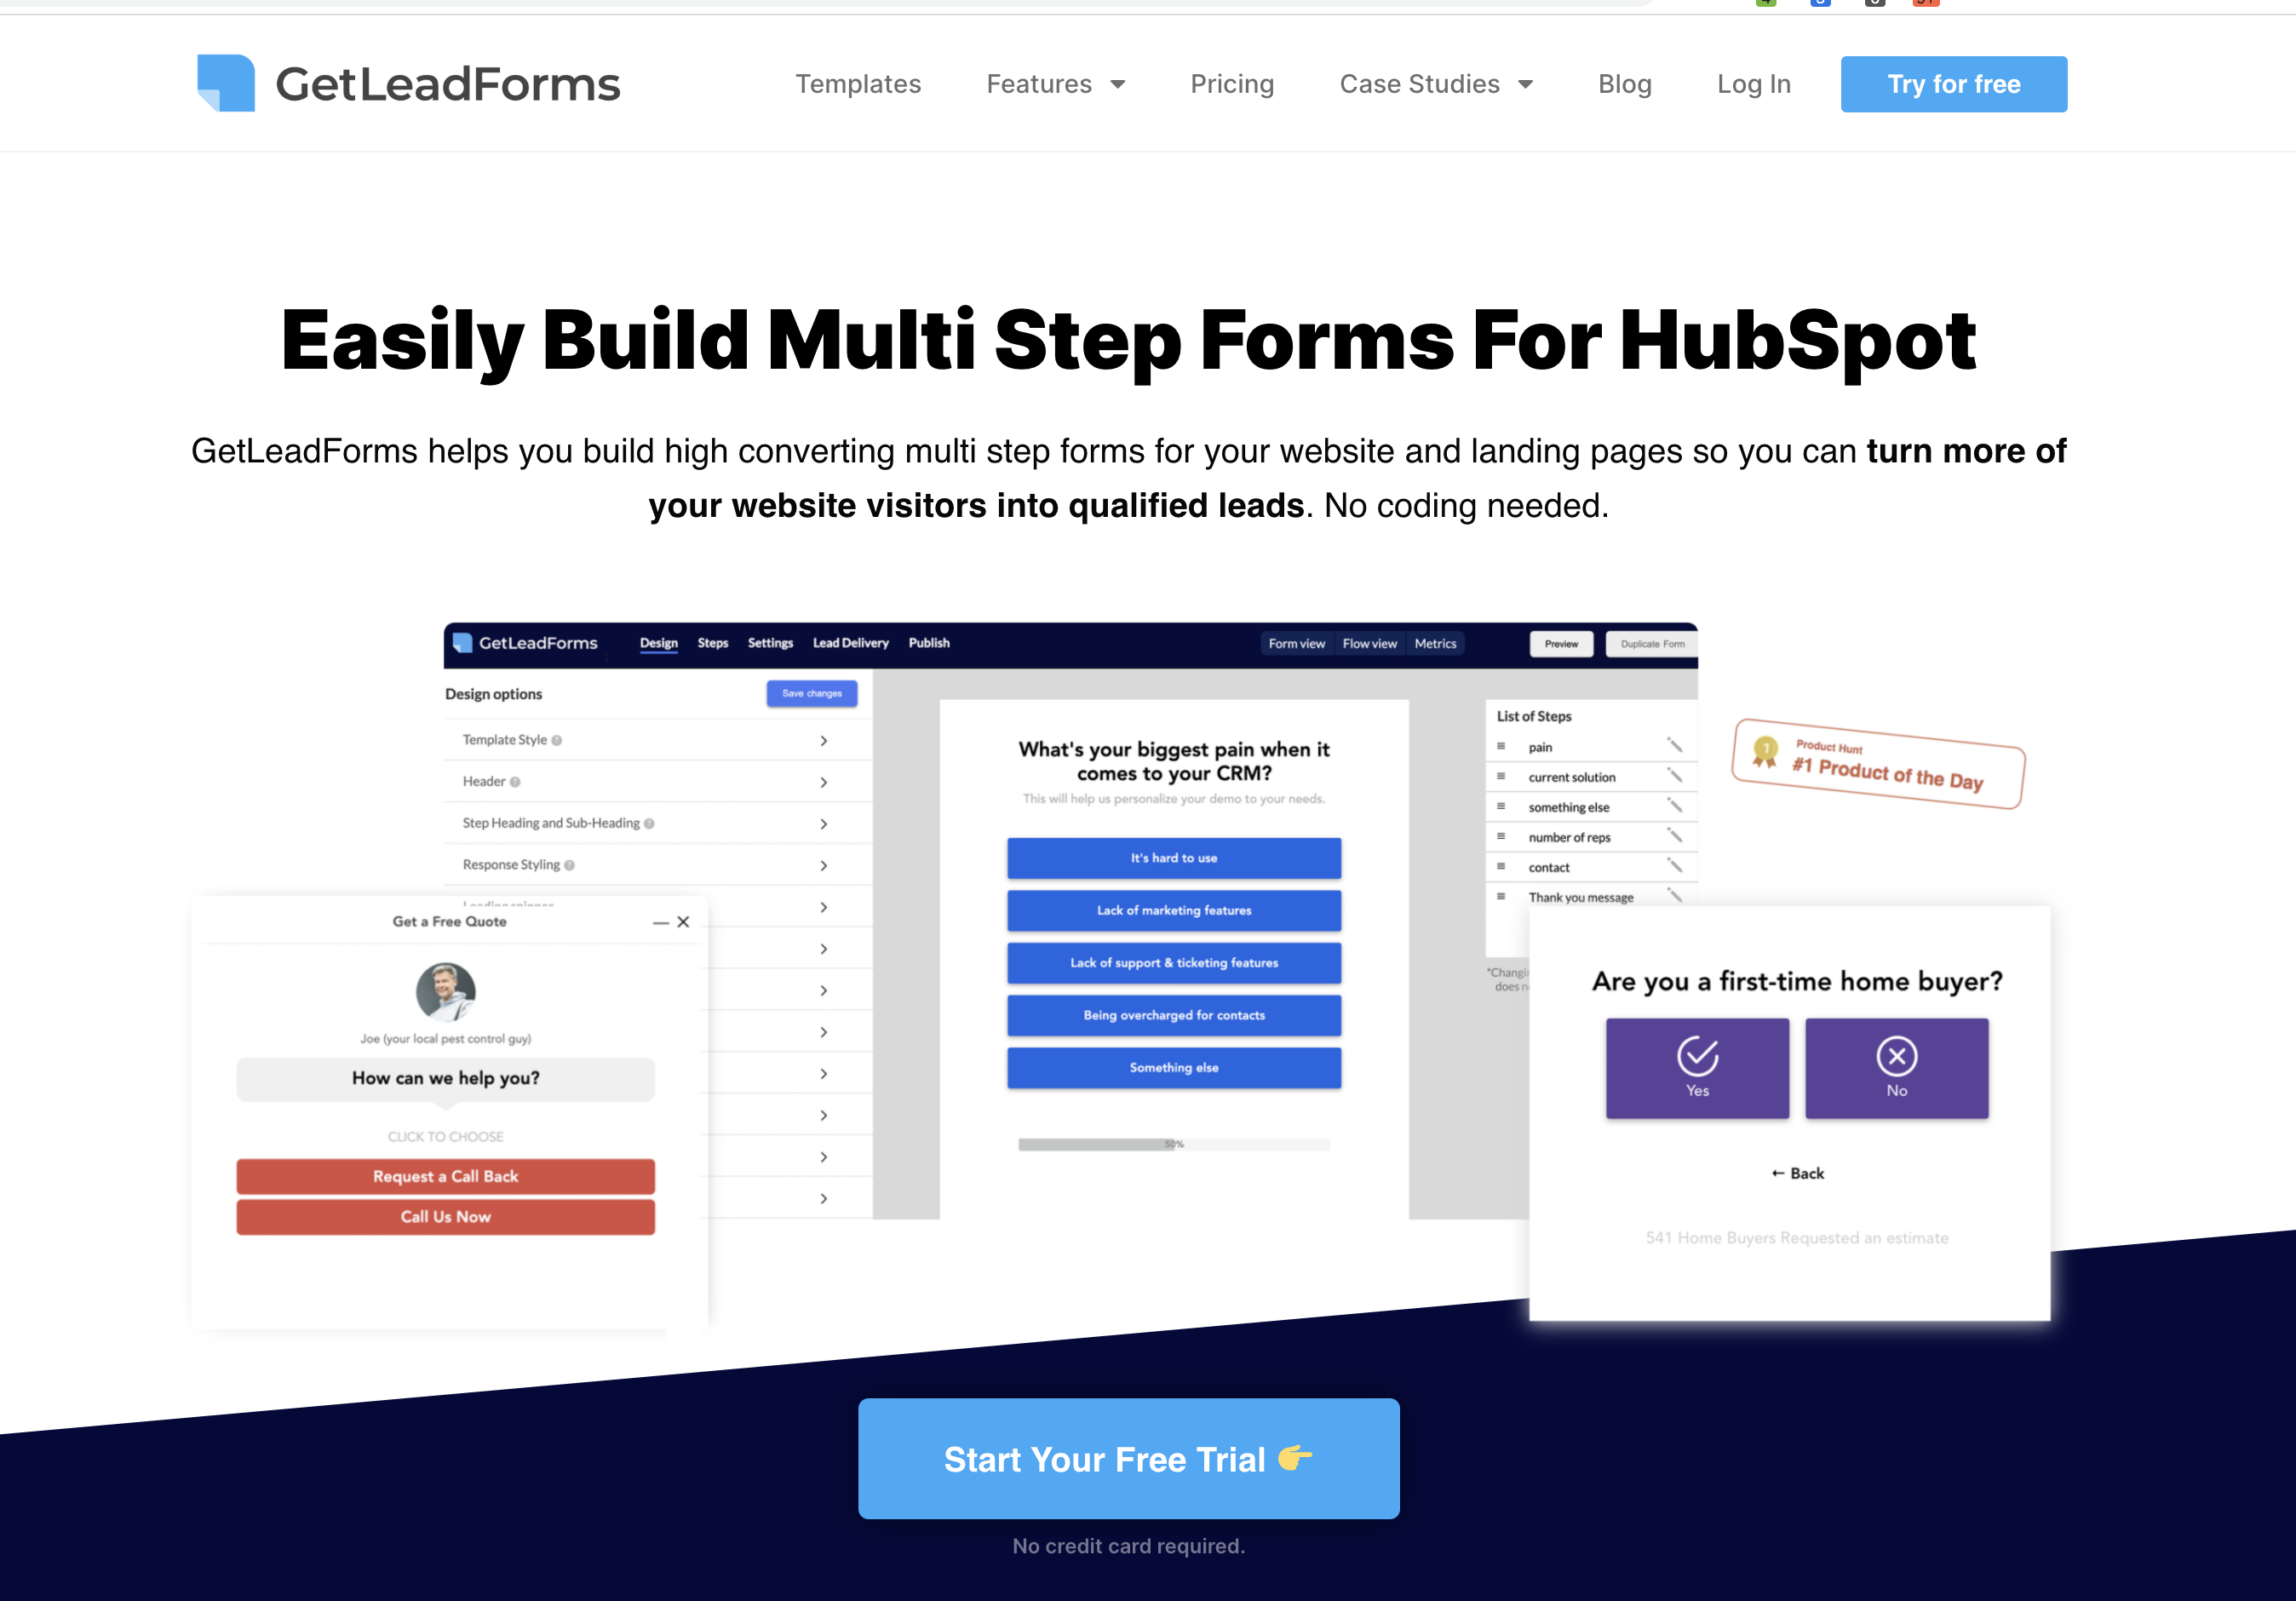
I’m talking about a lead generation form that’s broken into multiple steps like this:
The above is an example of a multi step lead capture form that we built for agencies — here’s a template of this exact form to help you capture more qualified agency leads.
Here are some of the reasons to use multi step forms with HubSpot:
1. Improved user experience
A more interactive LeadForm has the potential to dramatically boost the user experience of your website or and landing page.
In this day and age, the vast majority of both B2B and B2C buyers interact with a website at some point during their buyer journey now more than ever before.
Most marketers know this, which is why so many businesses are placing more emphasis on improving the user experience of their website.
And a key trend that I’m seeing is that forms are also really starting to come into focus. Marketers especially those in B2B SaaS, have come to realize that the form is one of the key areas of the website to optimize.
2. Increased conversions
This is somewhat related to the first point, but it also deserves to be mentioned on its own.
The impact of improving the user experience of your forms is that you will dramatically reduce your form abandonment rate and increase conversions. This means more leads for you.
When it comes to conversion, some of the benefits of using multi step forms are:
- Reduced cognitive overload for the visitor by showing one step at a time
- More people-friendly and user-centric forms
- Visually appealing, unlike overwhelming single-step forms
- Easier to test and optimize to see which questions are causing the biggest drop-off
For example, in GetLeadForms, you can actually see the drop-off rate of each step of your form, giving you visibility into what’s working and what’s not.
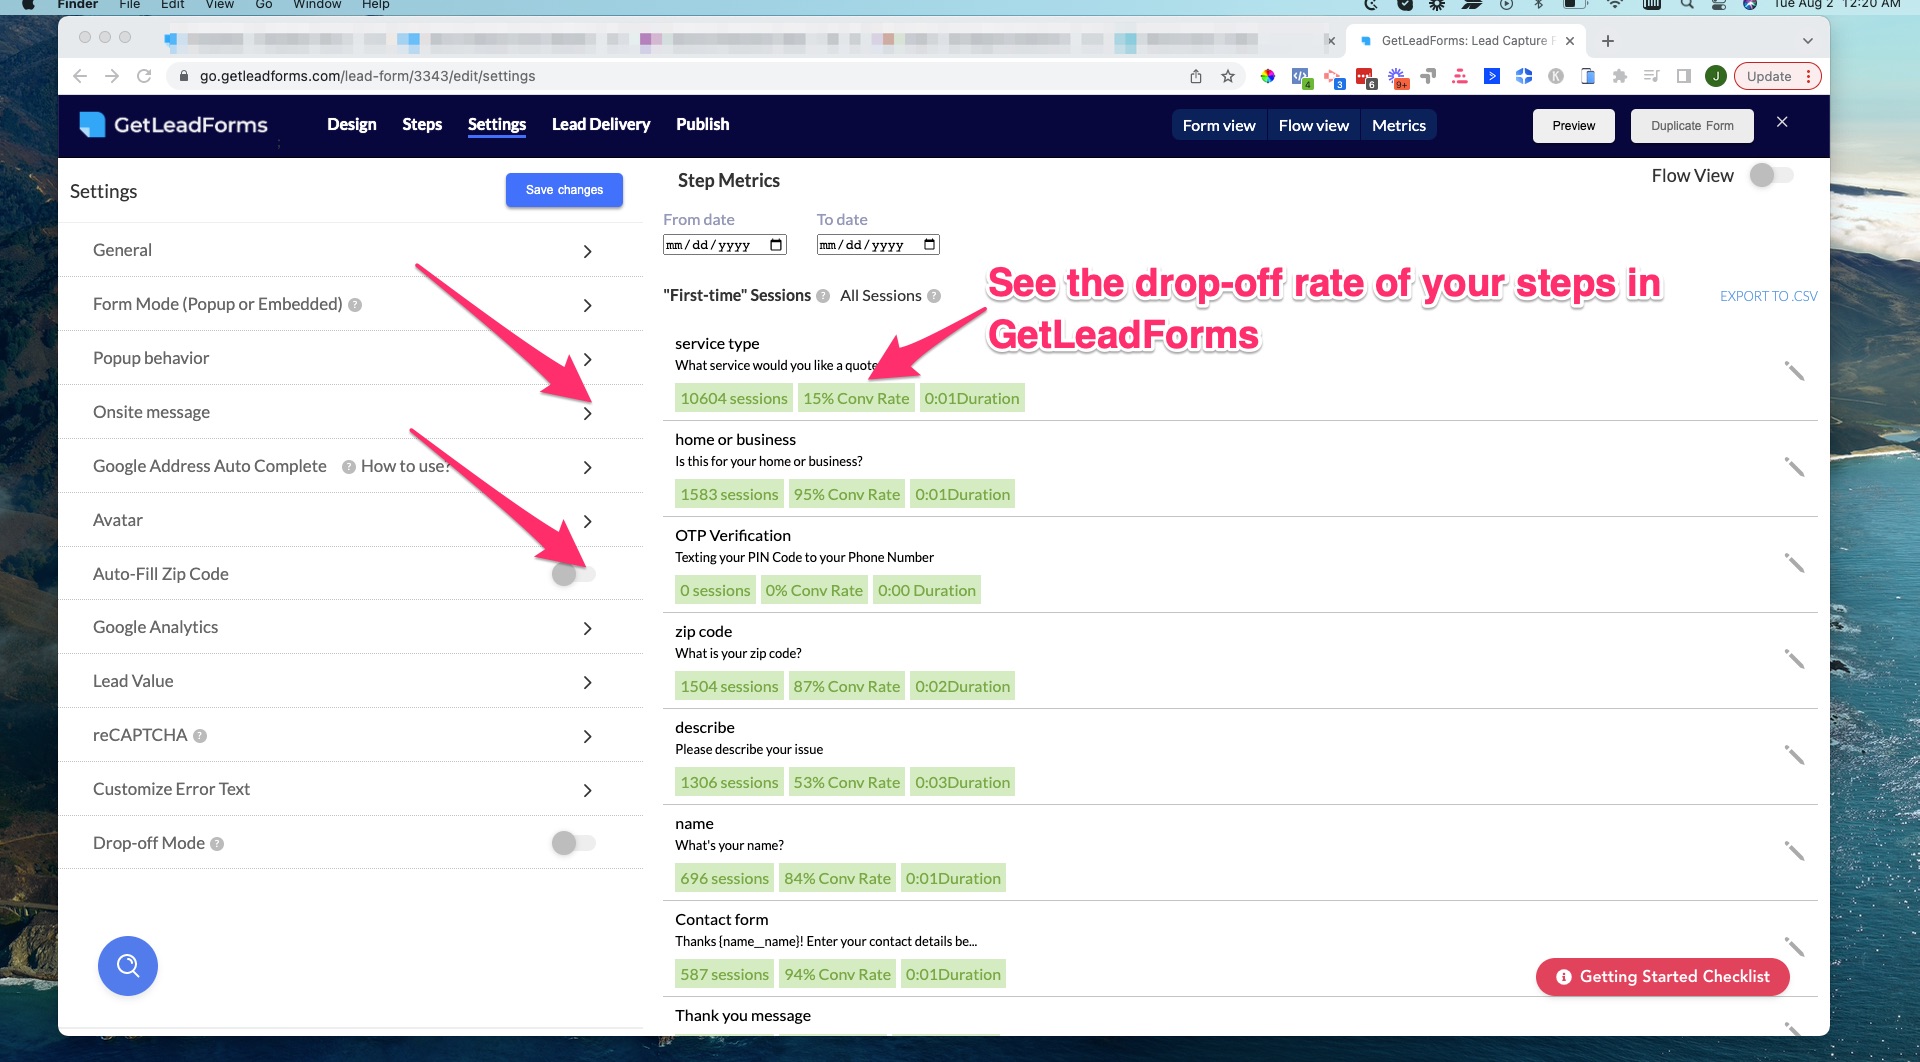
Pretty cool, right? To get access to this type of feature grab a free trial of GetLeadForms here.
3. Better lead quality
A multi step form can help ensure that you’re getting high quality leads in your HubSpot CRM.
And this is really important.
Not just for follow-up, but also because part of HubSpot’s pricing is based on the number of marketing contacts that you have in your CRM.
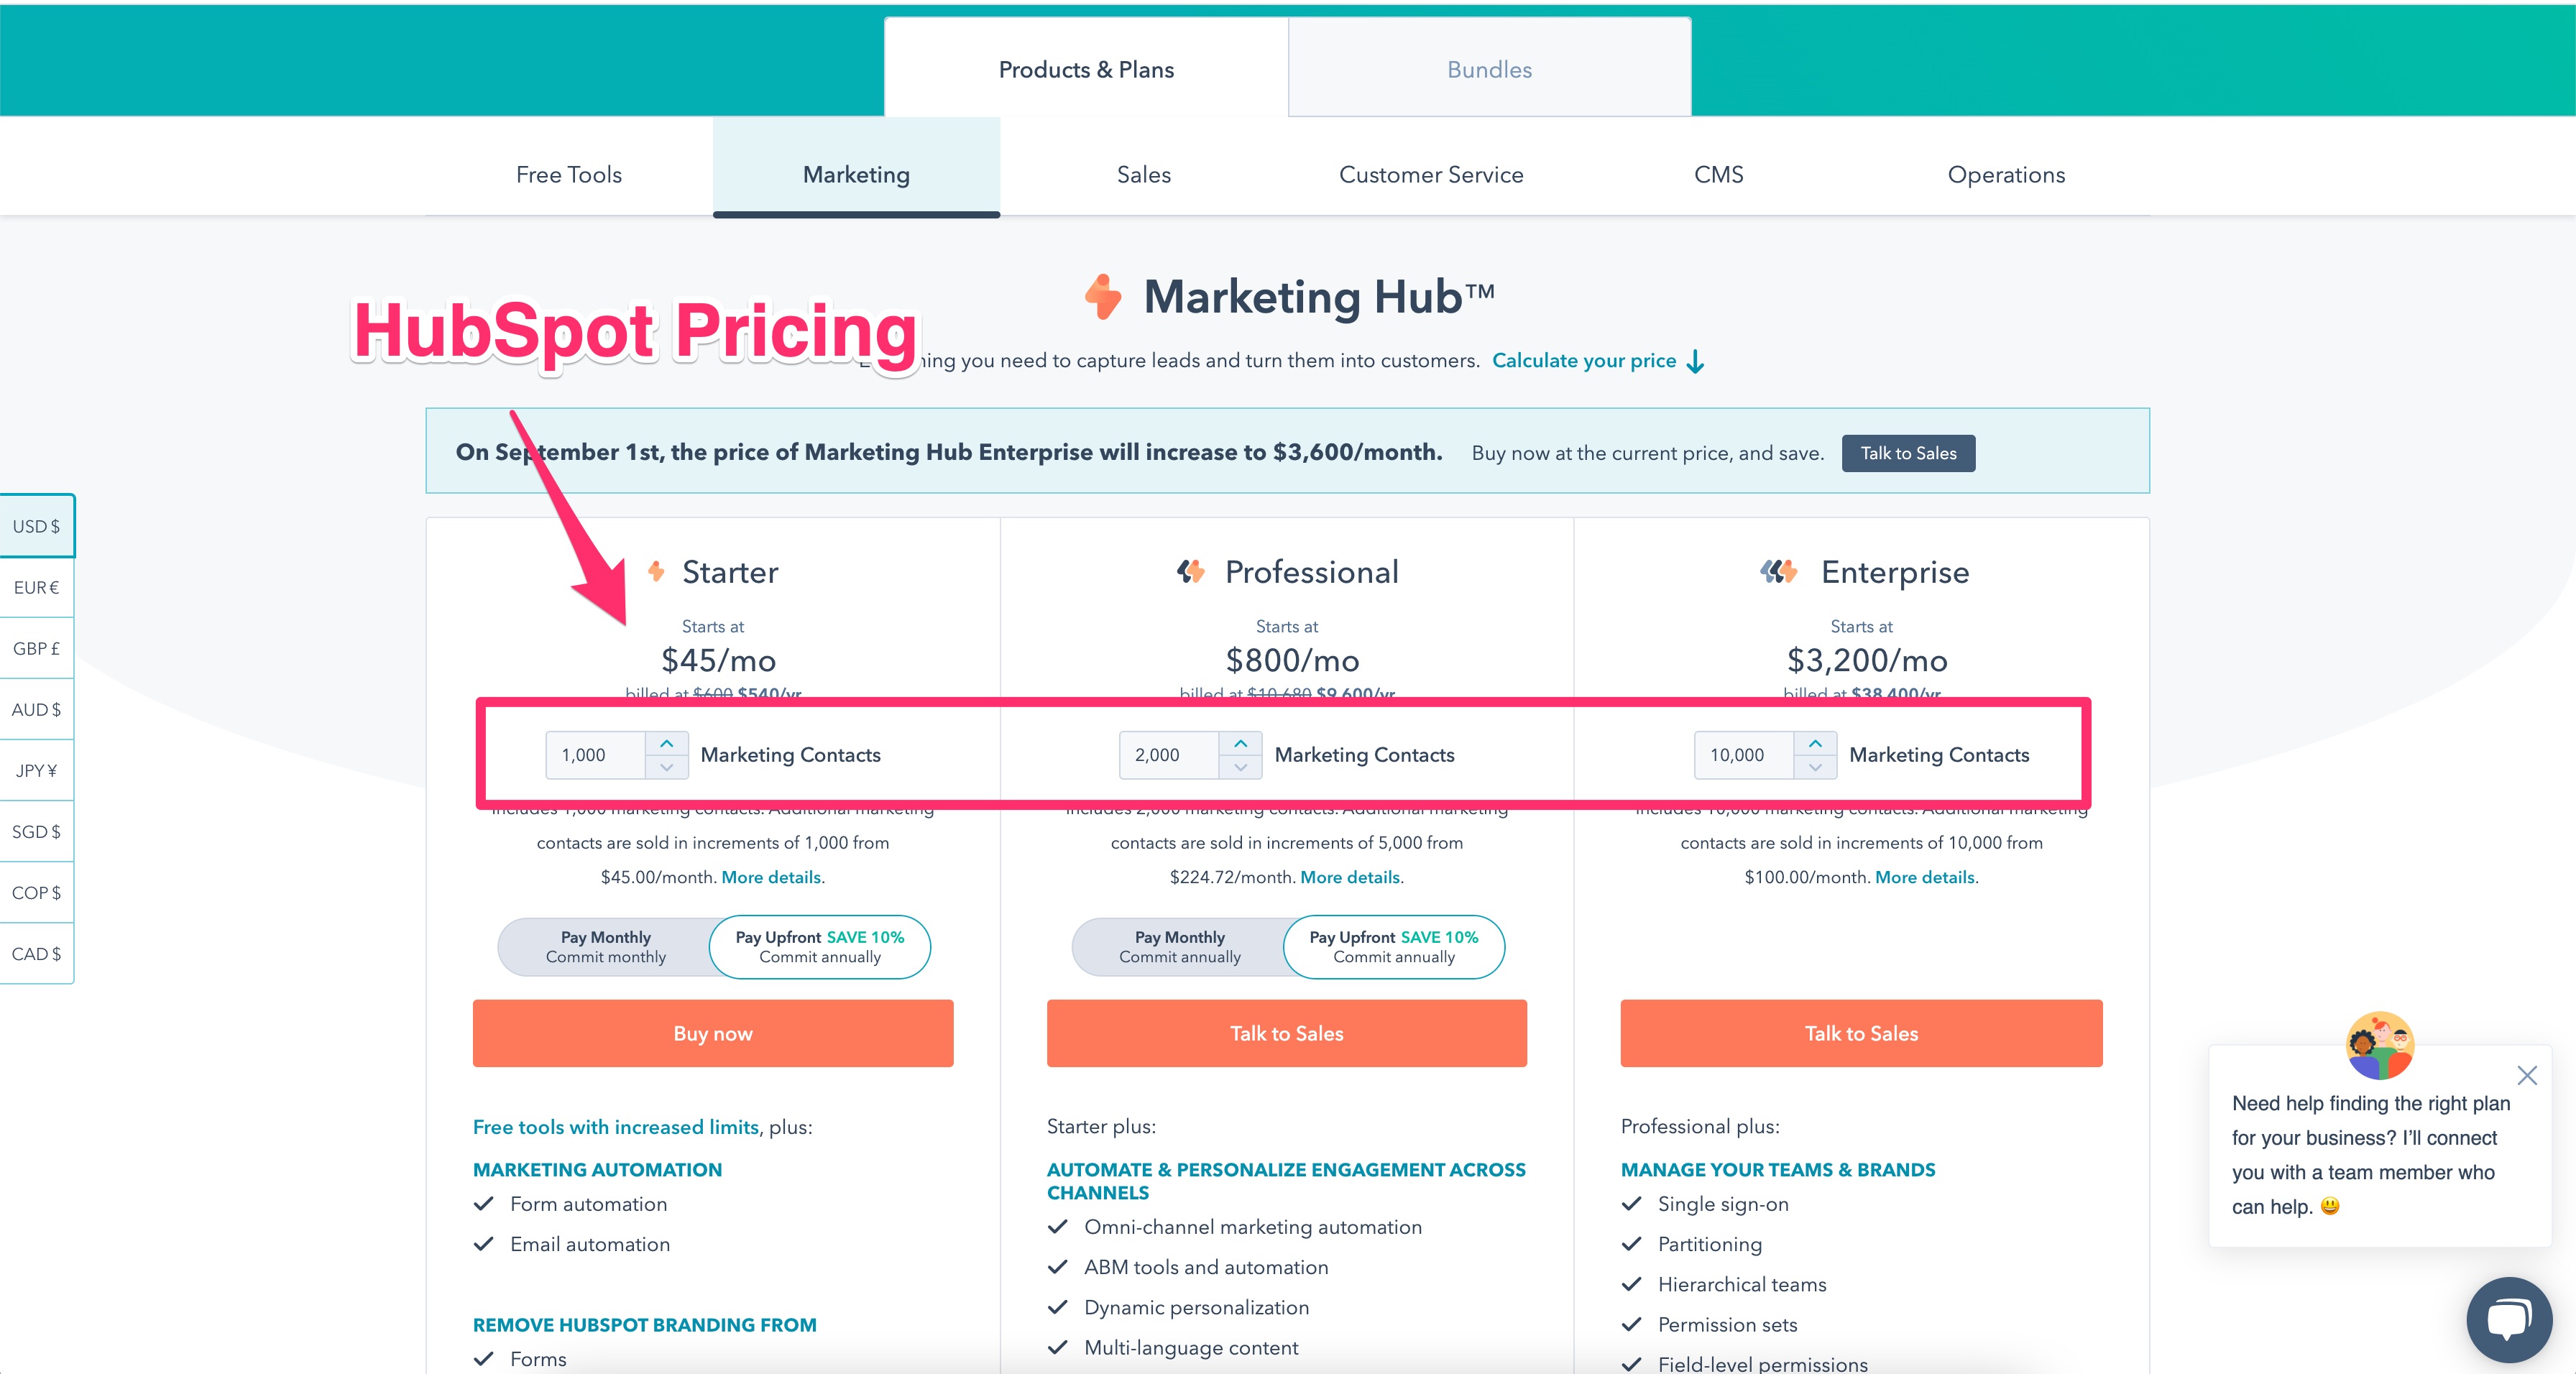
Would you rather be paying for a bunch of low quality contacts or high quality leads that you can properly follow-up with and nurture?
I’d vote for the high quality leads any day hands down.
And your boss (or client) will most likely agree — especially if it keeps the pricing of your HubSpot contract down.

With that said, one of the huge benefits to switching from a single-step form built in HubSpot, to a multi-step form is that you can use conditional logic to improve quality of your inbound leads that are sitting in your HubSpot CRM.
This results in:
- Potential cost savings
- Cleaner CRM
- Better and smarter follow-up
4. Improved segmentation with your HubSpot CRM (which means more effective follow-up)
One of my favorite HubSpot features is the HubSpot Workflow feature.
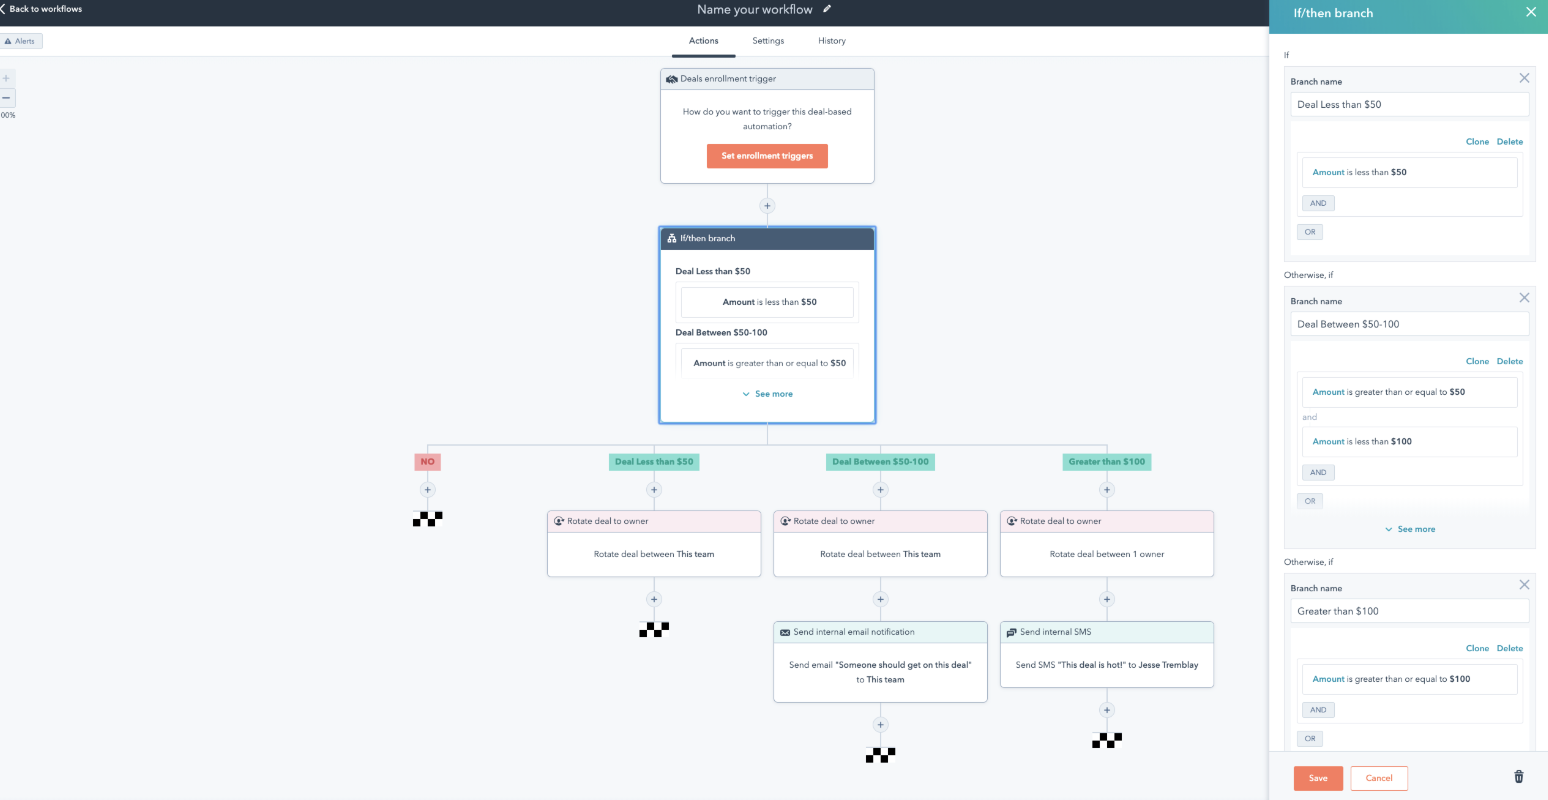
What are HubSpot Workflows?
A HubSpot “WorkFlow” is an automated process where tasks and emails are triggered based on rules that are set up in HubSpot. Workflows can help you create automated nurture sequences based on form responses, which are stored as Properties inside of your CRM.
For example:
Imagine that you have a multi step form that asks your prospect about their biggest pain point.
Let’s pretend that it’s a form for CRM and some of the options include: hard to use, lack of marketing features, pricing, and so on…
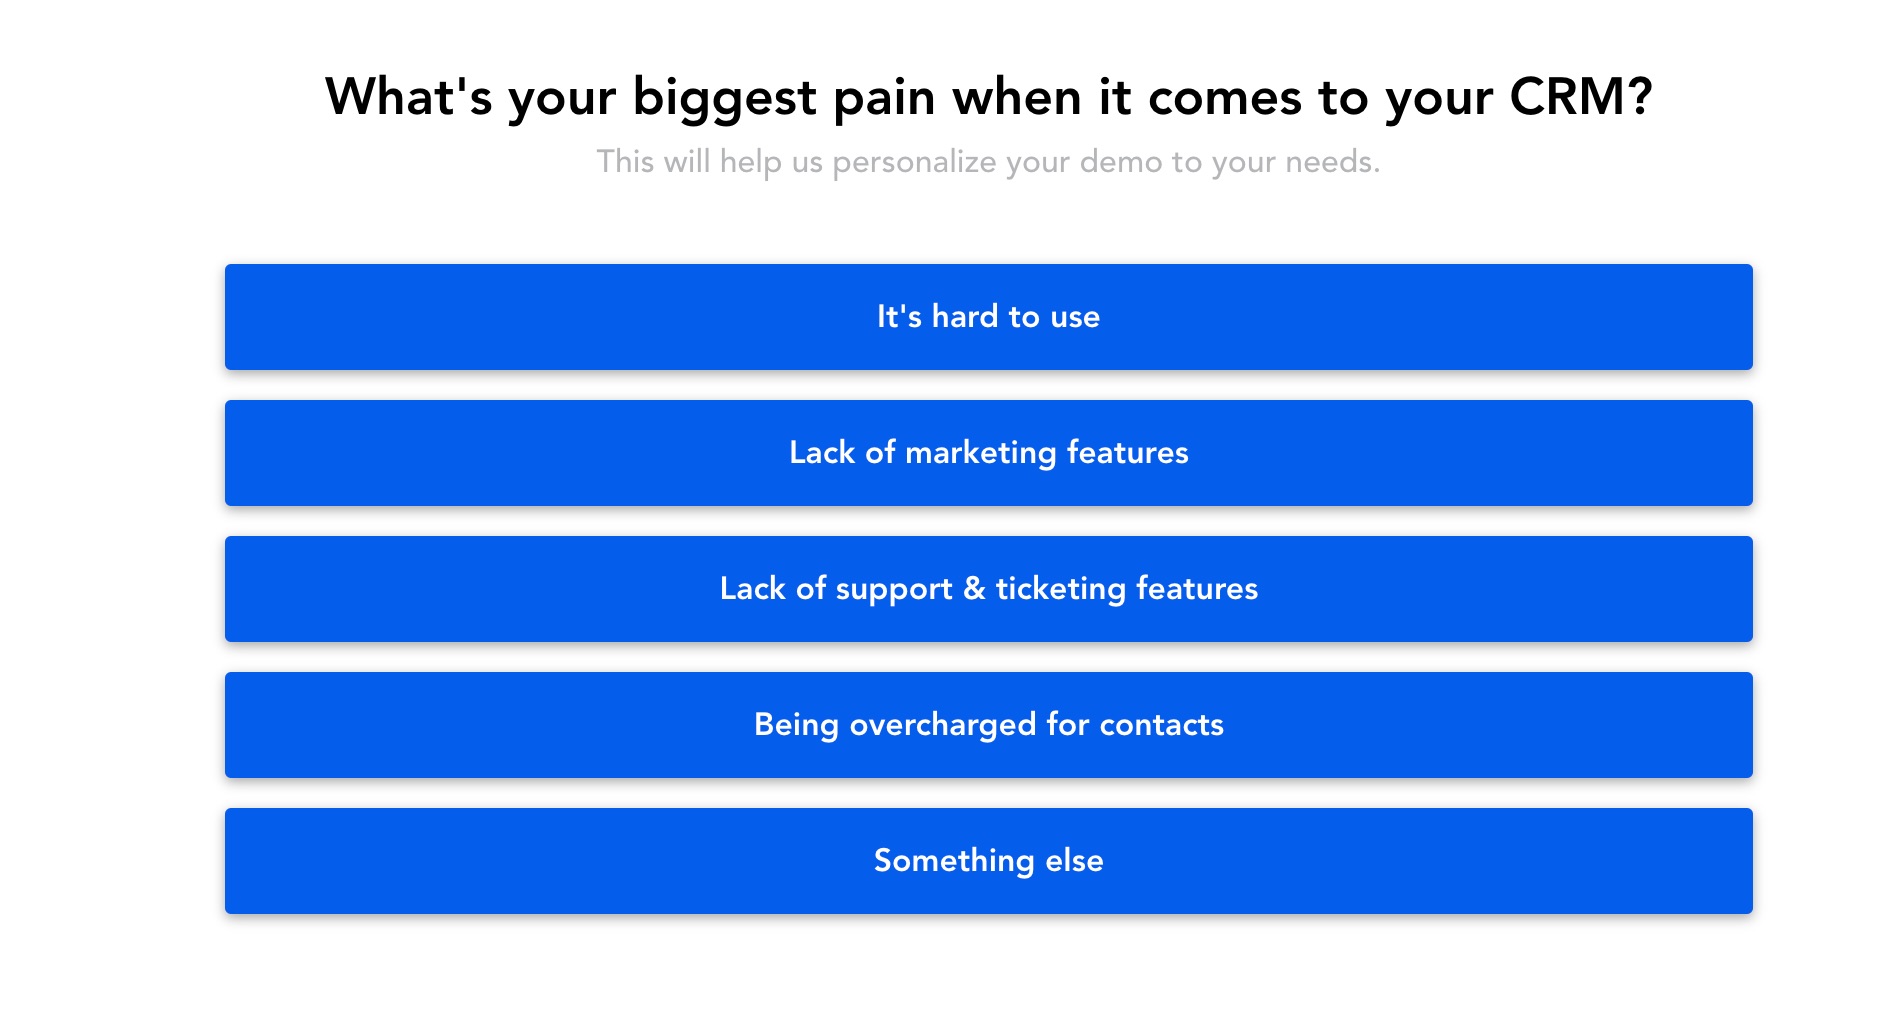
What’s really cool here is that you can capture the response and store it in a custom property called ‘Pain’.
Then from there, you can setup a HubSpot Workflow to move anybody into a HubSpot list or email nurture sequence based on the pain that they selected in your multi step form.
For example, I might want to follow-up differently with someone who selected ‘being overcharged for contacts’ than someone who selected ‘lack of marketing features’.
That’s just one use case.
Another is lead routing.
If you were to qualify a prospect based on the company size, then you can route larger leads to enterprise sales reps and smaller leads to an intake team like an SDR who may field smaller opportunities.
That’s the power of using a multi step form with HubSpot. As you can see, a multi step form really opens up the possibilities of what can be done in HubSpot from a nurturing perspective.
Now let’s take a closer look at the HubSpot Forms feature to see what we can build inside of HubSpot.
Can you build forms in HubSpot?
HubSpot is loaded with features — it has everything from ticketing and live chat to meeting scheduling software and email automations.
But what about forms?
Yes, HubSpot provides forms too.
What about multi step forms?
Kind of, sort of but also no not really. I’ll get to that in a minute.
First let’s take a look at HubSpot’s forms.
HubSpot’s Form Builder
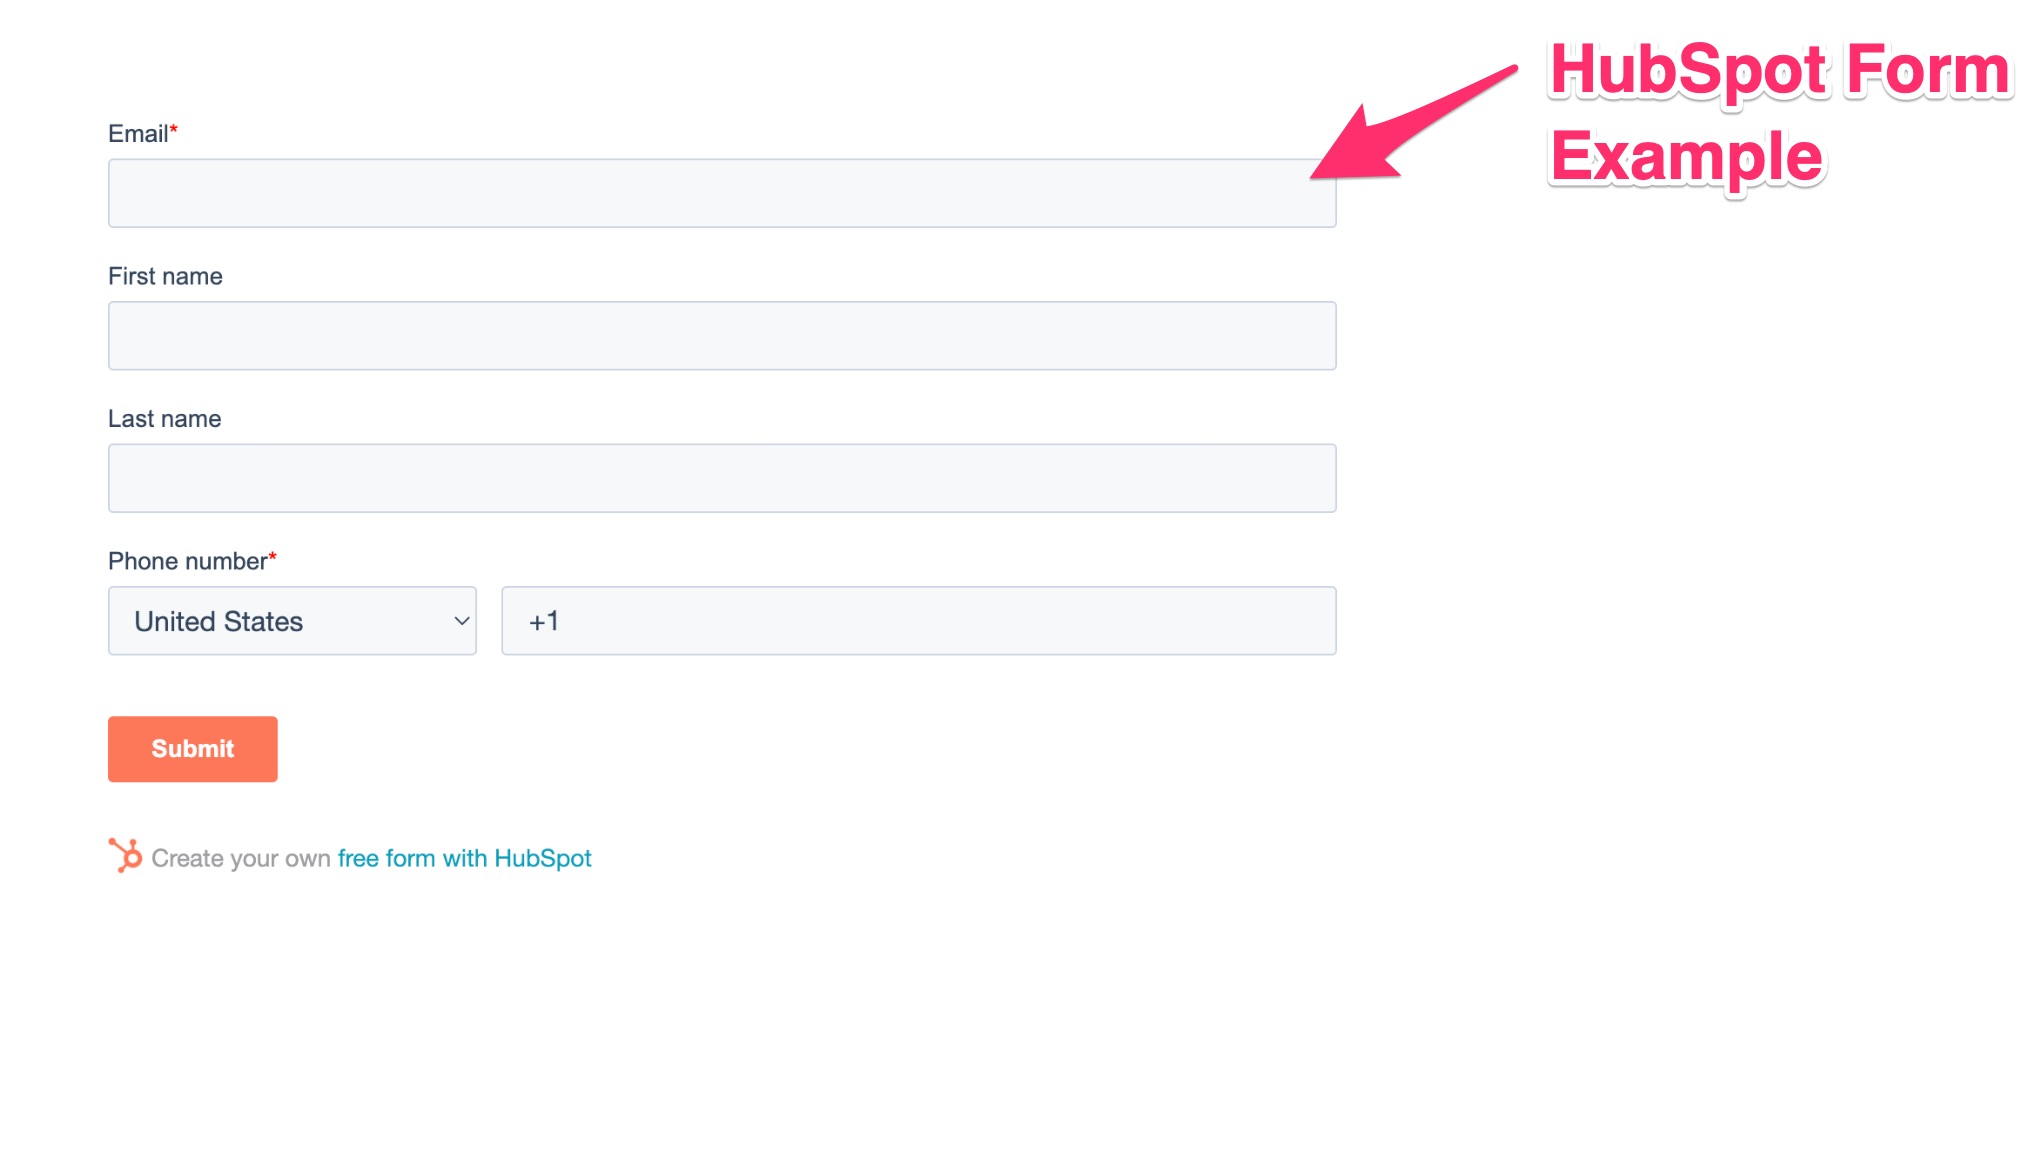
HubSpot offers a simple and easy to use online form builder.
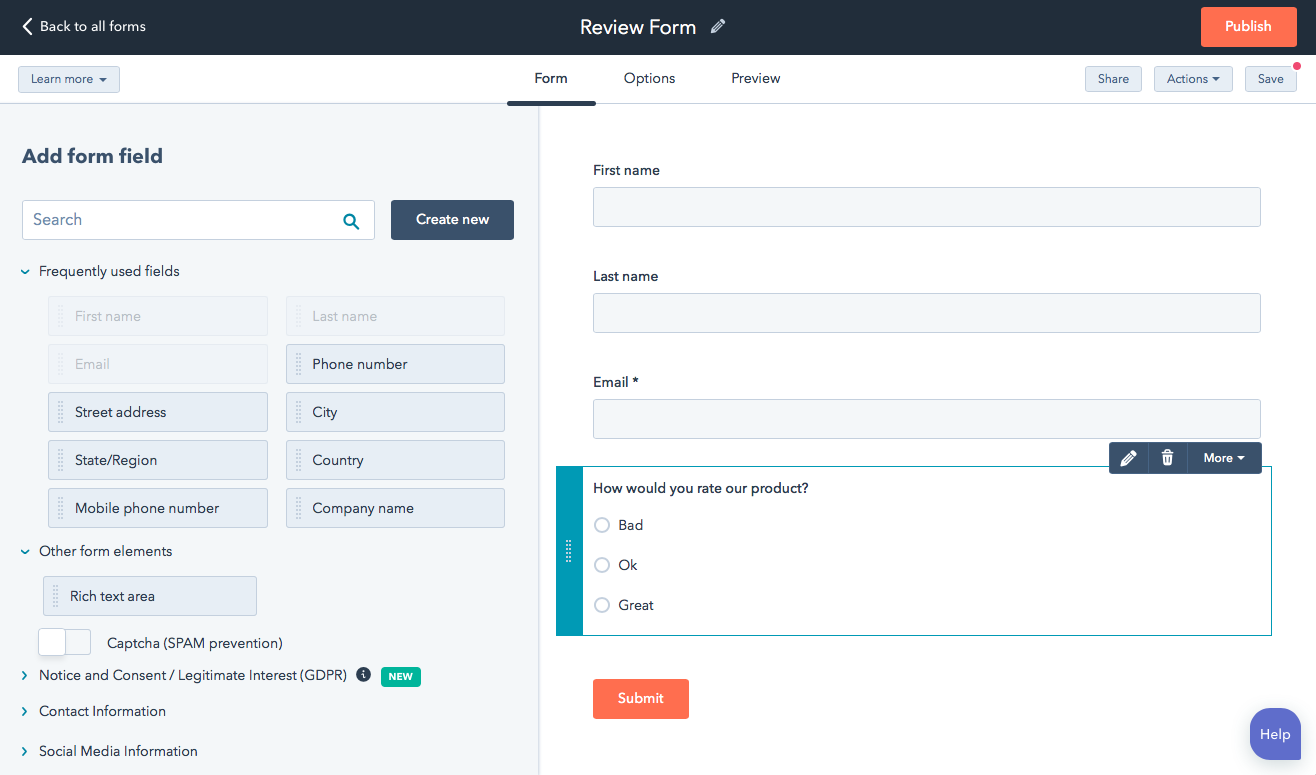
With HubSpot’s Form Builder, you can easily setup a static single step form, which can easily be added to your website and landing pages.
HubSpot’s form builder offers all of the standard form fields that you’ll need, including more advanced fields and conditional logic. In addition, you can setup your form to route leads to your email and into a HubSpot list pretty seamlessly — which makes adding your new leads into your CRM a breeze.
HubSpot Forms: The Good & The Bad
The good:
- HubSpot Forms look great and have a modern UI
- Very easy to setup
- Integrates seamlessly with the HubSpot CRM
- Ability to route leads to an email address
- Pretty easy to add to a WordPress landing page and other landing page builders
- Can redirect to a custom thank you page
The bad (or not so good):
- Extremely hard to turn into a sophisticated multi step form
- No conditional logic out of the box
- Lacking more advanced features like Address Autocomplete and SMS Phone Verification features
- Lacks of conversion-focused features like: advanced pop-up settings, social proof, and other conversion focused UI tweaks
- Hard to measure at a deeper level to know exactly what to optimize
Don’t get me wrong, HubSpot built a great form tool and I’m not knocking it at all. If you’re just looking for simple single-step contact forms then HubSpot is probably the way to go.
However, if you’re in need of more advanced lead generation (or lead qualification) forms with built-in features to help boost both conversion rates and lead quality, then HubSpot will most-likely fall short for you in this area.
Is it possible to create multi step forms in HubSpot?
Now let’s talk about actually creating multi step forms in HubSpot.
At this point you might be thinking:
“HubSpot forms sound pretty basic. Can I even build a multi step form in HubSpot?”
The answer is — “sort of”…
Out of the box, HubSpot does not make it easy to build multi step forms.
In fact, there’s no actual multi step form builder and no way to easily create HubSpot forms with conditional logic.
As you can see in this HubSpot community forum, creating a multi step form in HubSpot is pretty complex.
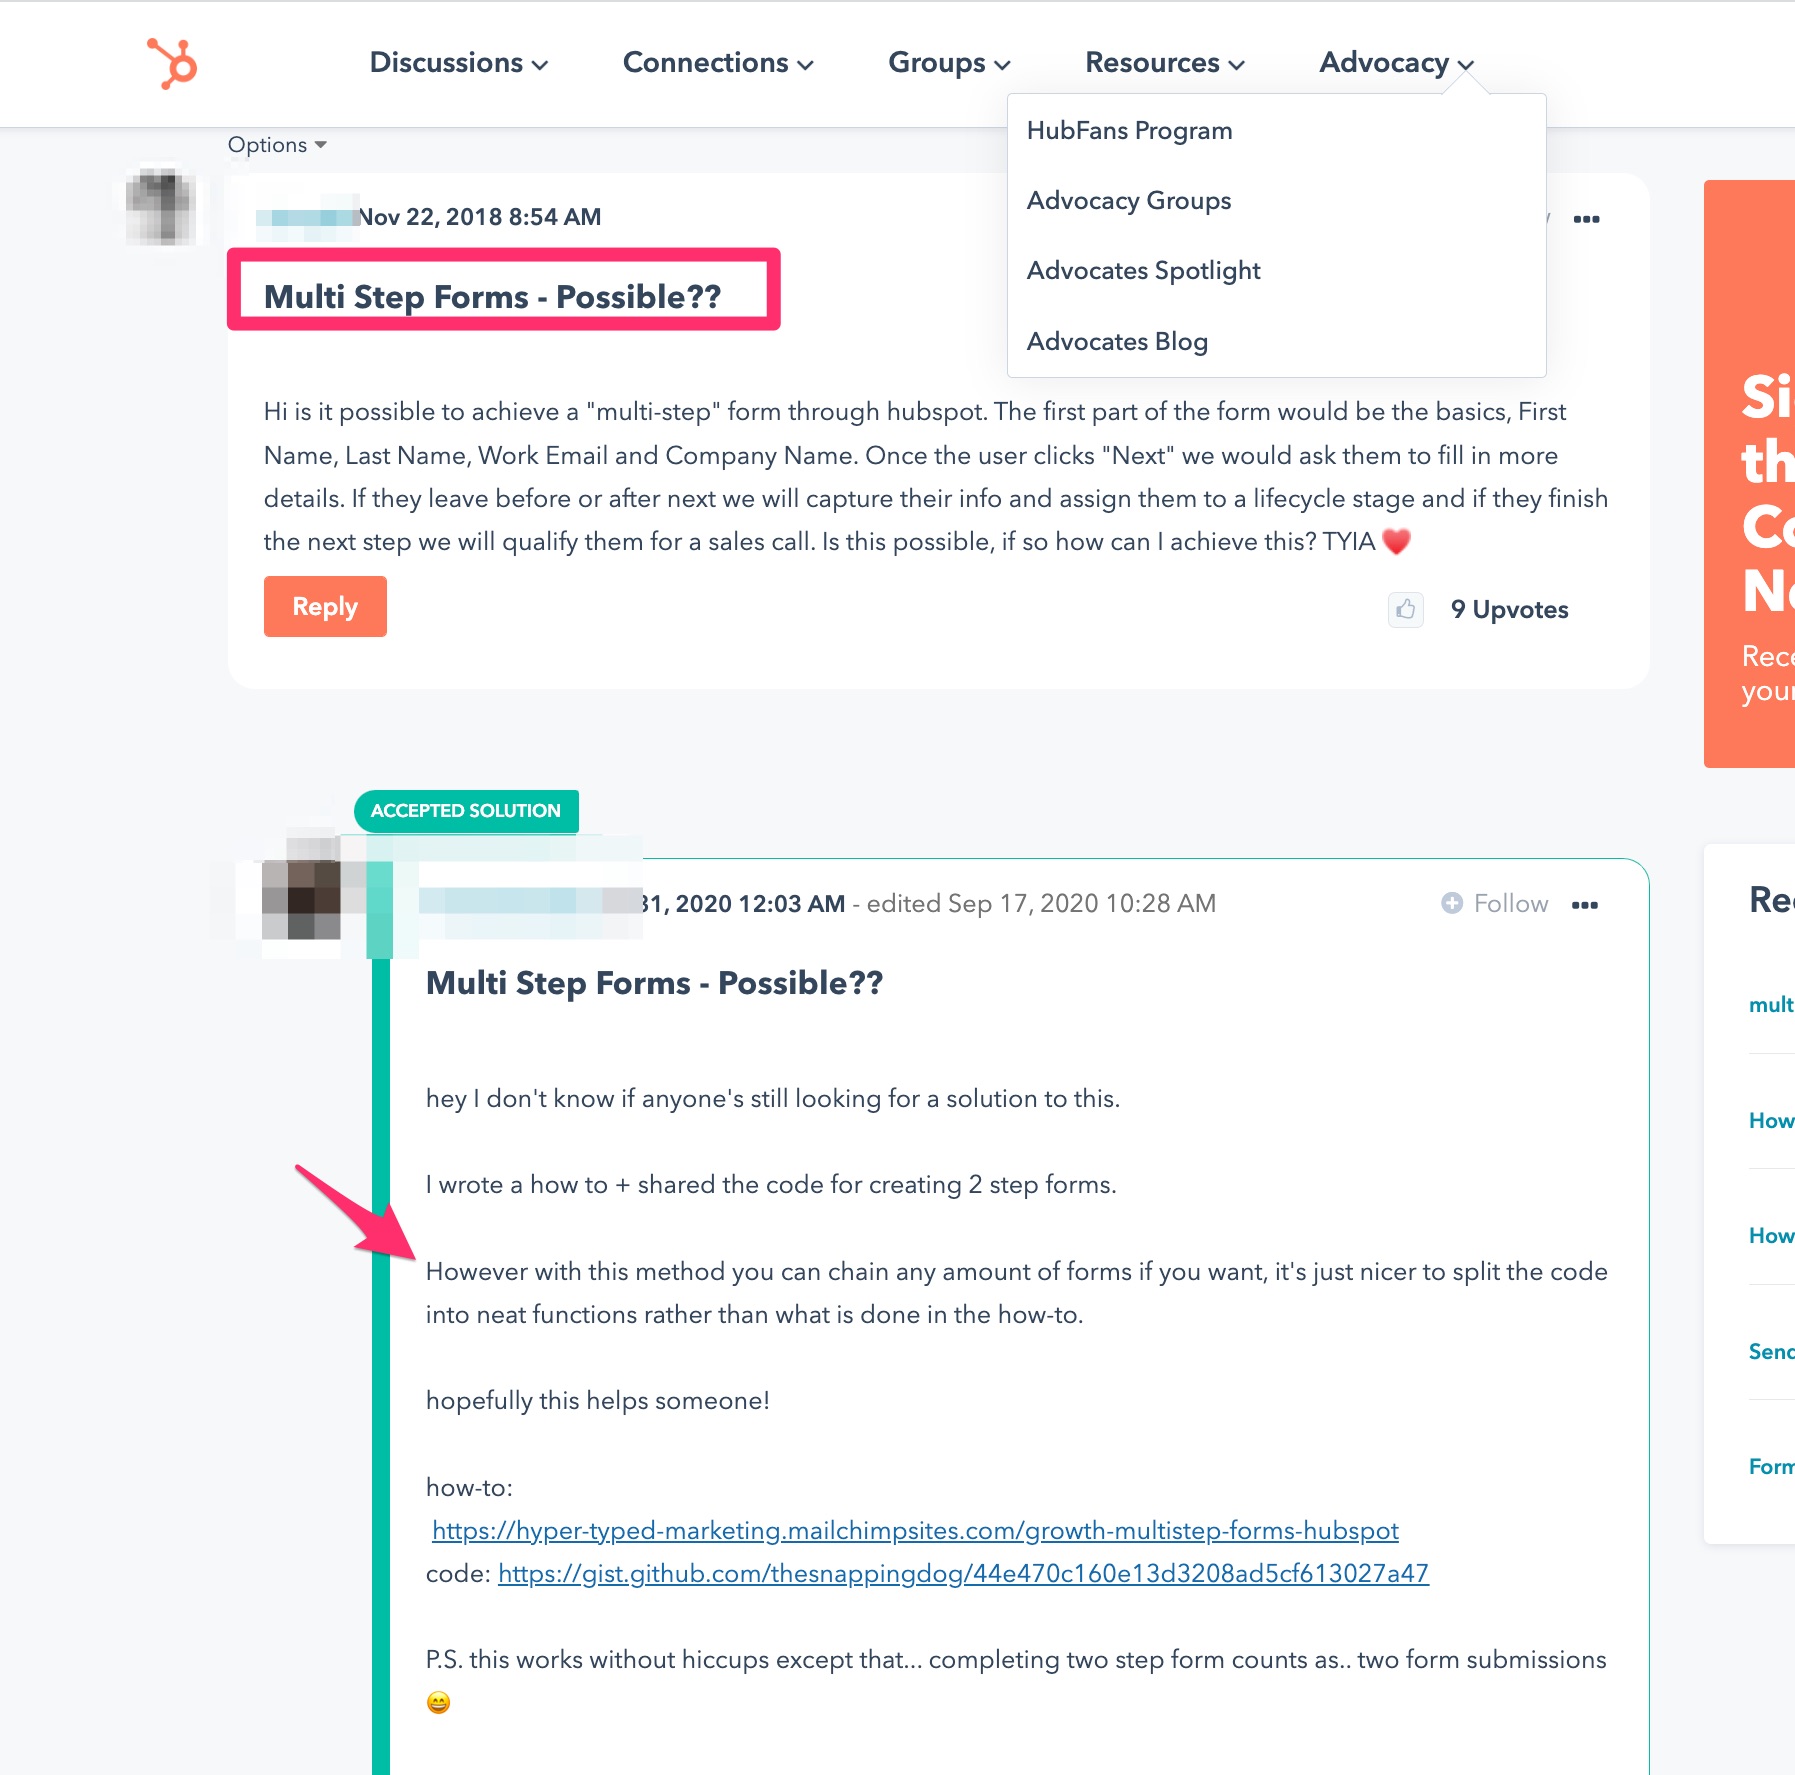
The process involves ‘chaining different forms together’ and using custom code to make it work.
This isn’t ideal if you’re a busy marketer. And it’s less ideal if you need a reliable feature rich multi step form.
But don’t worry, there are other solutions.
The easy way to create HubSpot multi step forms
Since HubSpot doesn’t make it easy to build multi step forms, interactive forms, or survey style forms out of the box, the easiest way to build your multi step form for HubSpot is to turn to a multi step form builder that integrates with HubSpot.
Fortunately, HubSpot offers a number of form builders in the HubSpot App Marketplace. But unfortunately, most don’t allow you to build high converting multi step forms or any sort of HubSpot multi step form plugin. And those that do, aren’t really that great at it if I’m being honest.
That’s why I recommend turning to GetLeadForms to help you build multi step forms that can integrate directly with your CRM.
GetLeadForms is a multi step form builder that allows you to create high converting multi step forms for any website and landing page. You can then easily send your leads right into HubSpot.
Features include:
- Multi step from builder with free templates to help you build sophisticated multi step forms, lead quizzes, lead surveys, and lead funnels that seamlessly integrate into your HubSpot CRM with our HubSpot Integration.
- Ability to be added to almost any website or landing page, including HubSpot’s landing page builder.
- Different embed options: Embeddable, timed popup, exit popup, click popup, etc.
- Advanced features such as SMS OTP Phone Verification and Google Powered Address Auto Complete to improve lead quality.
- Conversion boosting features built-in such as real-time social proof, personalization, and more.
- A/B testing capability
- Build-in metrics that include total leads, conversion rates, and drop-off rates for each step
Whether you’re capturing B2B leads or if you’re in B2C generating leads for service based businesses, GetLeadForms has all of the features that you’ll need to create high converting multi step forms for HubSpot.
If you’re interested in trying GetLeadForms, you can start your free trial here.
Now that we discussed why you should build multi step forms for HubSpot and some of the drawbacks of their Form tool when it comes to building these more sophisticated interactive forms, I want to spend the rest of this post showing you how to actually setup a really good multi step form that integrates with HubSpot.
How to build multi step form in HubSpot using GetLeadForms
In the sections below I’ll cover:
1. How to build a multi step form in GetLeadForms
2. How to connect your multi step form to HubSpot, so you can send leads into your CRM.
For this example, imagine that you’re running marketing for a B2B SaaS CRM and the goal is to capture more high intent demo leads through a form that’s broken into multiple step, which will then get sent into a list in your HubSpot CRM for further nurturing.
If you would like to follow along you can grab a free trial of GetLeadForms here. There’s no credit card required.
Step 1: Choose a Template:
To keep things simple, we’ll use the template below:
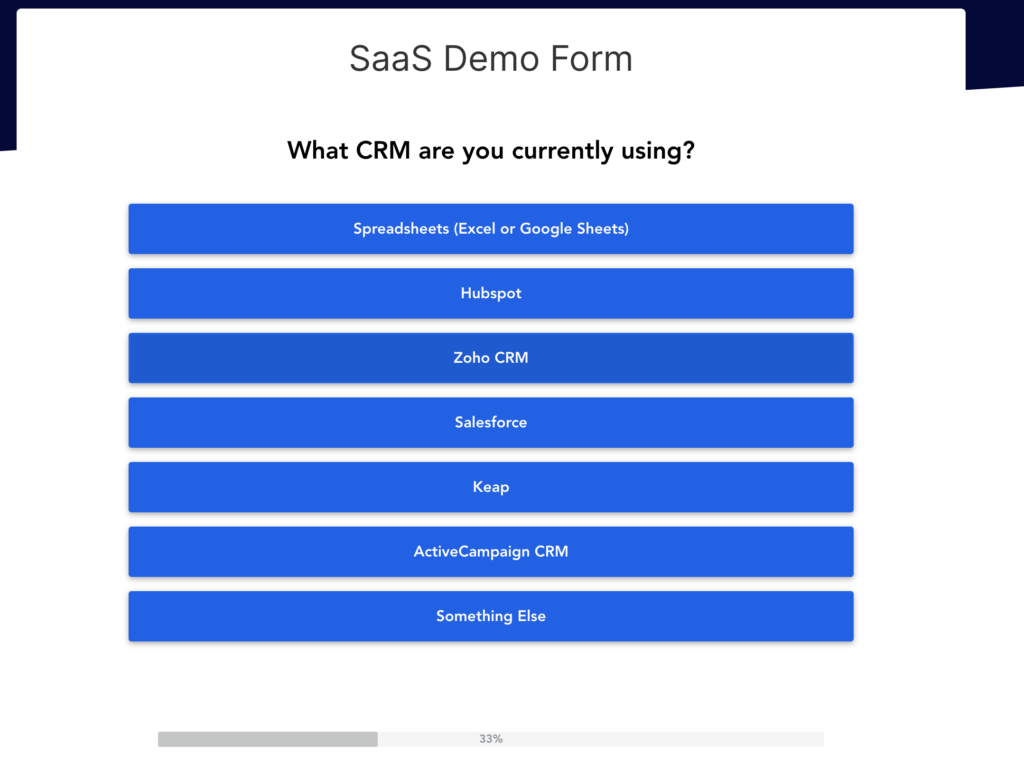
You can grab your own version of this SaaS Demo form template here.
If you’re looking for a different template, don’t worry we offer all different types of templates for almost every industry:
You will have the ability to select a template inside of your account. But you can see all templates here.
Step 2: Get familiar with your lead form
After you select your template, you’ll see it load inside of the GetLeadForms multi step form builder.
Don’t worry, we’ll show you how to connect the LeadForm to HubSpot very soon. For now, let’s just start with the basics.
I recommend getting a little familiar with your LeadForm so you can figure out what needs updating.
A few areas to check out:
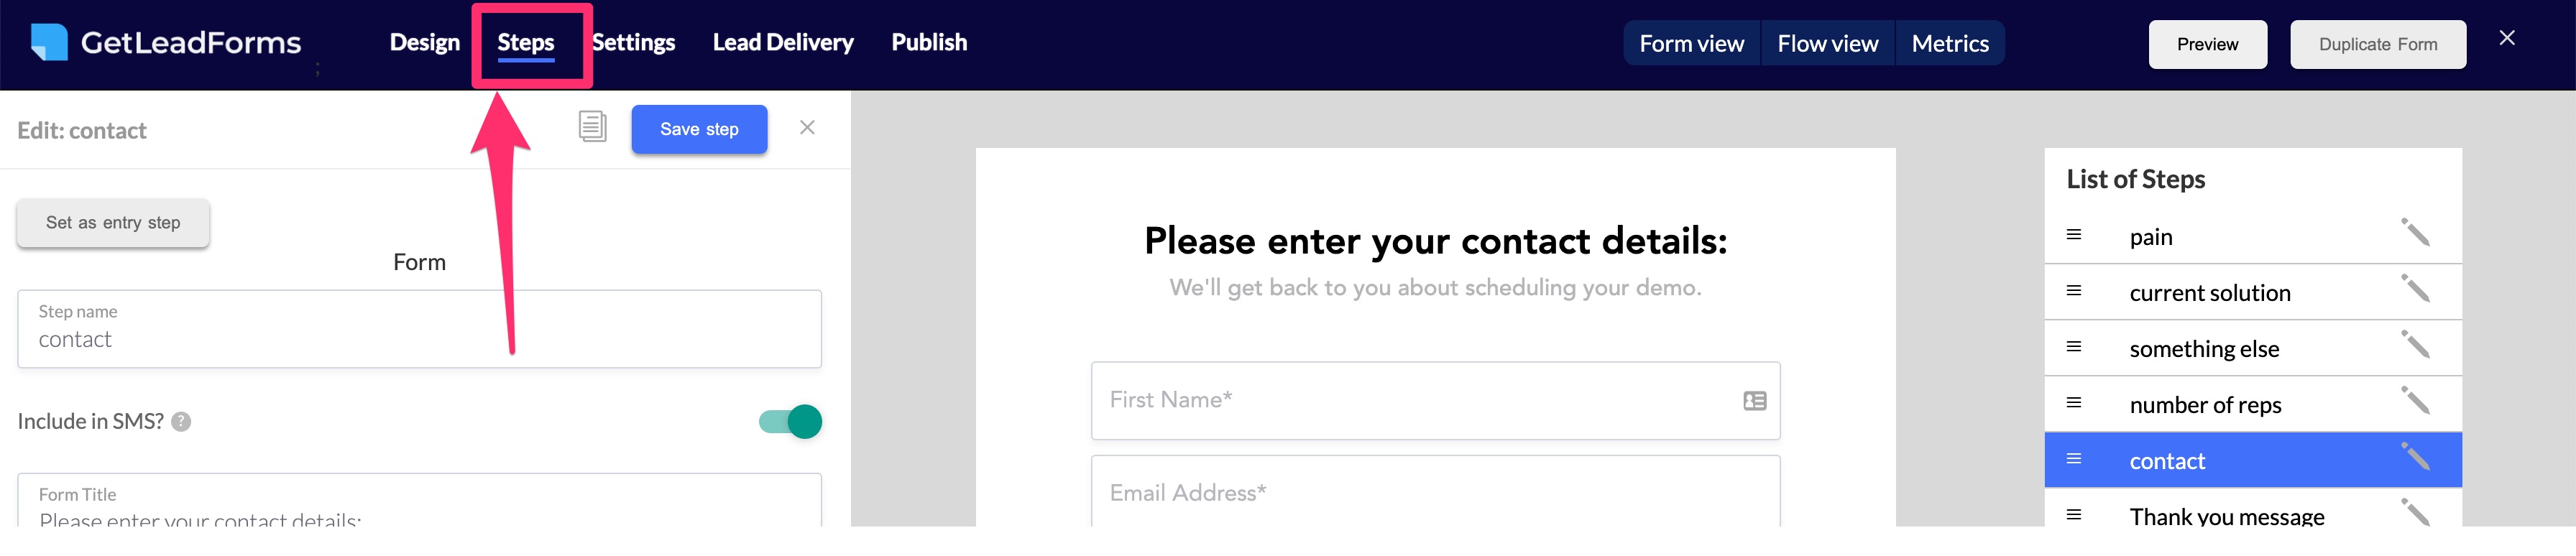
View List of Steps: If you look over to the right hand side of the builder, you’ll see the list of steps within your form. These are all of the main steps/questions that you’re asking your prospect.
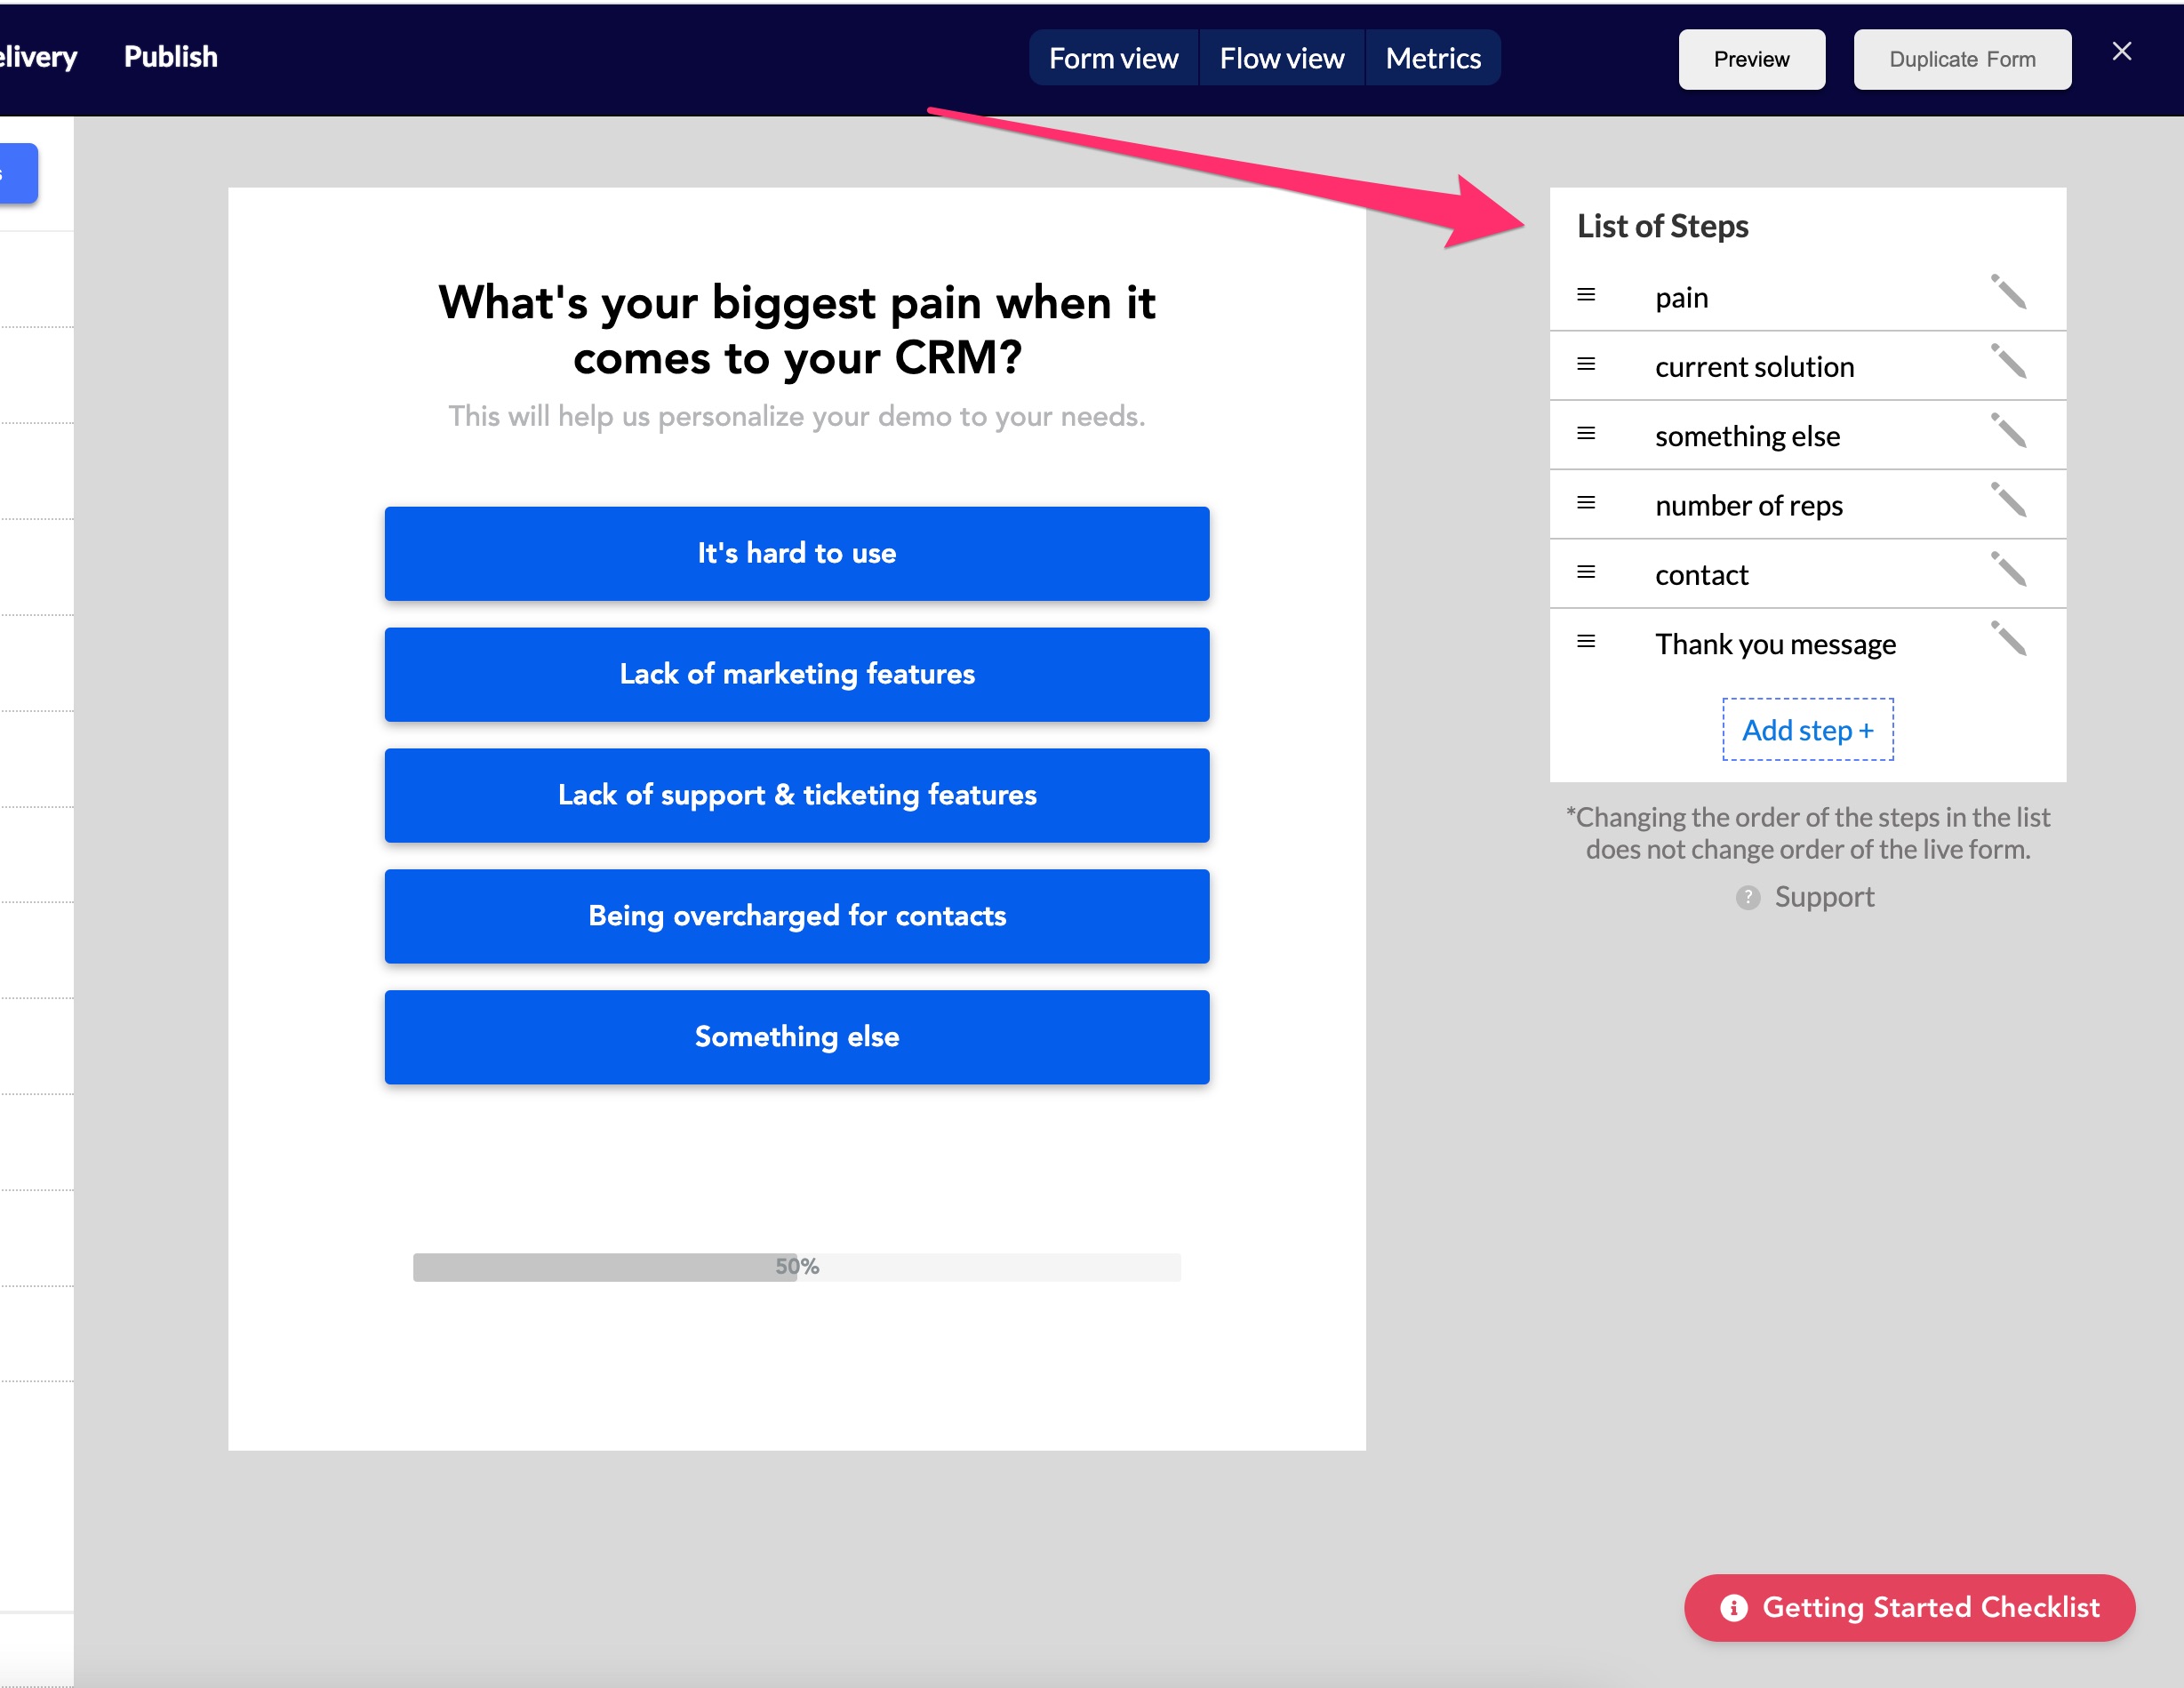
Clicking into each step will open up the step right on your screen – so you can see what it looks like.
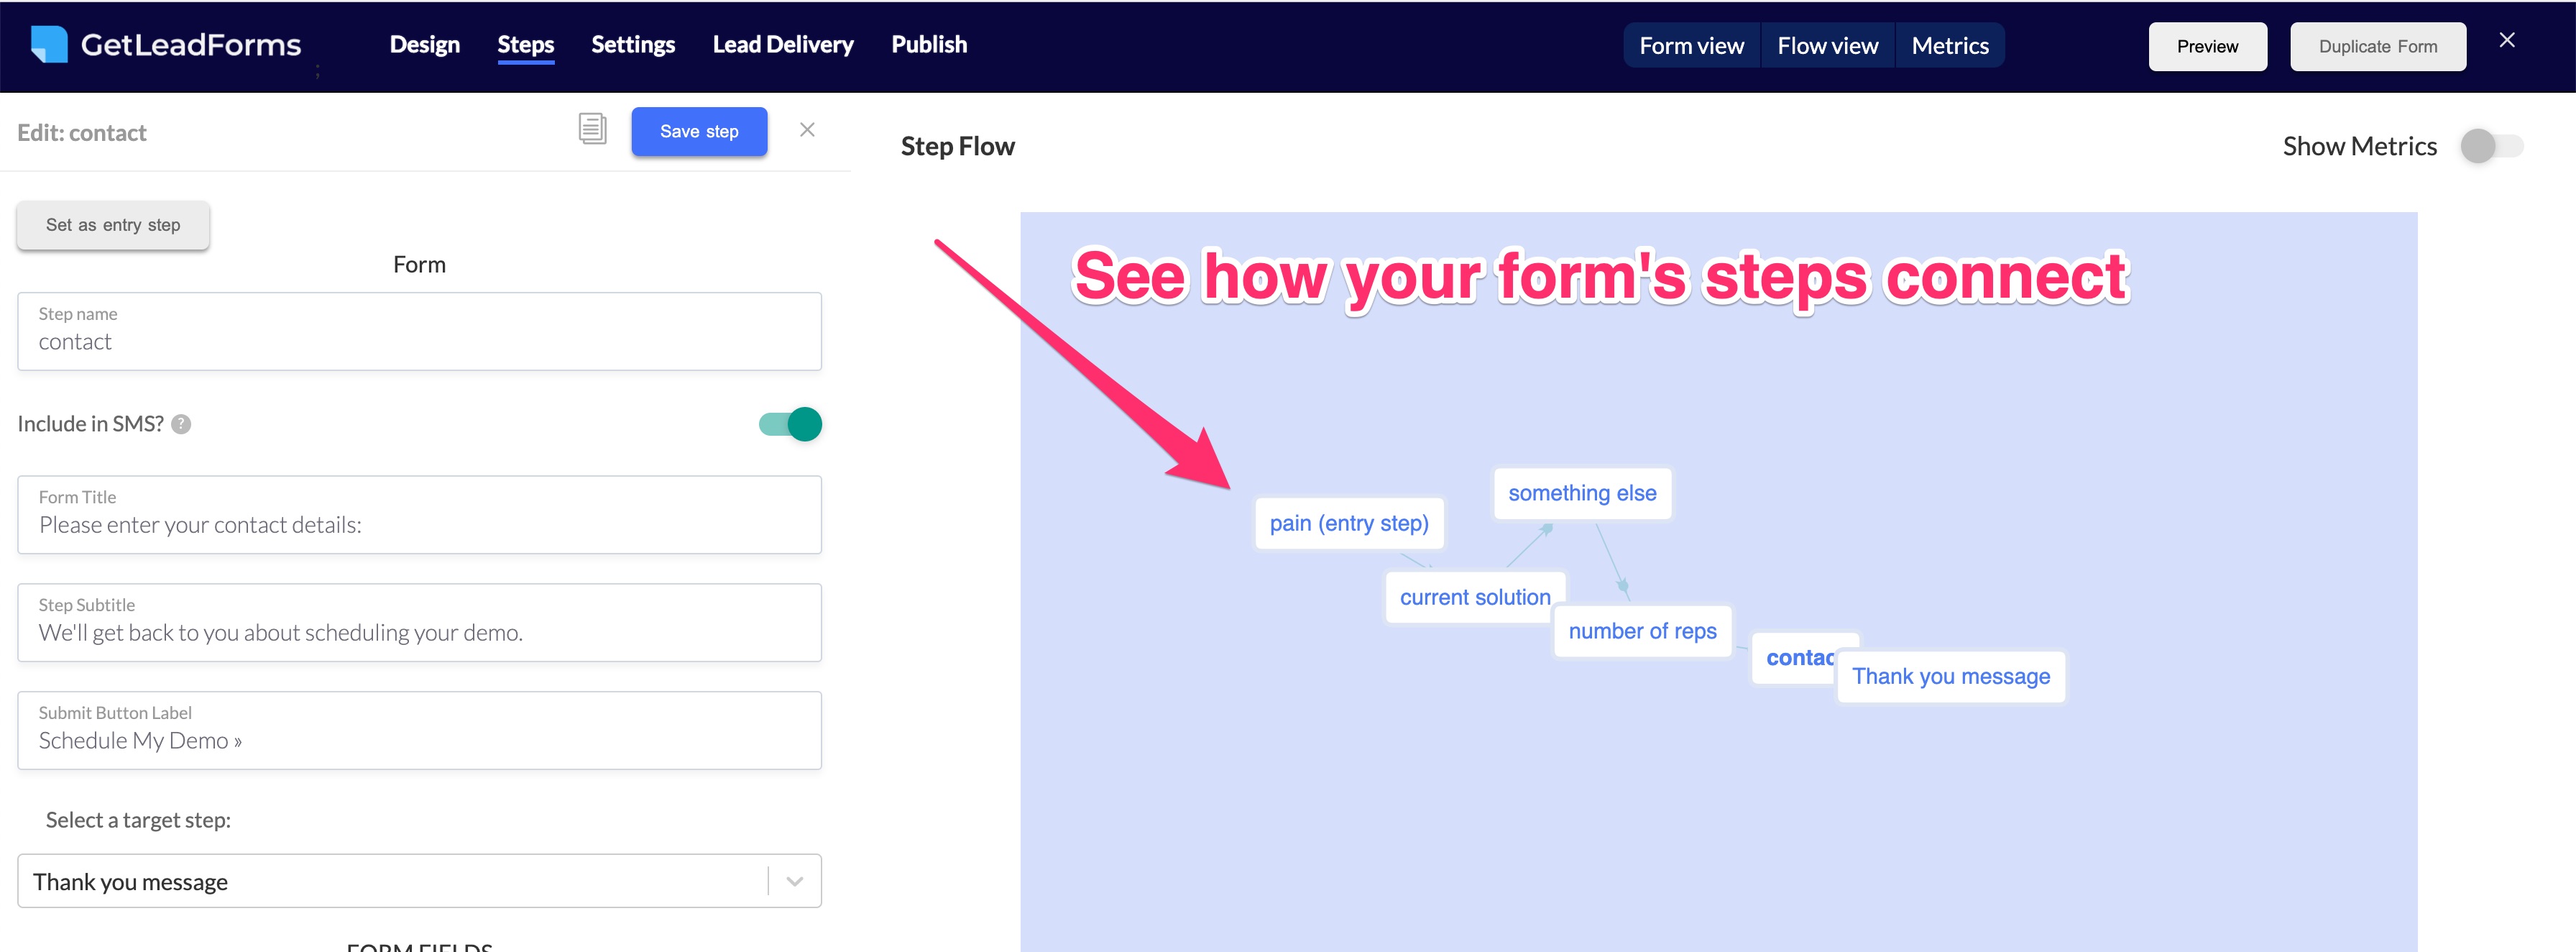
Flow view: If you want to get a sense for how all of the steps connect, click on the Flow view button:

This will give you a bird’s eye view into the flow of your multi step form. This is useful if your form gets more sophisticated with conditional logic.
Click Preview: Preview your LeadForm without embedding it into your landing page. This is a quick way to see your form in action.
Now that you’re a little familiar with your LeadForm, let’s dive a bit deeper here.
Step 3: Adjust your LeadForm’s design
The next step is to adjust the design of your multi step form to match it to your website or landing page.
Simply click on the Design tab to access the primary design options.
As you can see, you can adjust everything from the form background to button colors.
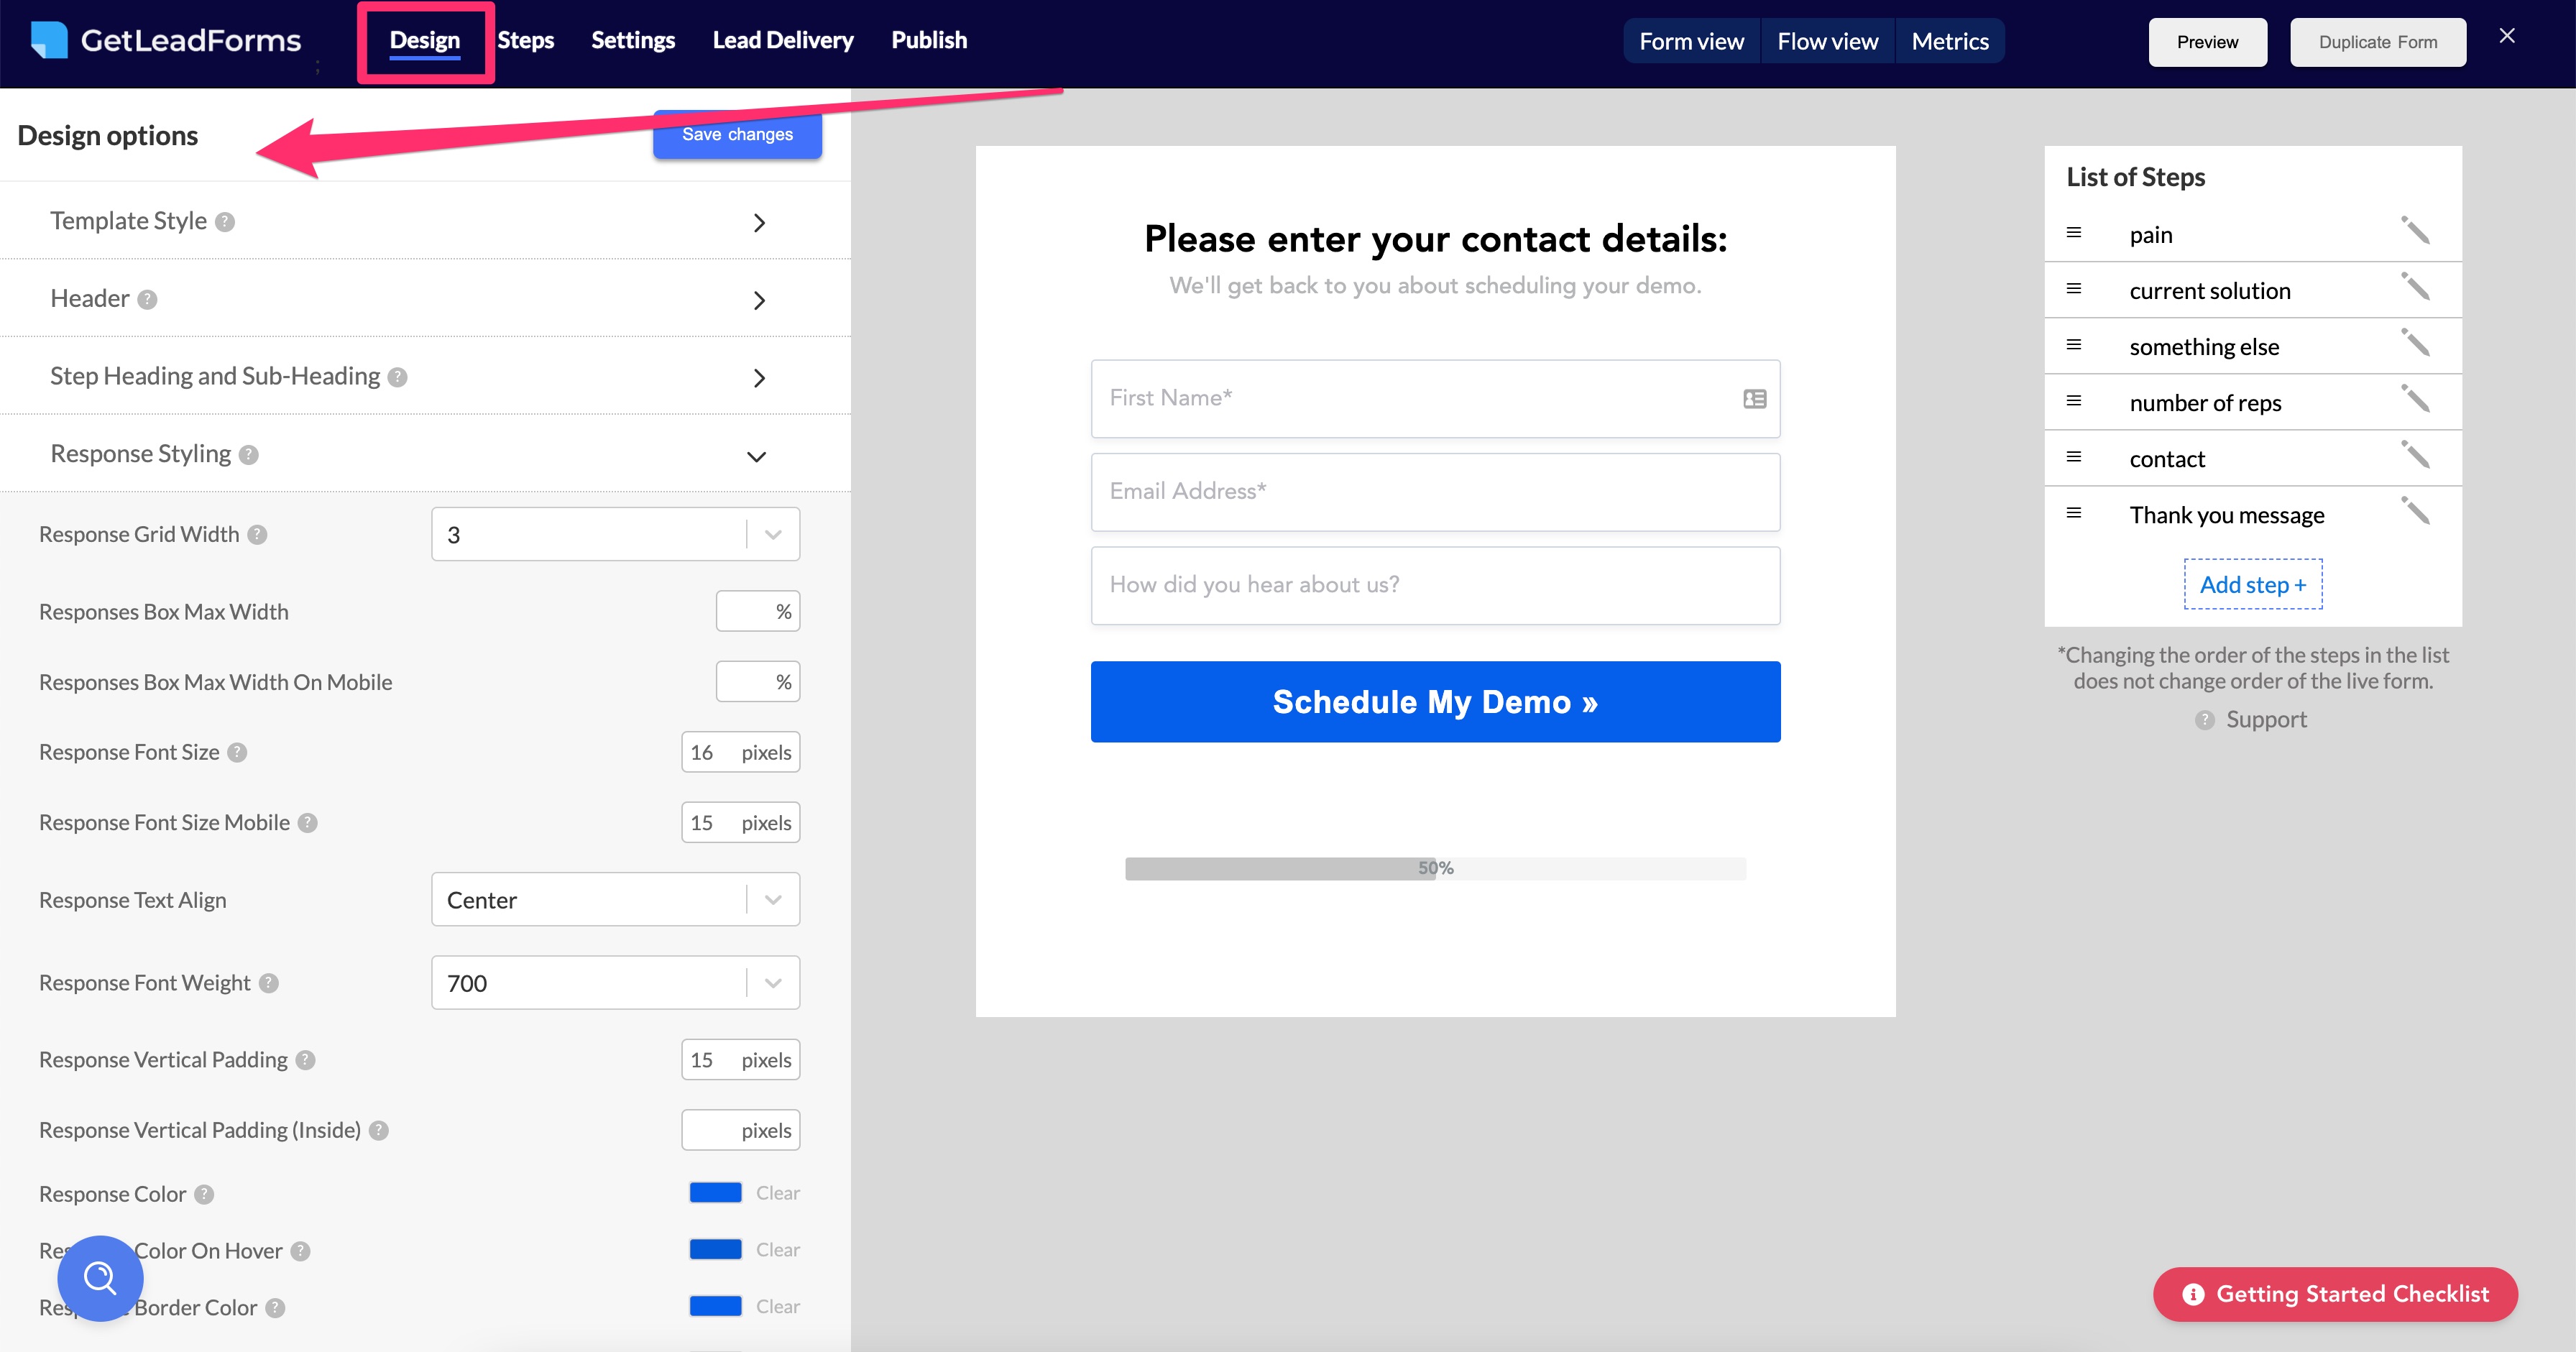
You can even toggle between different style templates. From our traditional multi step form style to a more unique chat style form, which you won’t see any other form builder offer.

What’s great is that there’s absolutely no coding required. Simply adjust some settings and then you’re good to go.
Step 4: Add questions and responses
The next step is to start adding some questions and responses.
This is where you’ll most likely end up spending most of your time, depending upon how far you deviate from the pre-set responses and questions your template.
Simply click on ‘Step’ to bring up the step editor section of the form builder.
If you’re using a template, then everything is already configured for you and ready to go right out of the box.
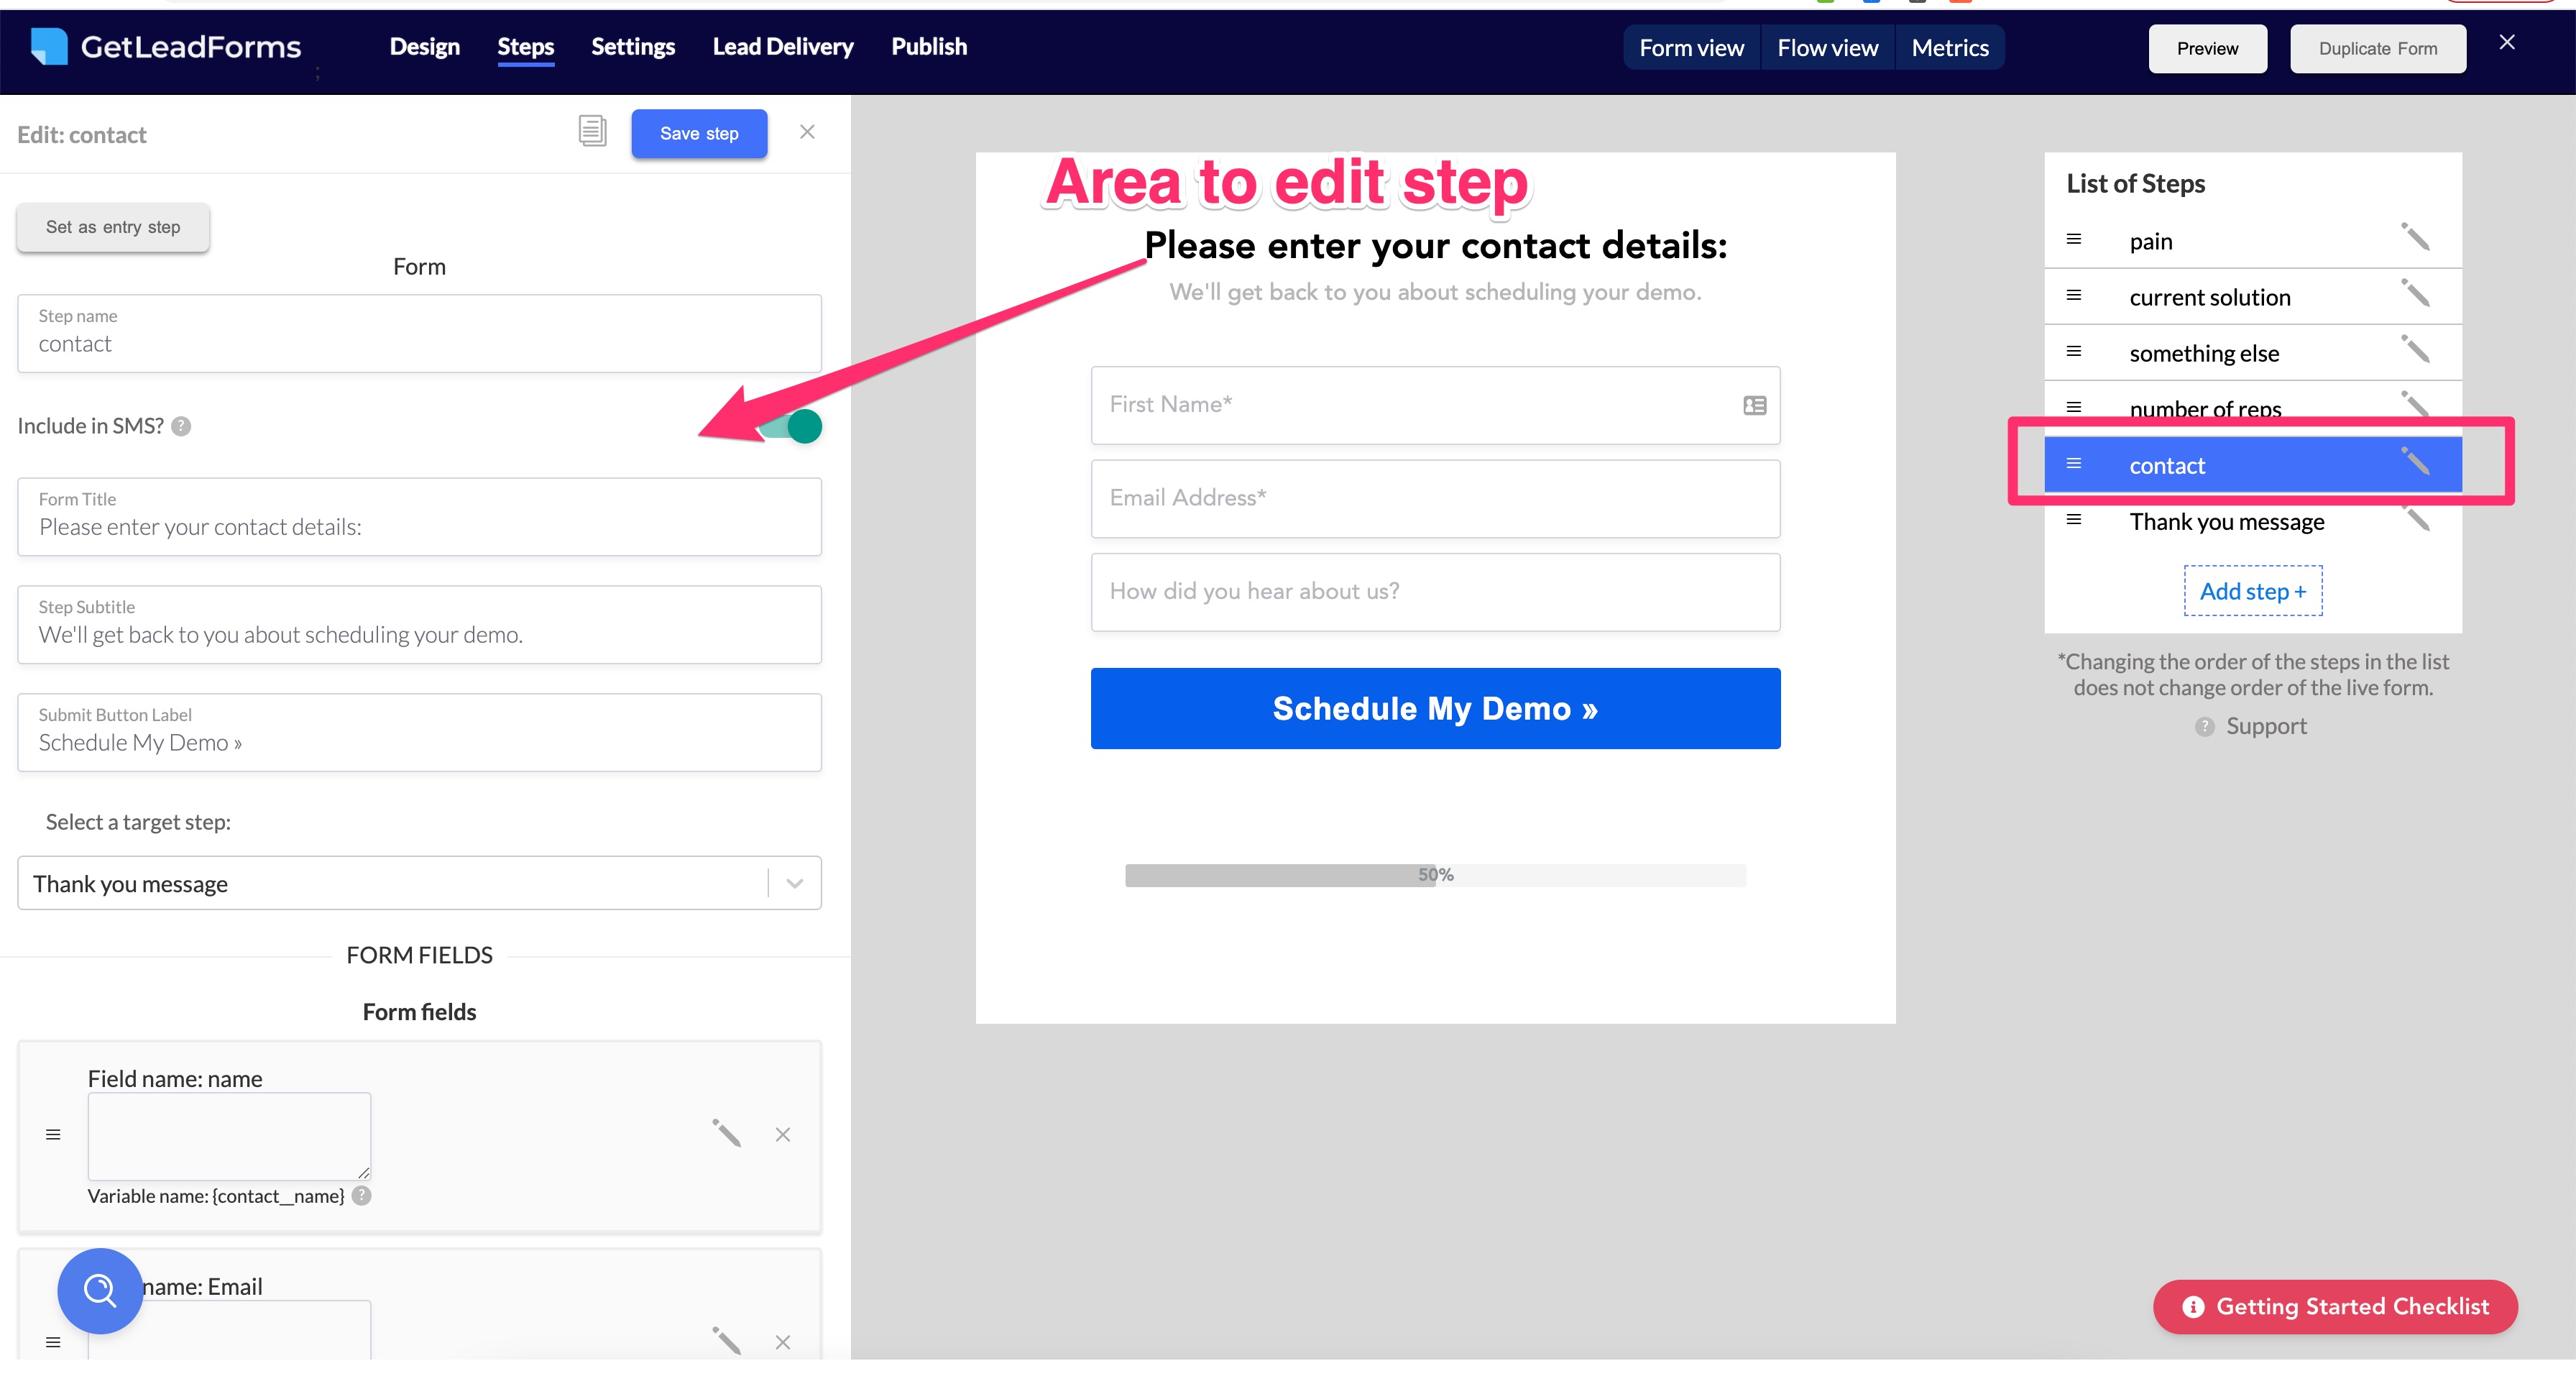
To modify a step or response:
Click into the step in the List of Steps
Then shift your attention to the left hand side of the screen. This is where you’ll do your editing:
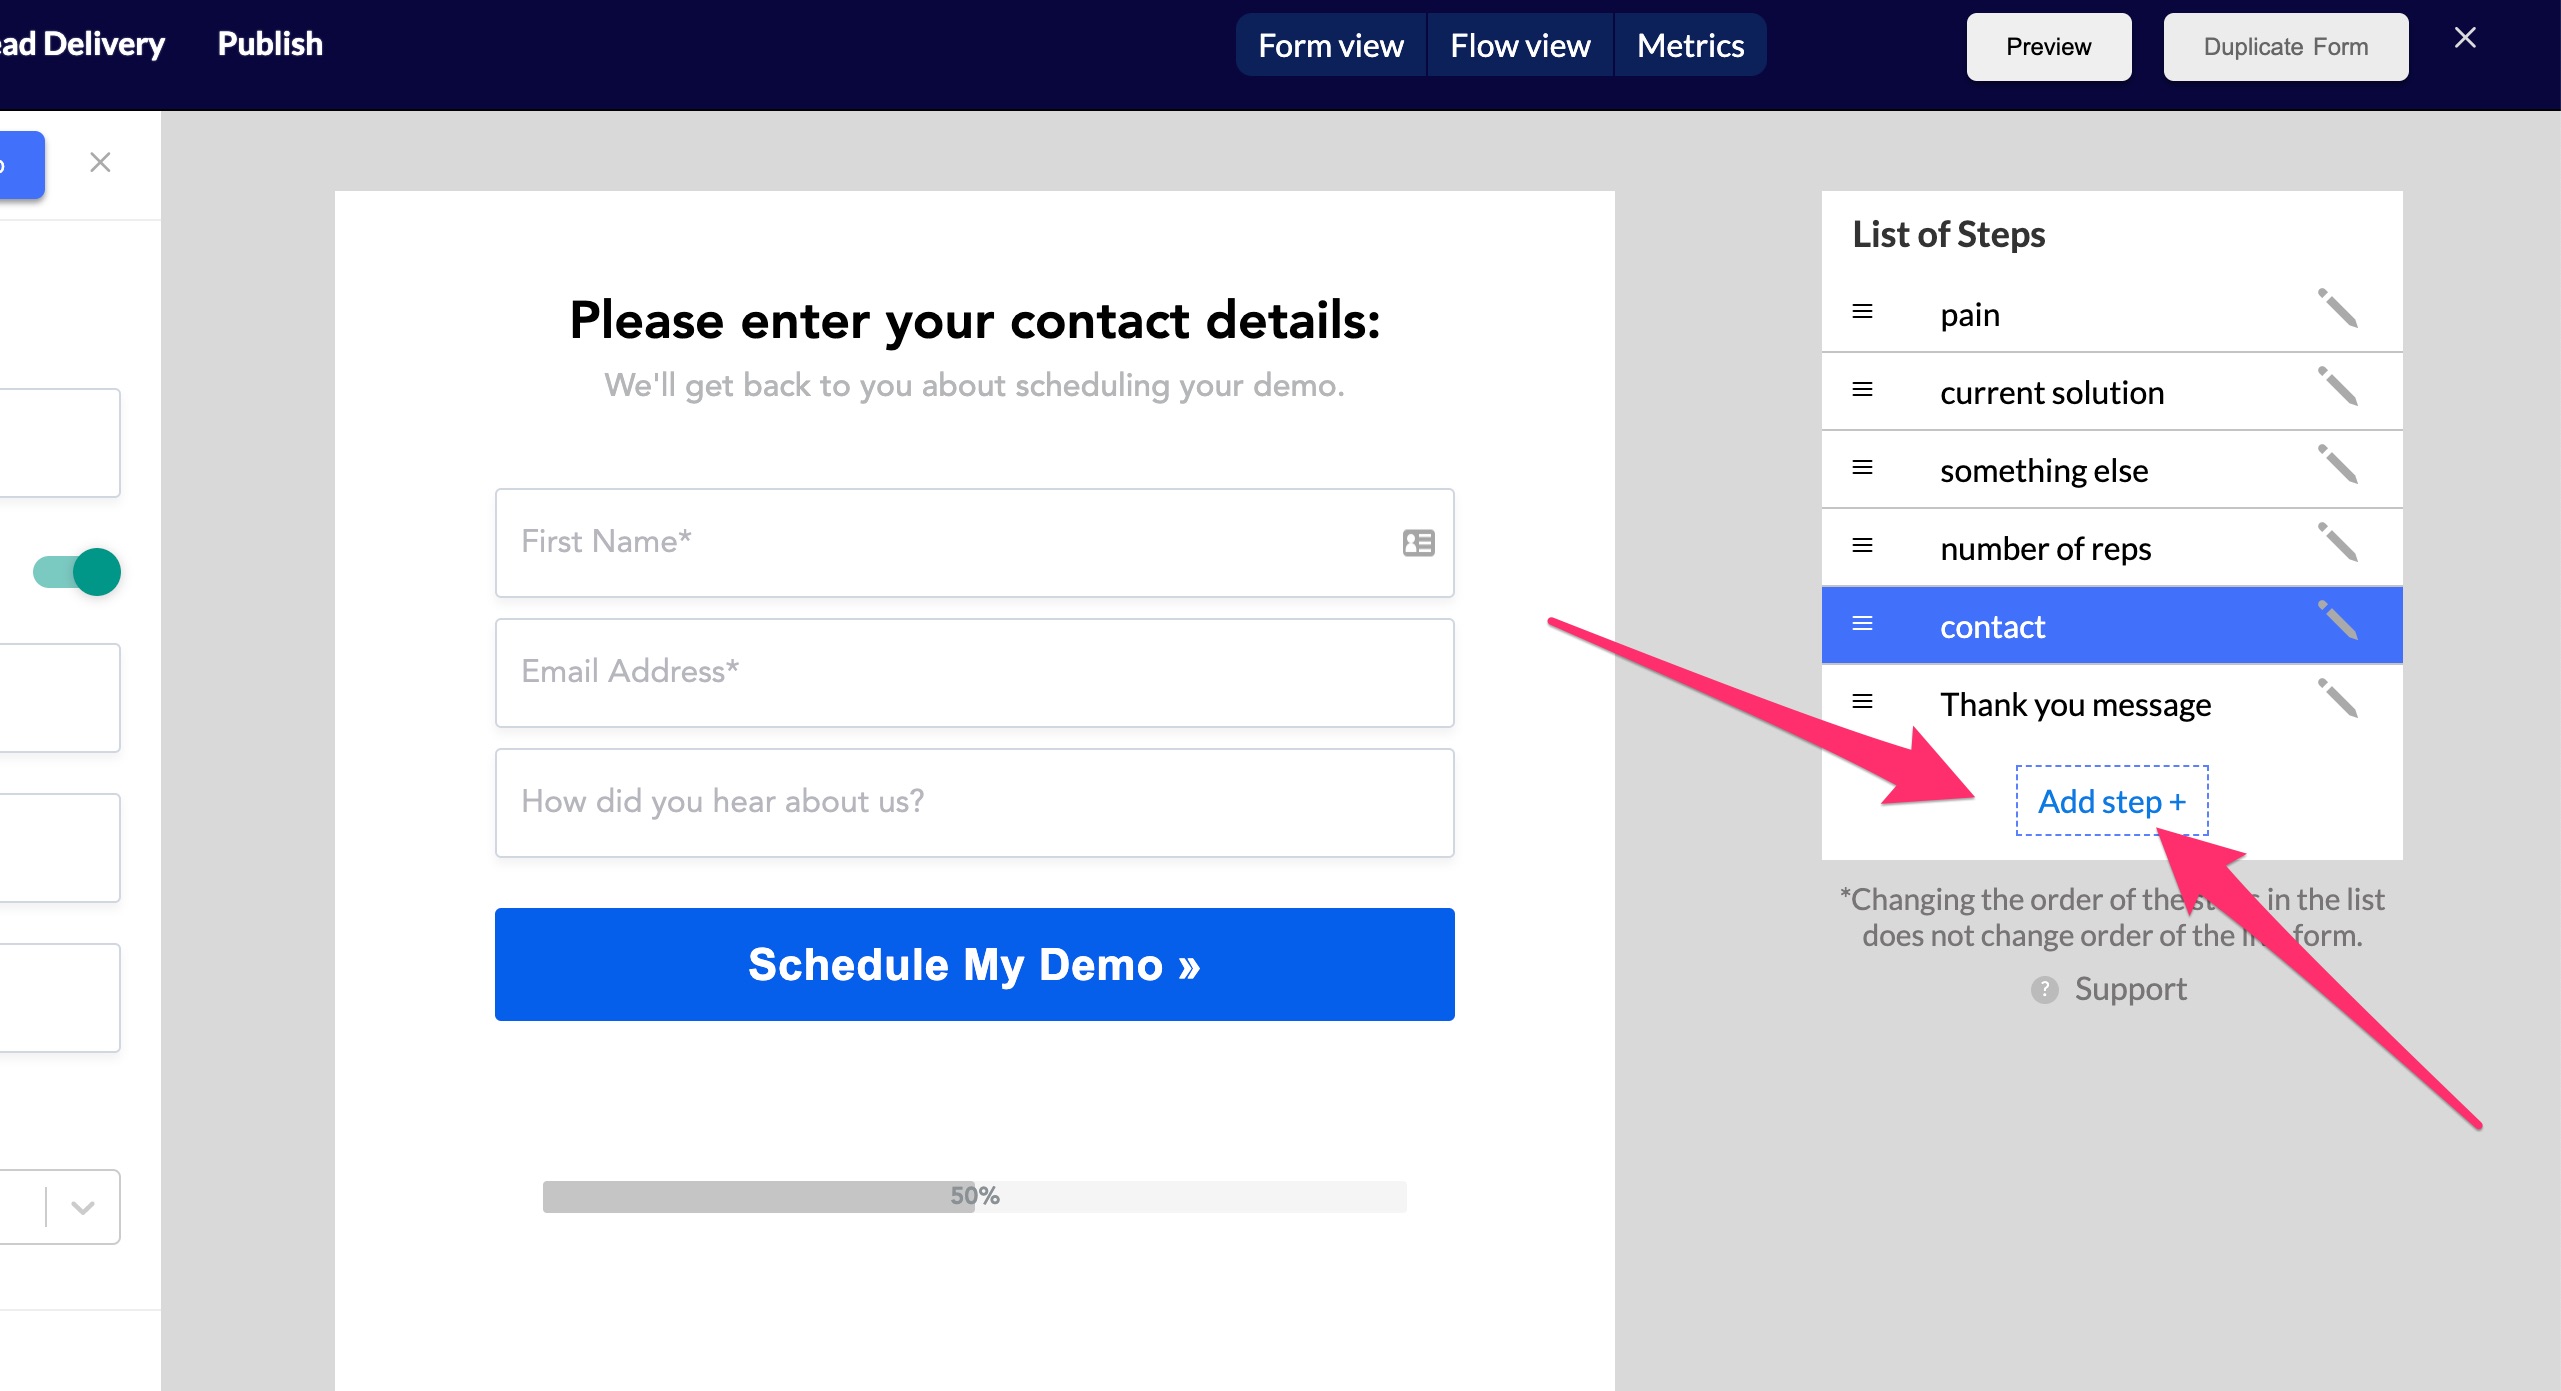
To create a step:
Click on the Add Step + button.
Next, select your step type:
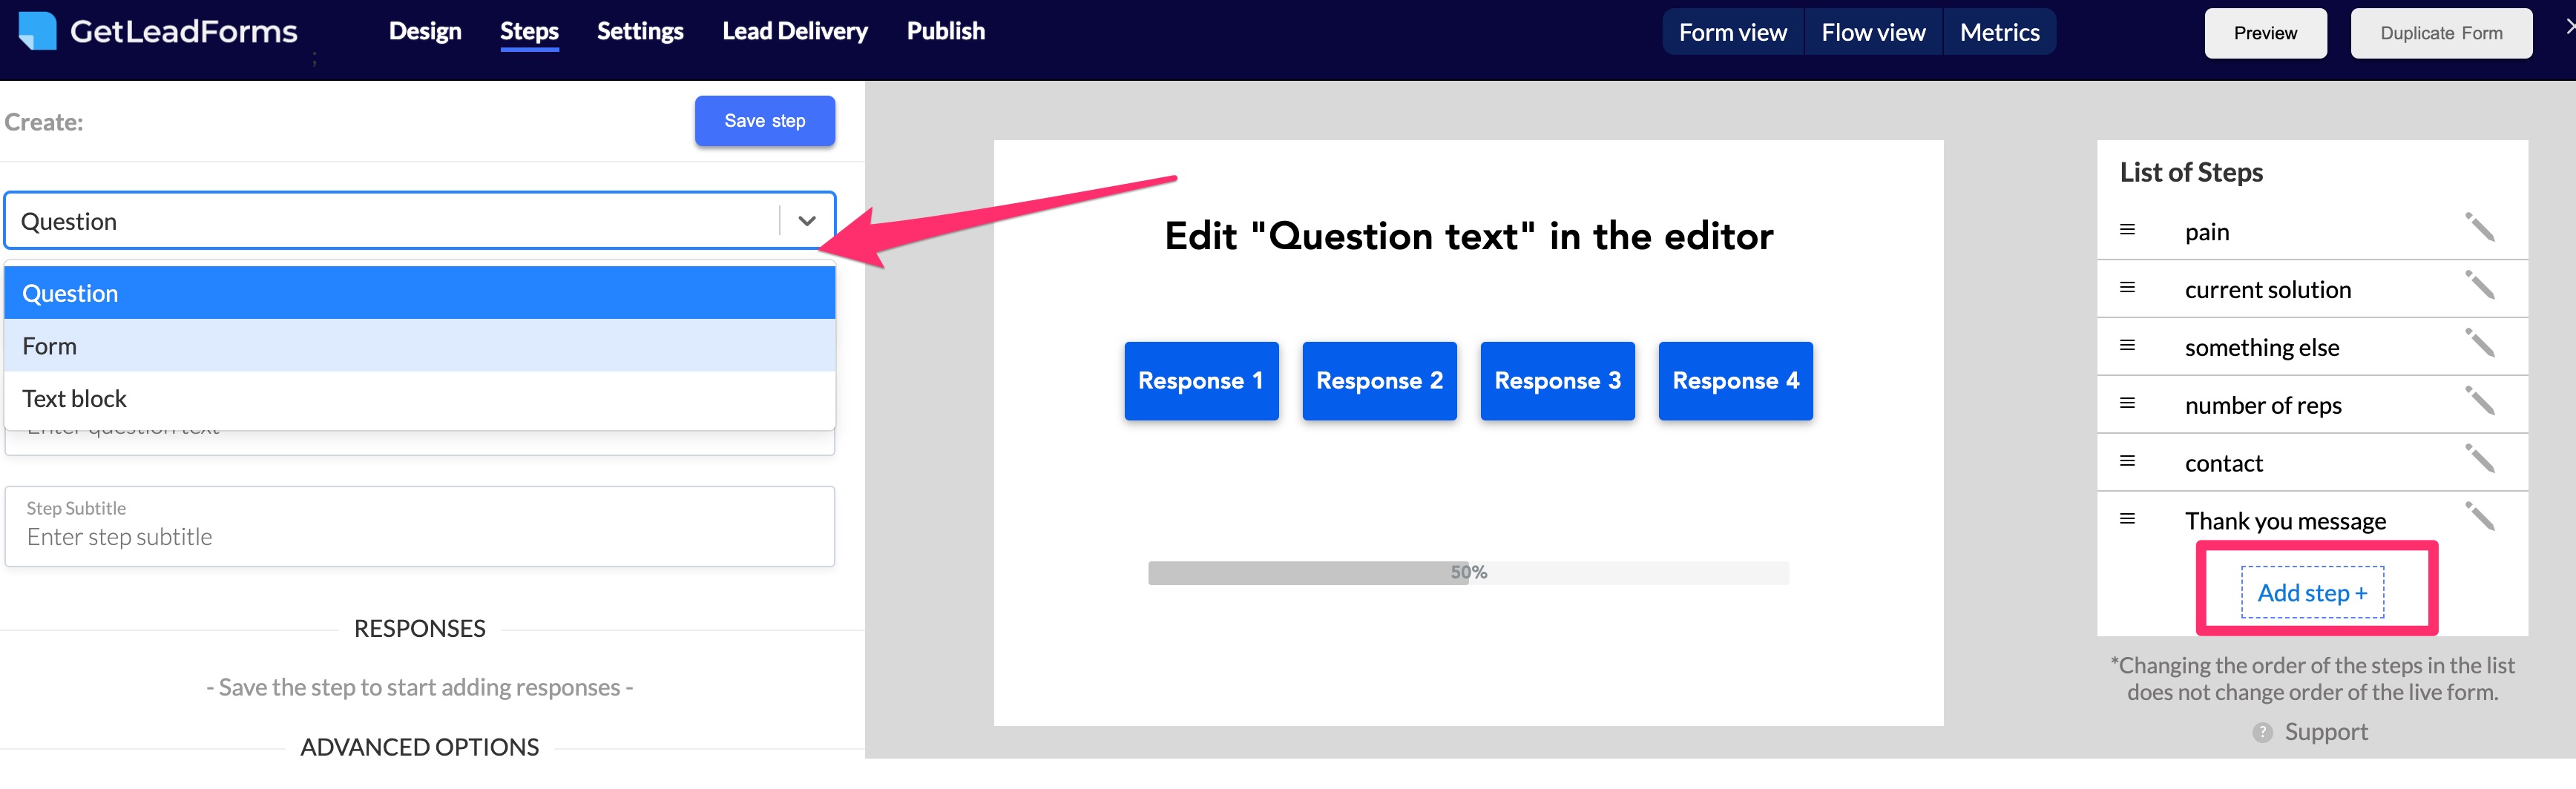
There are three types of steps:
- Question: This is your multiple choice type of response.
- Form step: This is your standard form style response (number inputs, range sliders, name fields, email address, phone, etc)
- Text block: This is just a text block step which is typically reserved for the end of your form.
As you can imagine, building a multi step form can be extremely challenging and complex. Creating a form builder that allows for building multi step forms is even harder, which is why very few companies of tackled this problem. GetLeadForms makes this process fairly easy.
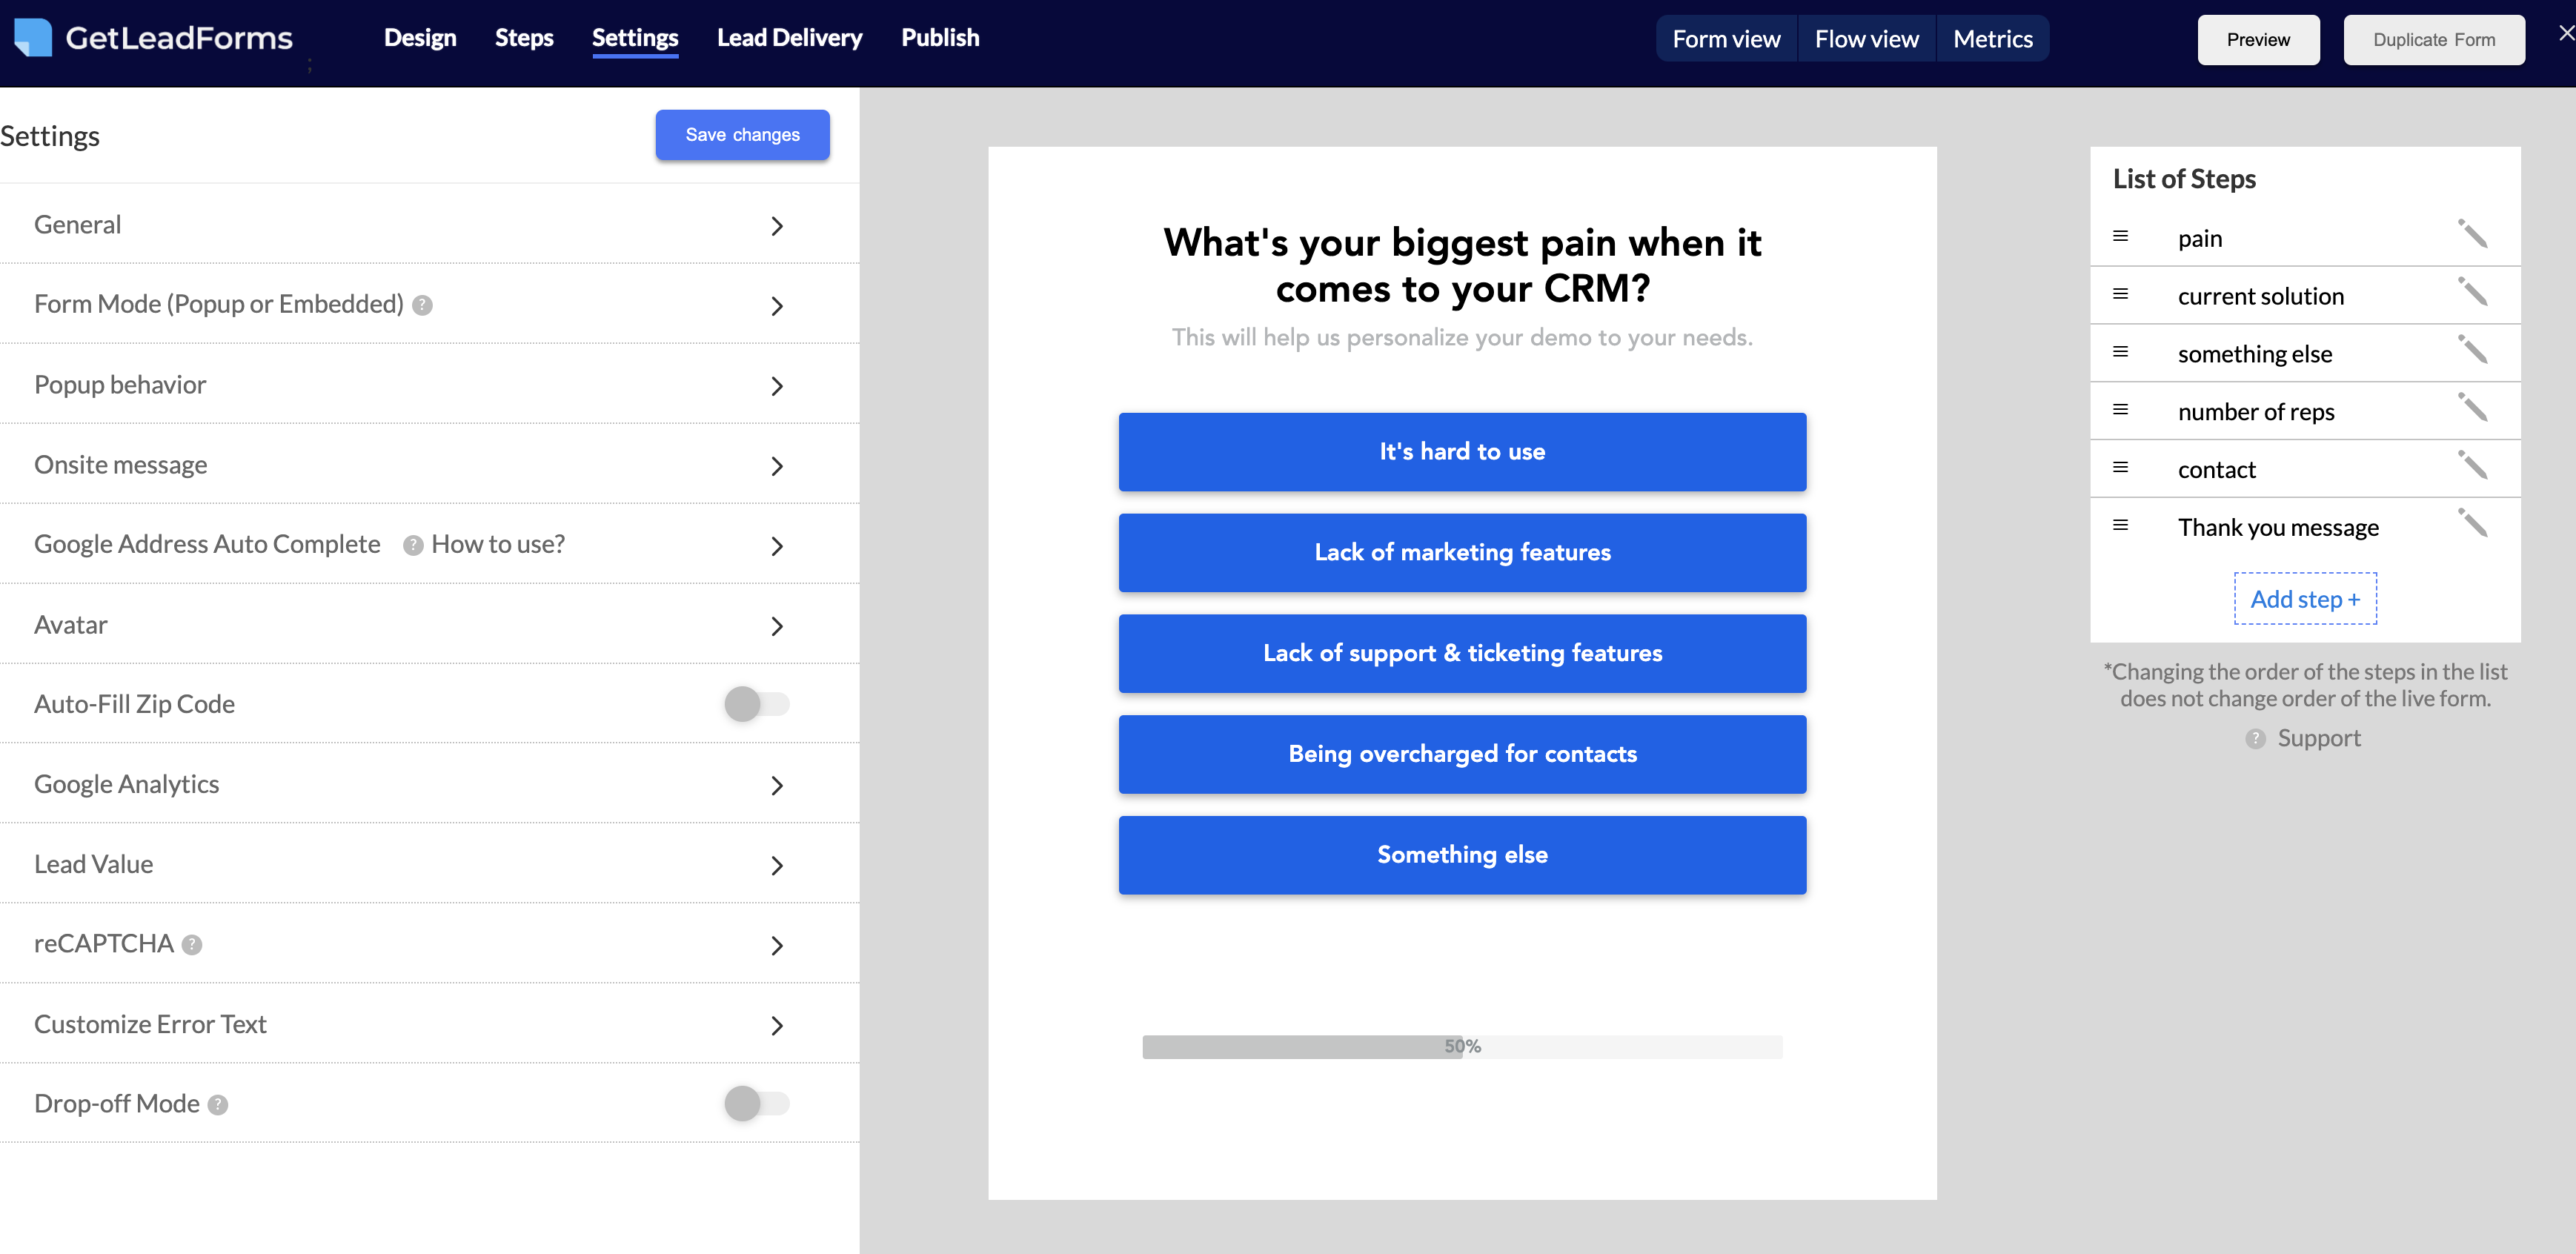
Step 5: Adjust the form’s Settings
After your form is all setup, the next step is to adjust your form’s settings.
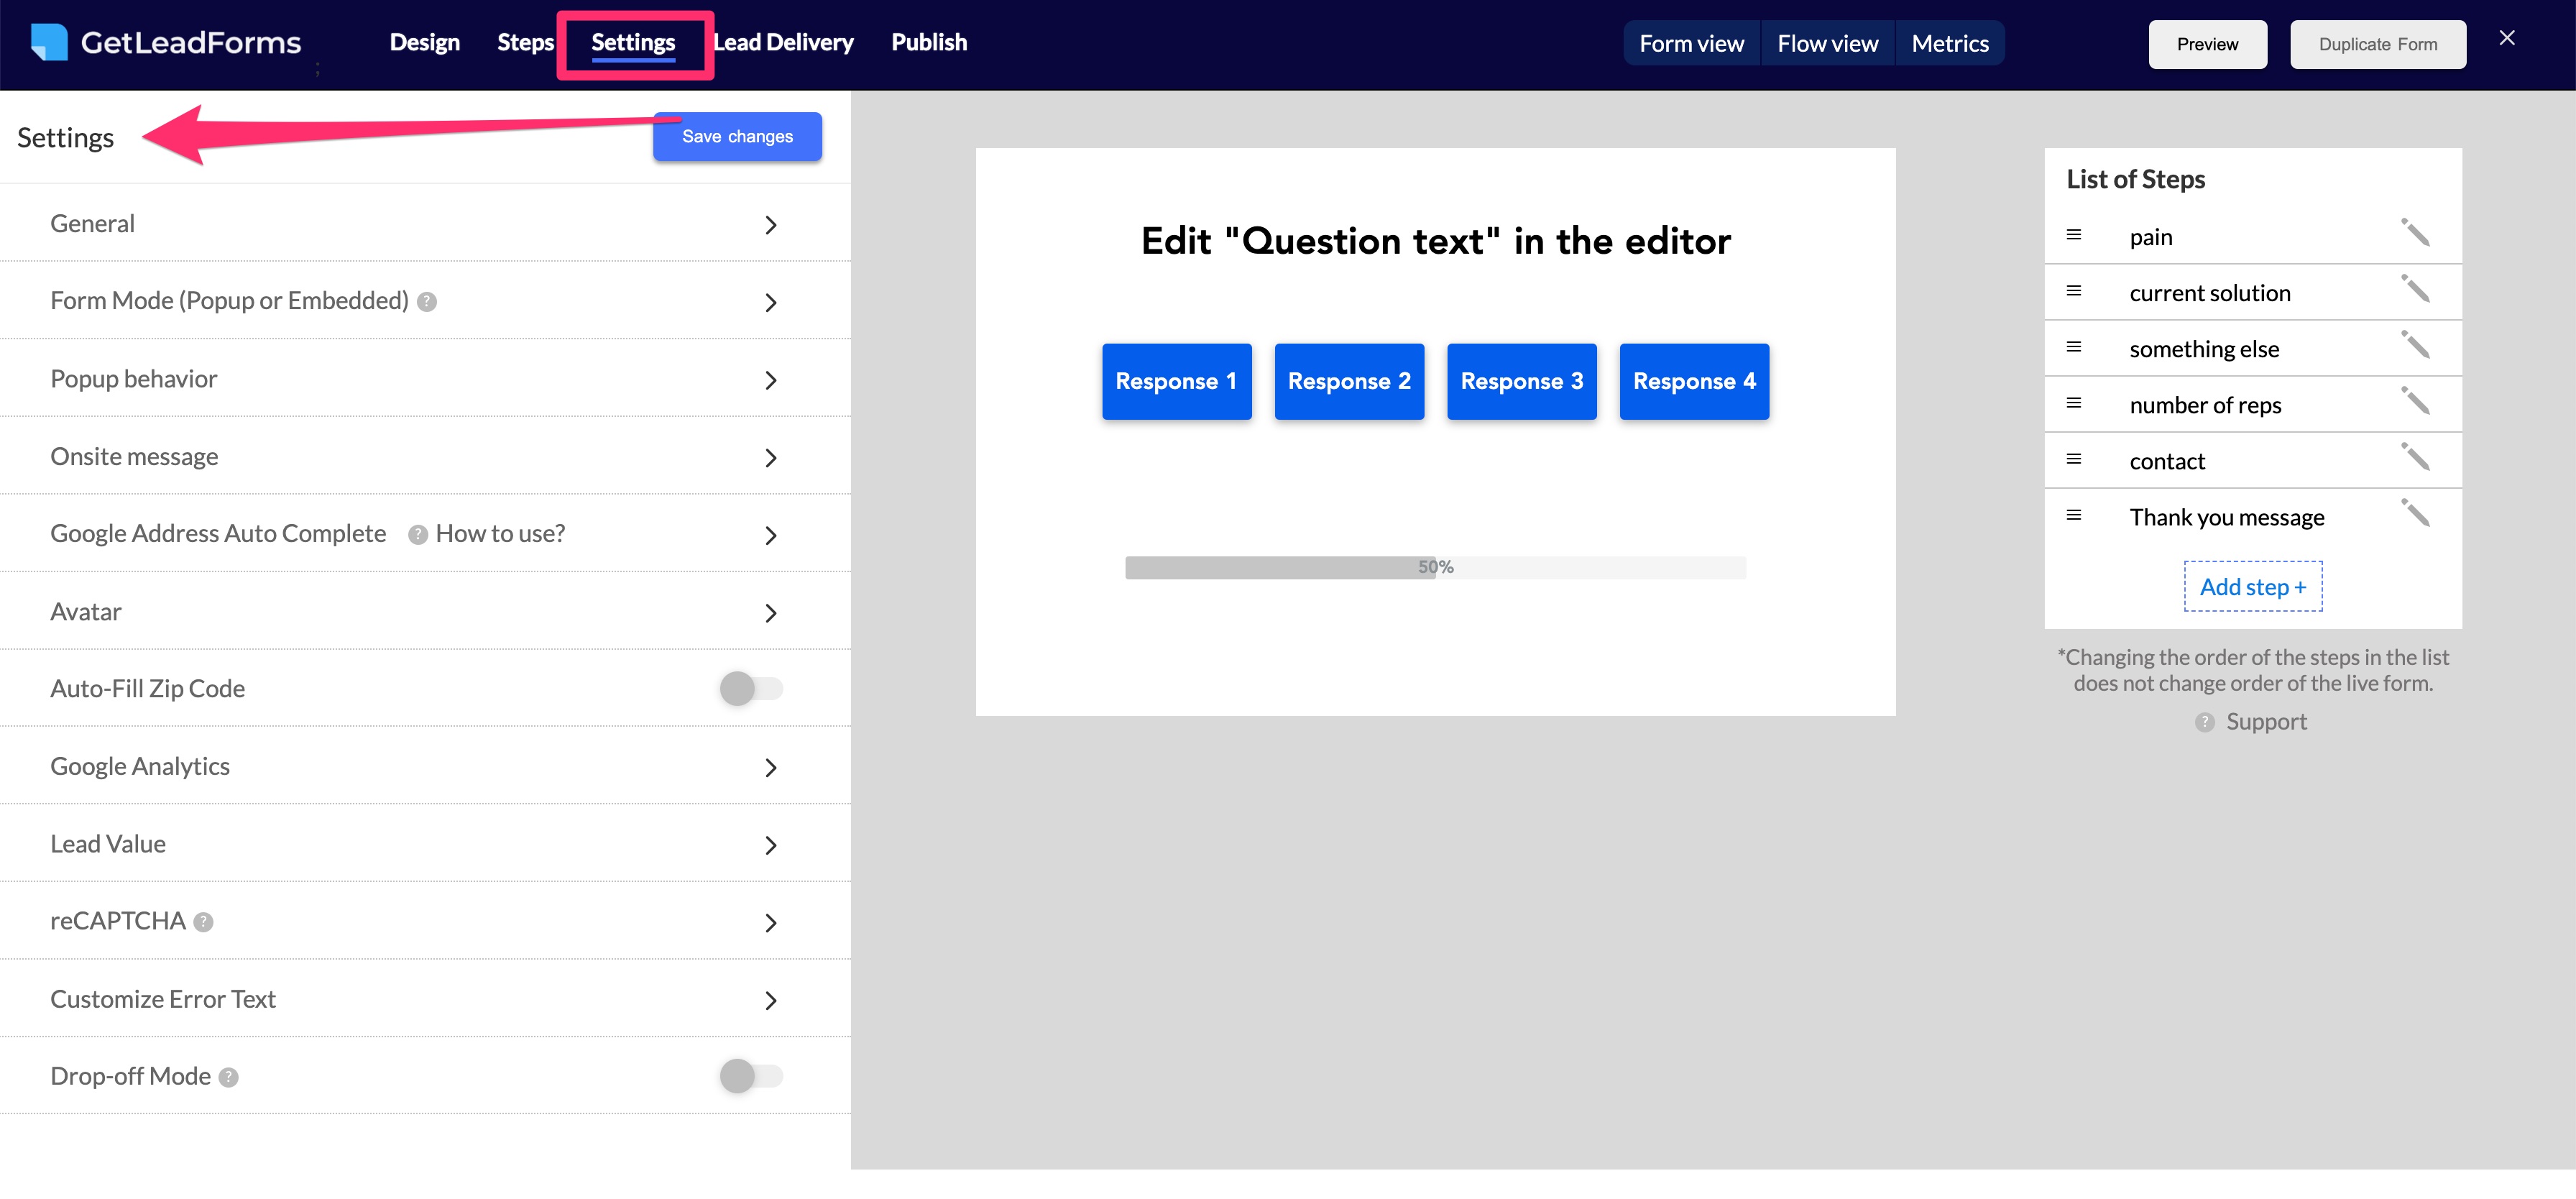
Here are a few key settings to note:
- Google Analytics: You can connect your LeadForm to Google Analytics, both Universal Analytics and GA4
- Autofill Zip code: Will automatically pull the prospect’s zip code into a field if this is something that you’re looking to capture
- Google Address Auto Complete: This is a great feature if you’re looking to capture address information without adding a ton of friction to your form
- Drop-off mode: This is a more advanced feature that will allow you to capture partial lead information in the event that the the lead does not submit your form.
Step 6: Lead Delivery: Connect to your HubSpot CRM
At this point, your multi step form should be just about ready to go. Now let’s discuss how to connect your LeadForm to your HubSpot account.
There are two steps:
1. Connect your LeadForm to a HubSpot List
2. Map your fields to your HubSpot properties
Connecting your LeadForm to a HubSpot List
To connect your multi step form to HubSpot, go to the Lead Delivery
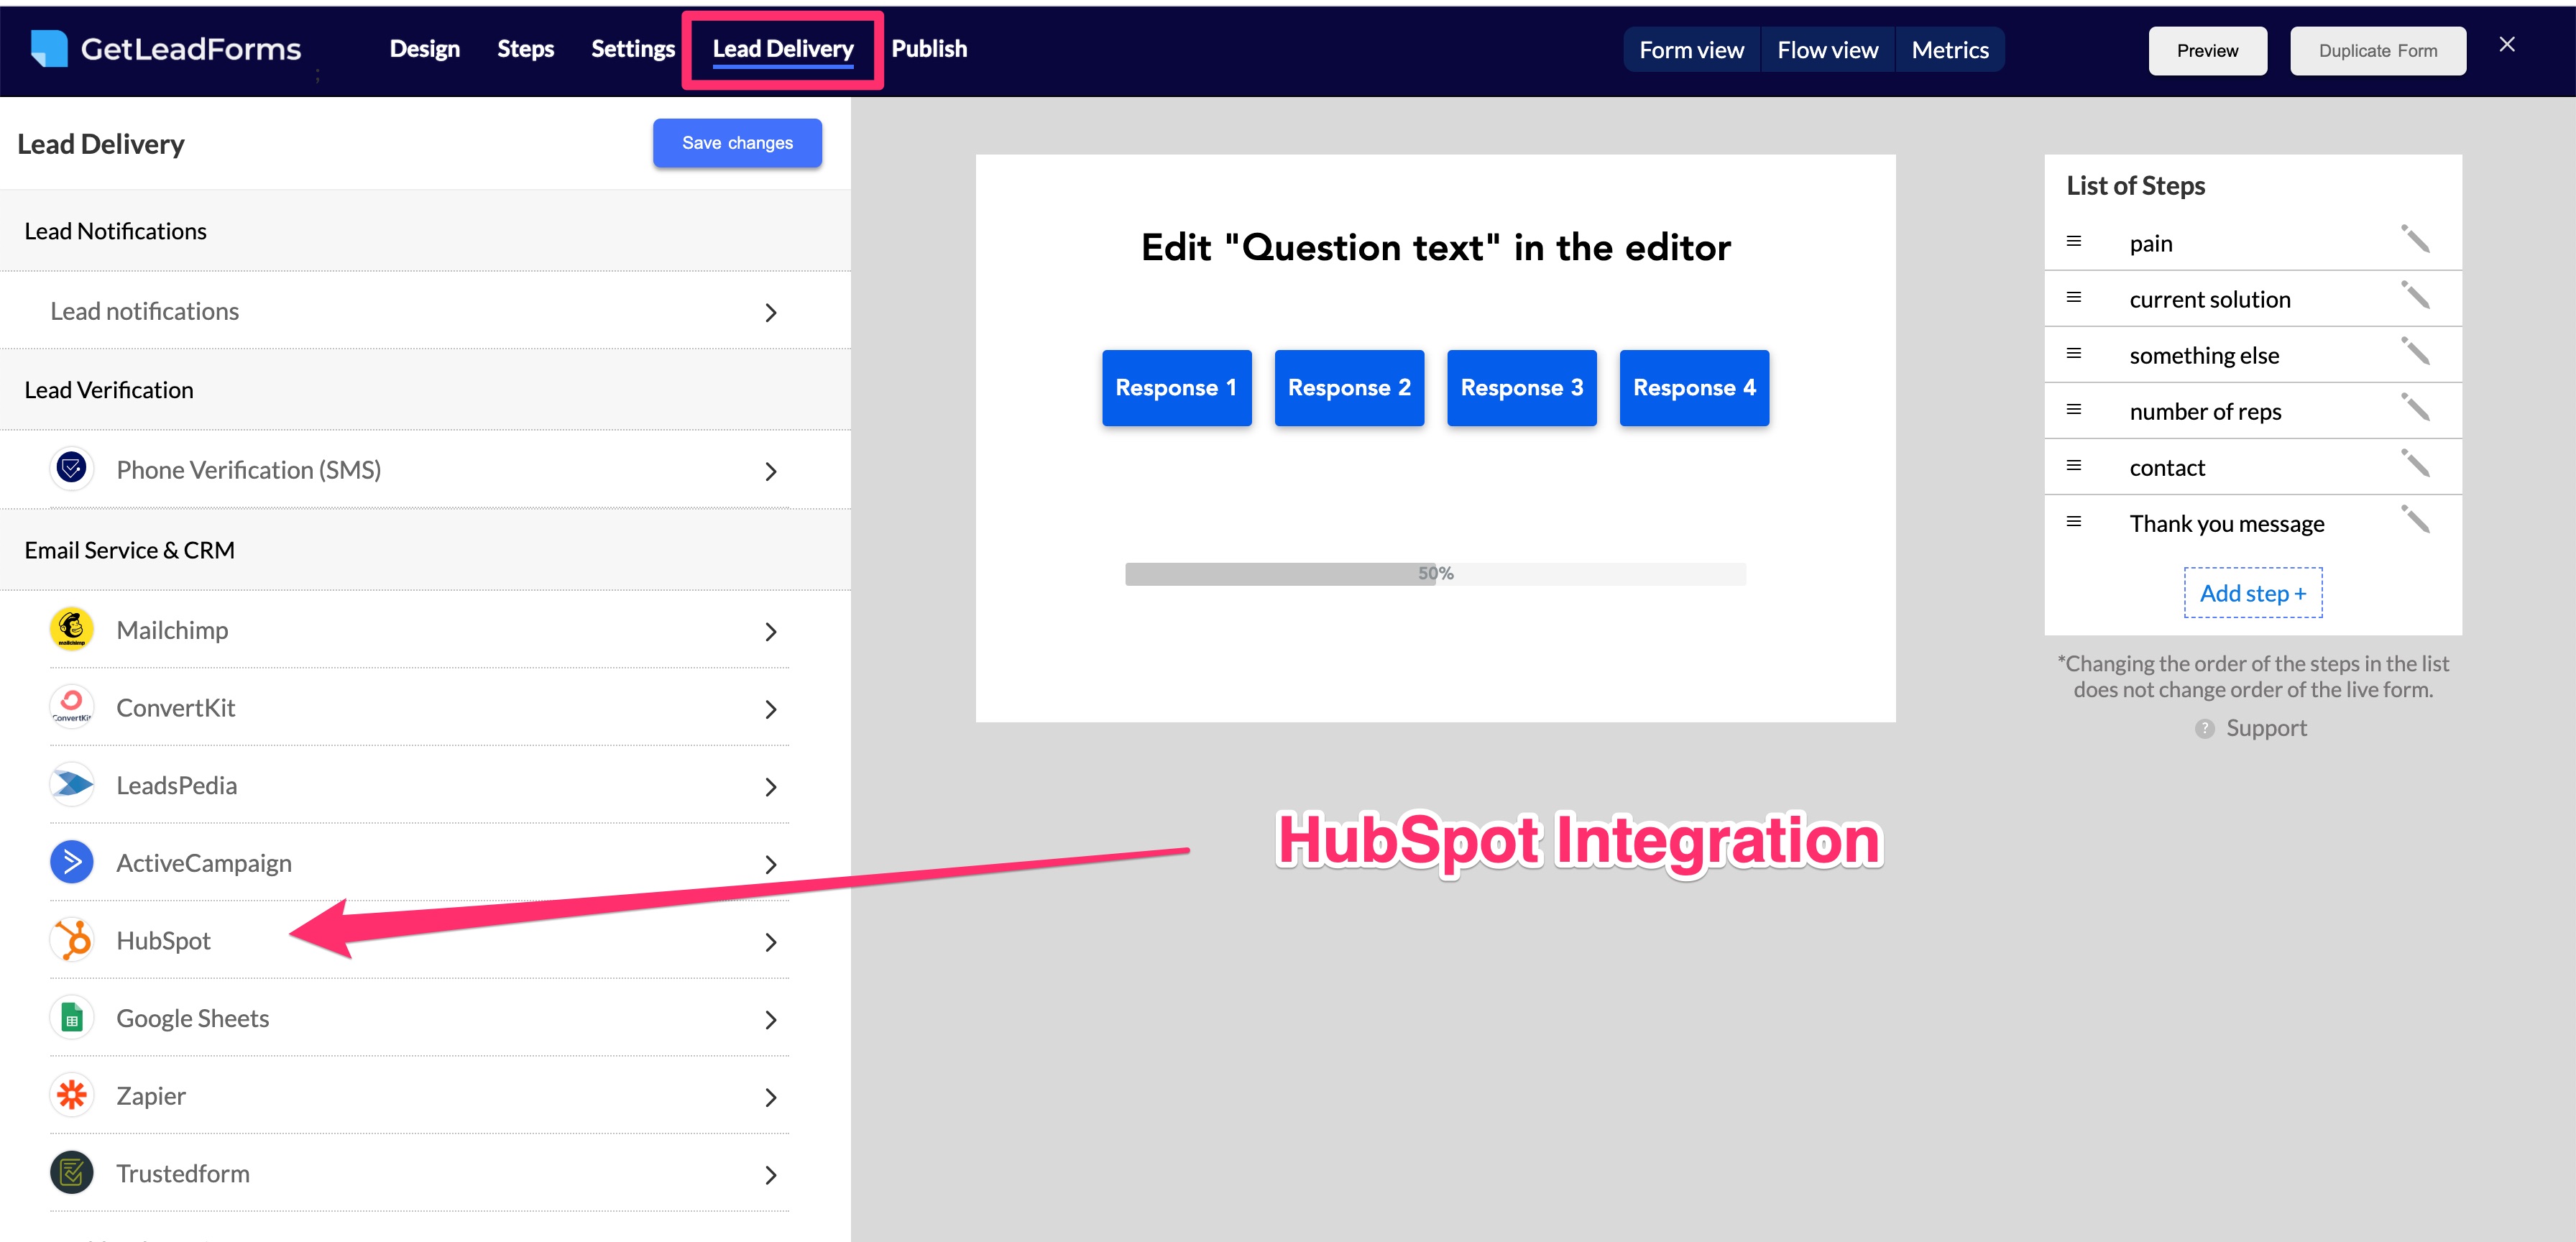
Next go down to Email Service & CRM and click on the HubSpot icon.
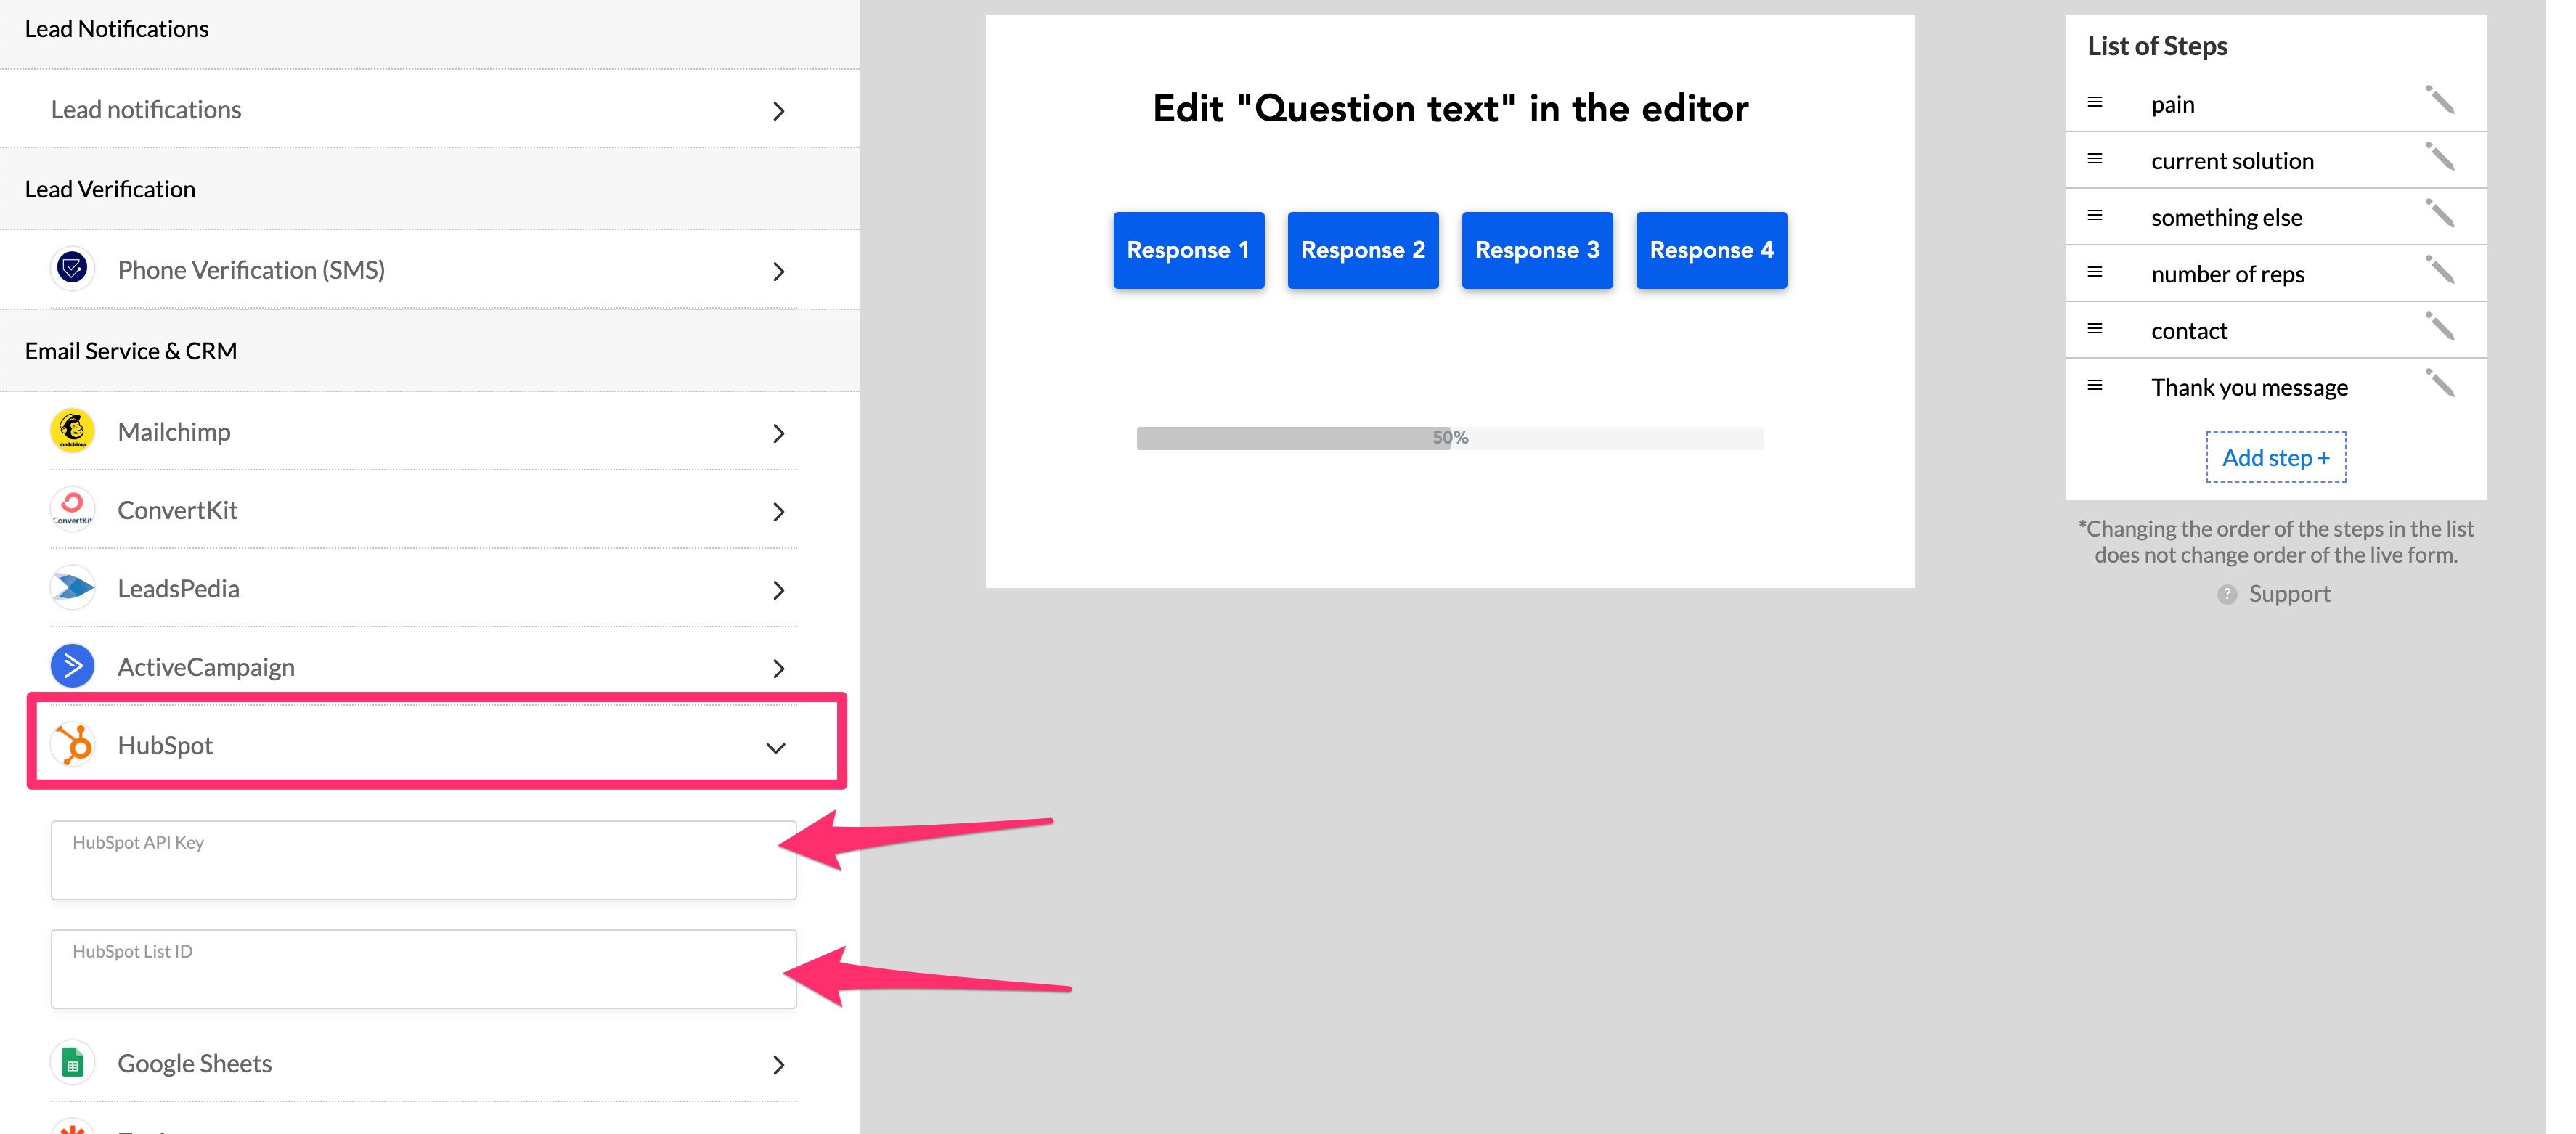
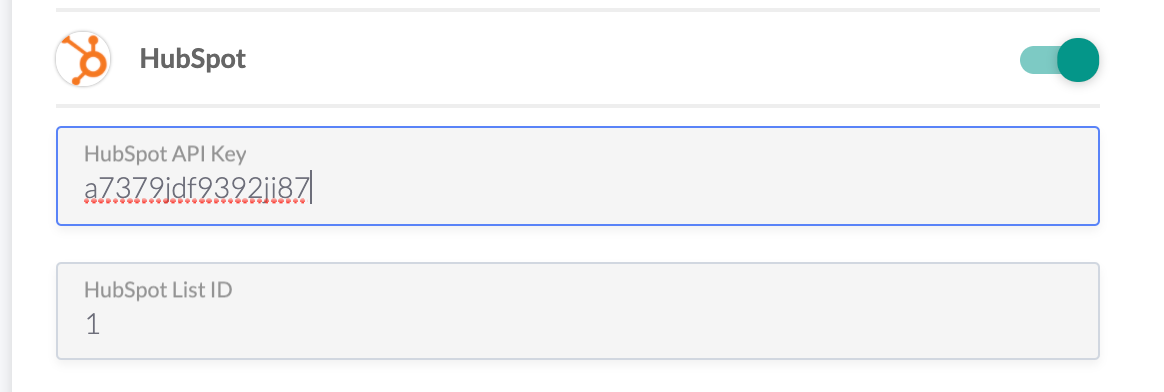
Since GetLeadForms is not yet in the HubSpot marketplace (that’s coming soon), you will need to integrate with your API key.
Simply jump into your account and grab your HubSpot API Key.

While you’re in HubSpot, you should also grab your HubSpot List ID. This is the list where you’re going to be sending your leads to.
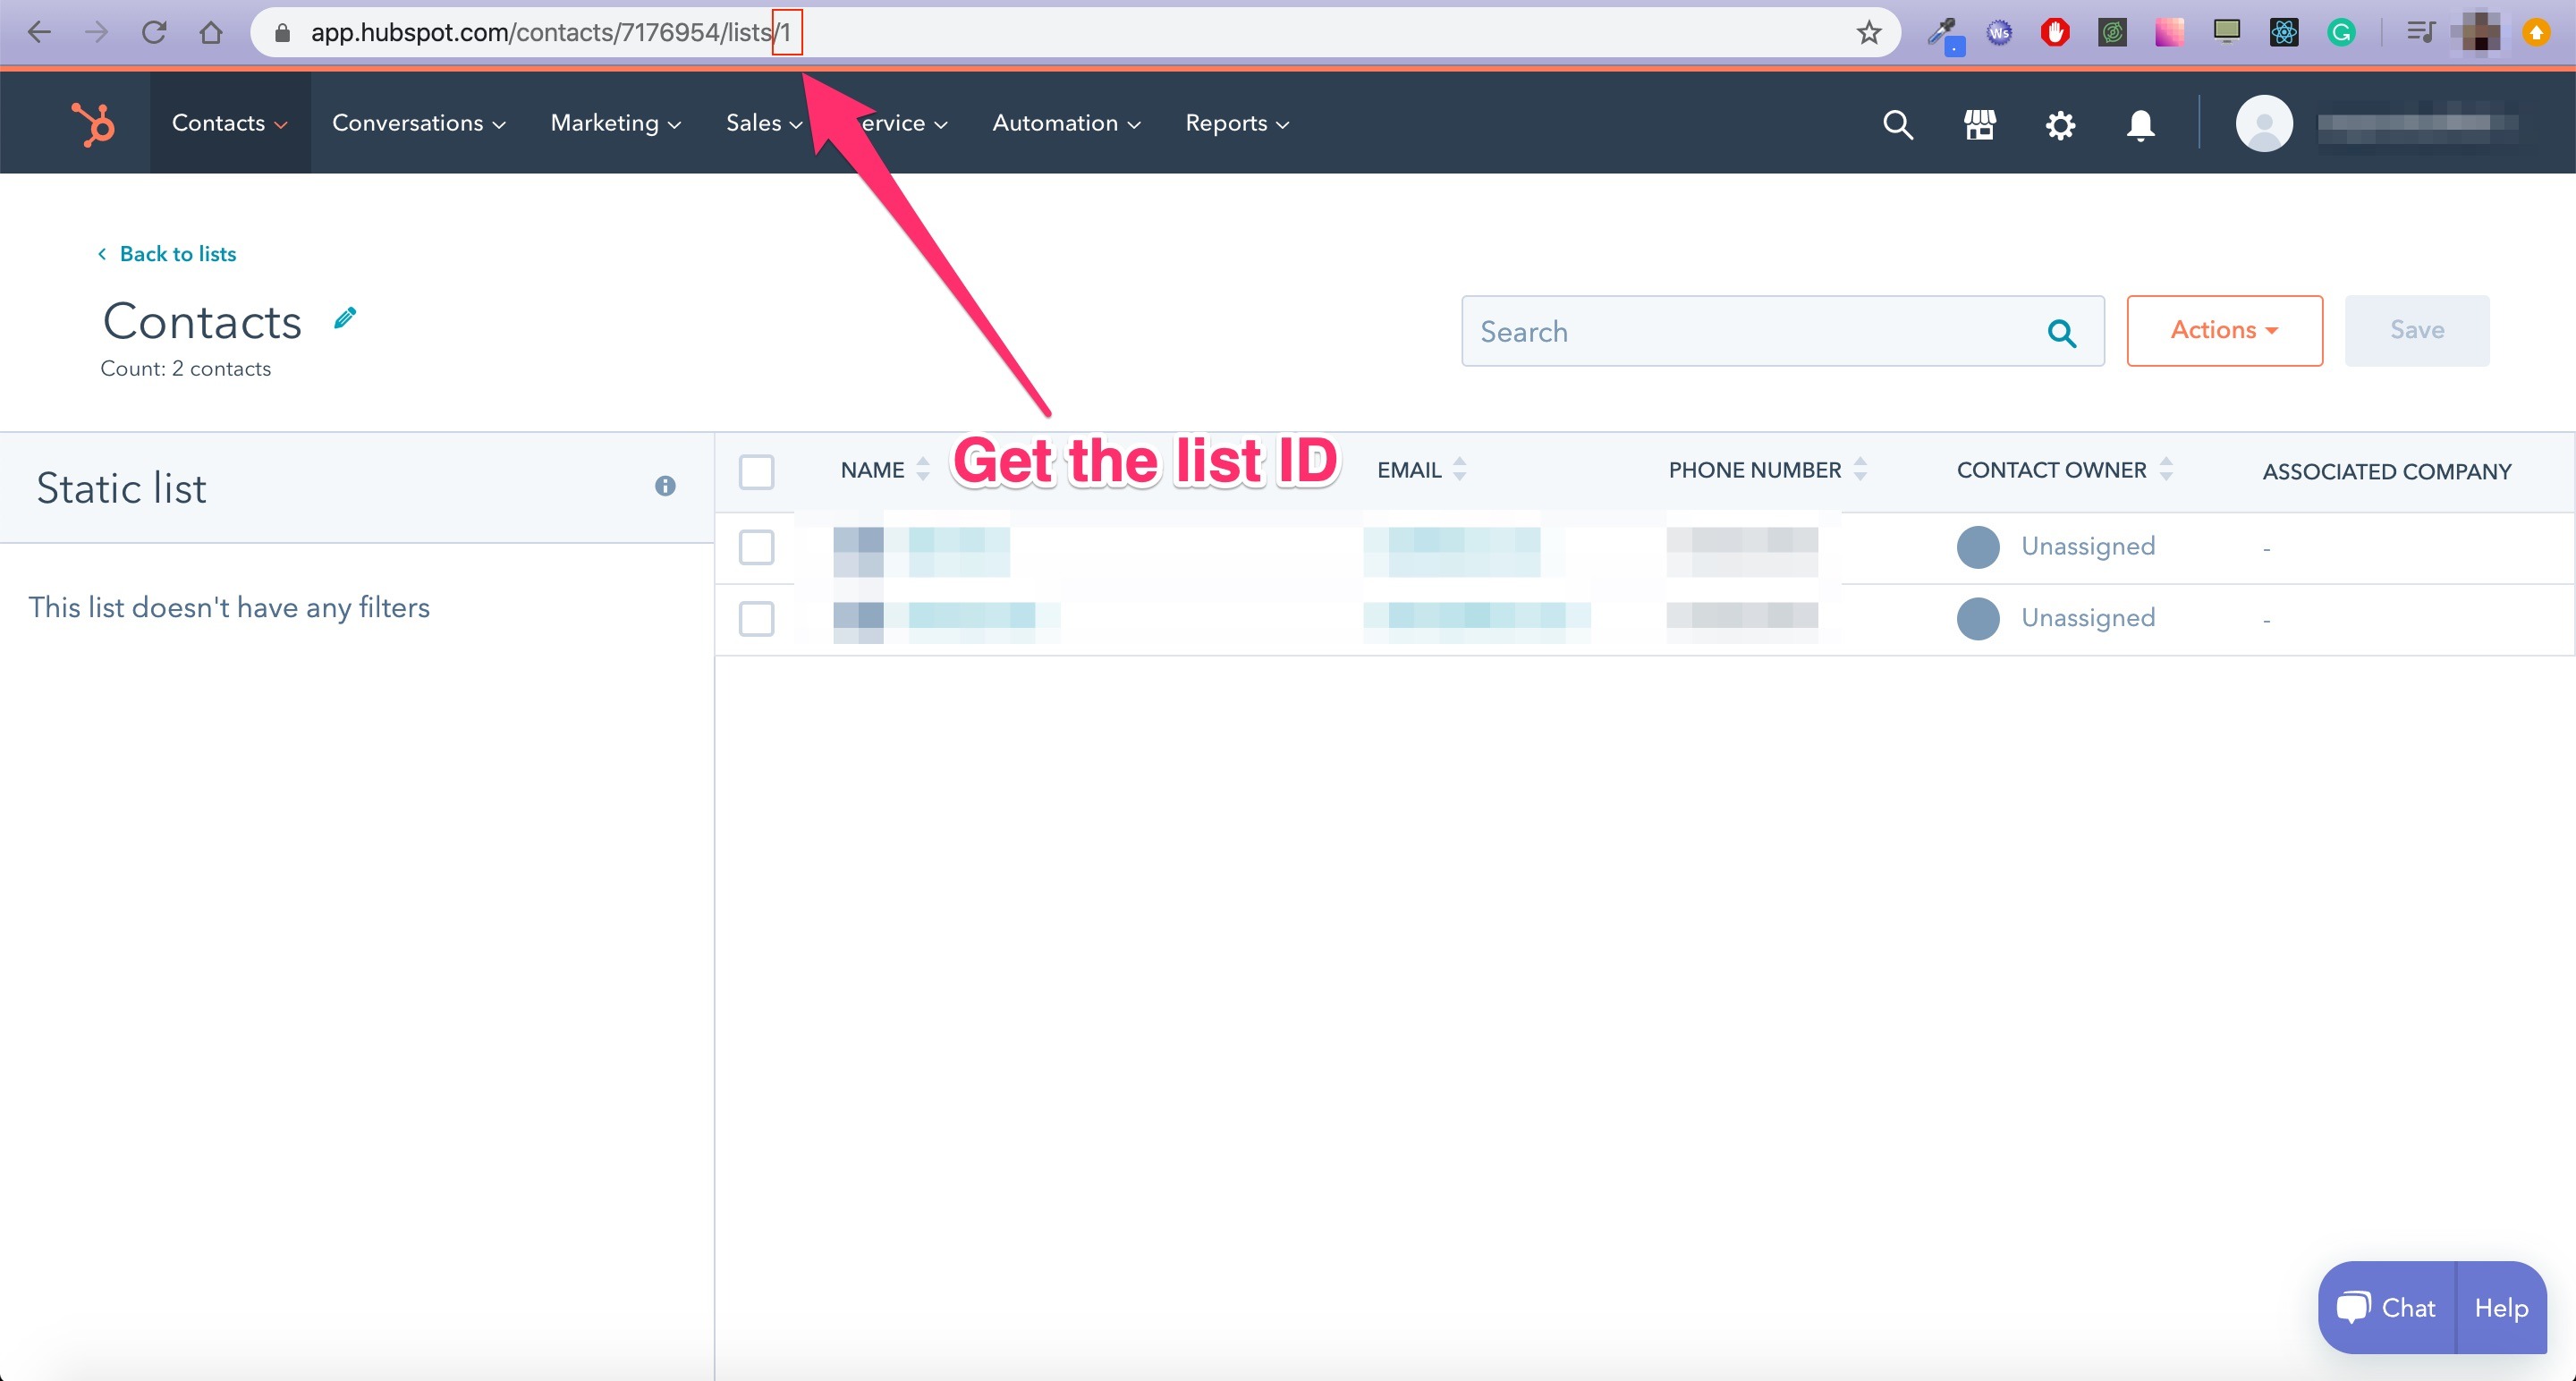
Note: You can only send leads into a static list. Please make sure that you do not use a dynamic list.
Now that you have your HubSpot API Key and List ID, simply go back into GetLeadForms and paste them into the HubSpot integration fields, then click Save.
At this point, there’s just one more step. You’ll need to tell the system which fields to send to HubSpot. Luckily this is pretty easy.
Mapping your fields to your HubSpot properties:
All responses in your LeadForm will get mapped to properties in your HubSpot account.
HubSpot has a wide variety of different property fields by default.
In some cases, you’ll map your fields to the default HubSpot property. For example, your email field will be mapped to the email property inside of HubSpot.
If you have a question such as ‘pain point’ in your form, then this most likely will need to be mapped to a custom property.
So it’s important that you list out all properties and map each field to the property. I like to do this in a spread sheet.
Let’s use the email field as an example.
- Simply click on whatever step the email field is located in.
- Then go to the ‘Form Fields’ section of the builder and open the Email Field.
- Scroll down and expand the HubSpot section.
- Finally, enter the HubSpot field name and click ‘Save form field’ – in this case it’s ’email’
Just like that your email field is mapped to HubSpot.
Repeat for all other form fields such as name, phone number, etc.
If you need to map a custom response to HubSpot such as ‘number of reps’ in this example, then follow the steps below.
- Click on the step that you would like to map to HubSpot. In this case ‘ number of reps’
- Go to the left hand side – ‘Advanced Options’ and expand HubSpot
- Add the HubSpot field name. In this case it will be whatever the custom property name is inside of HubSpot. Let’s say it’s something like number_of_reps.
Repeat that process for whatever steps and responses you would like to push into HubSpot.
Next, we just need to add the form to your website and test.
Step 7: Add to your website
When you think your LeadForm is ready to go and when it’s mapped to HubSpot, the next step is to add the LeadForm to your site.
To do this, simply start by clicking on the Publish button.
Next follow the steps below:
- Add your Landing Page URL as a target Page
- Add your GetLeadForms pixel to the <head> section of your site. If you’re using WordPress this can be accomplished through Google Tag Manager or the Insert Headers and Footers plugin.
- Embed your newly create multi step form on your page by copying the embed code and dropping it on your page
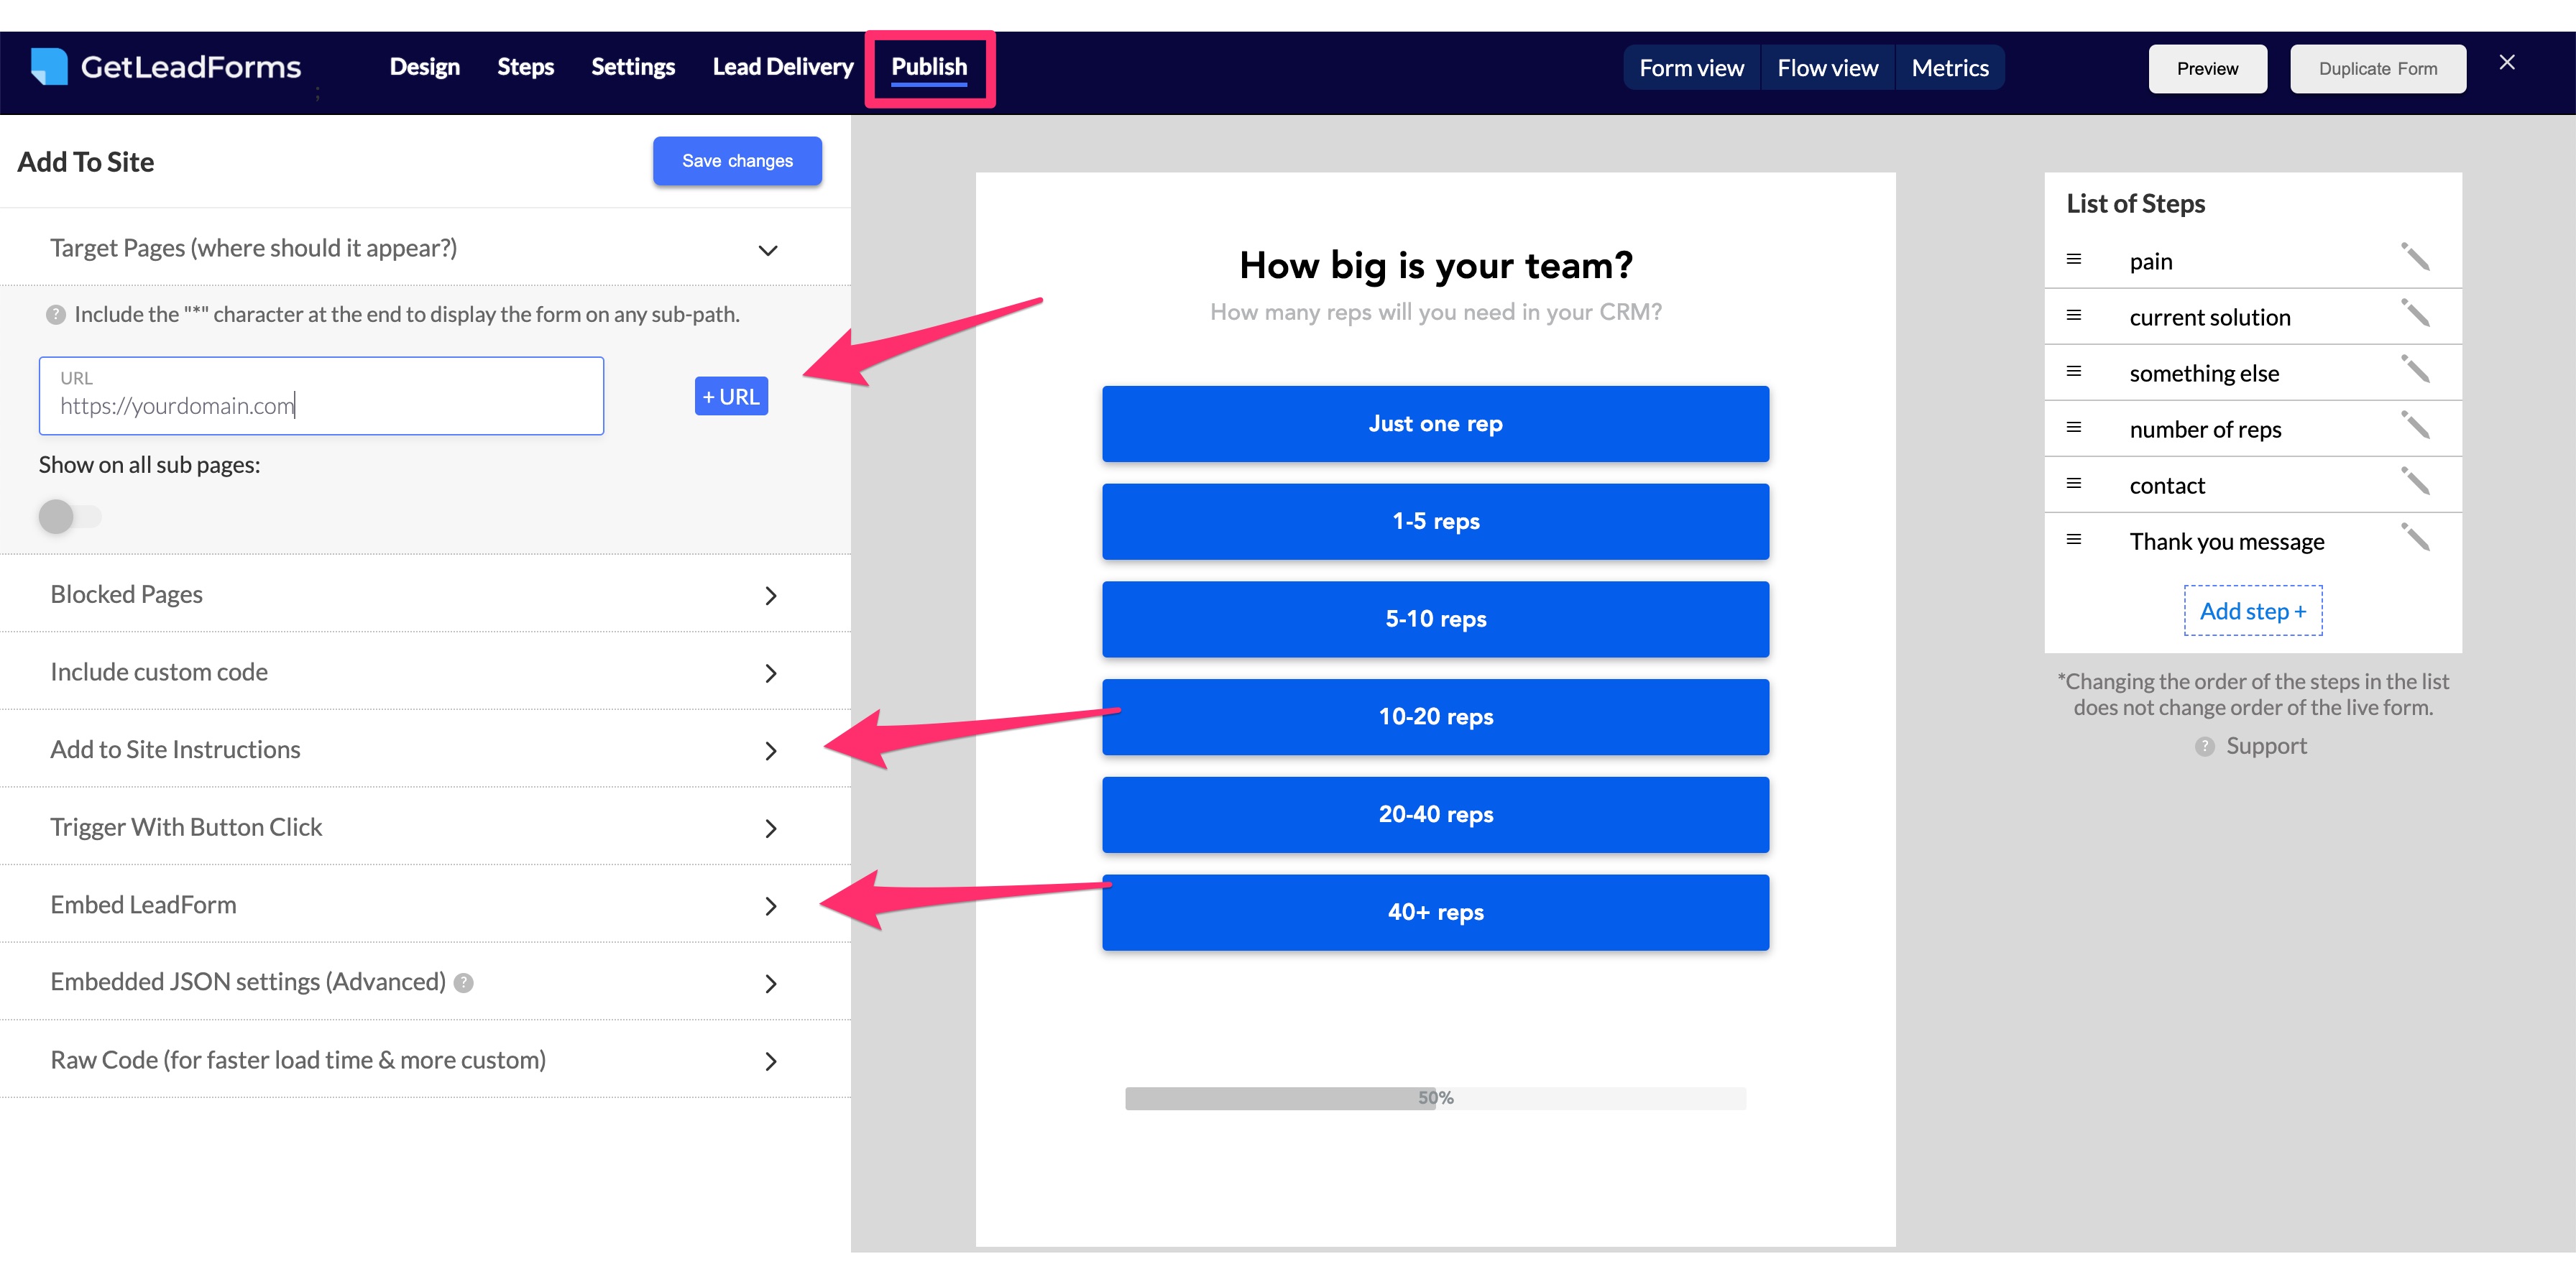
And just like that your lead form will appear on the live page
Finally send a test lead through and make sure that the lead is appearing inside of your list.
If you run into any issues, you can always reach out to us at support@getleadforms.com and we’ll be happy to lend a helping hand 🙂
Final thoughts on creating multi step forms in HubSpot
As you can see, despite HubSpot being an extremely powerful platform (and one of my favorites), it falls a little short when it comes to building high converting multi step forms, interactive forms, and quiz style forms.
And unfortunately, HubSpot does not really offer a great way to natively overcome this shortcoming inside of their own tool, unless you want to hack together a form with some custom code, which probably isn’t the best approach unless you have the time and really know what you’re doing.
With all of that said, if you’re looking to easily create a high converting multi step form for HubSpot, then GetLeadForms is the way to go.
You can grab your free trial of GetLeadForms here.
And if you need any help with either setup or integration then we are always an email away. We never charge for setup/integration assistance.
Some other content that you might be interested in:
– See more free starter templates that work with HubSpot
– See how to add a multi step form to an Unbounce landing page
– How to supercharge LeadPages with multi step forms and lead quizzes