Did you know that only 27% of leads are even qualified to have a sales conversation?
This means that a whopping 73% of leads are typically rejected because they’re unqualified.
If you’re a marketer who’s responsible for generating leads then these stats are sure to make you wince.
After all, just think of all the hours and money lost following up with bad leads.
That’s precisely why lead qualification is so important and why lead qualification frameworks like Budget, Authority, Need, and Timeline (BANT) and Situation, Pain, Impact, Critical Event, and Decision (SPICED) exist.
But here’s the thing.
The best time to start the lead qualification process is before the lead is sent to your sales team — right when your prospects are submitting your forms.
In this post, I’ll explain why you need to qualify leads before sending them to sales and how to get more qualified inbound leads through your forms.
Let’s go!
Want more qualified leads? It all starts with your Lead Form
The problem with most lead qualification frameworks (like BANT) is that they are used after the lead has already been captured and handed off to the sales team.
This means that someone still needs to spend their precious time following up with leads, which doesn’t get at the root of the issue of generating unqualified leads in the first place.
That’s why I like to say that the best time to qualify leads is before the prospect even enters the sales process — right when they’re submitting their form.
By qualifying the prospect in your forms, you can ensure that you’re only sending the leads that meet the right criteria to your sales team or client.
For the leads that don’t meet the right criteria, you can nurture them until they are ready.
And for those that aren’t qualified, you can easily disqualify them without creating friction (more on this later).
For the rest of this post, I’m going to provide you with a simple lead qualification checklist you can use with your forms that will help you consistently generate ultra-qualified leads.
Your lead qualification checklist: 6 Strategies for capturing more qualified leads through your forms
1) Ask qualifying questions
This is arguably the most important strategy of all, as it allows you to efficiently gather critical information to determine if a lead is qualified or not.
If you’re sending leads to a sales team, this is one of the quickest ways to filter through leads.
And if you’re selling leads, there’s a good chance your client is going to have certain qualifying questions they’re going to need you to capture with your lead.
Without asking those questions, the lead will likely be rejected and you won’t be paid for your lead.
So, what qualifying questions should you ask?
From my experience, outside of the standard contact fields like name, email address, and phone number, there’s typically a sweet spot of 1-3 additional questions a business can ask to qualify a prospect before they submit the form.
For example, imagine that you’re in the legal space and you’re generating leads for a personal injury lawyer.
You may ask questions like:
- Do you have a lawyer? – If the answer is ‘yes’, the lead probably isn’t qualified
- When did the accident occur? – If the answer is ‘a few years ago’, they’re also probably not qualified
Or, say you’re in the moving industry. Qualifying questions could be:
- What’s your moving ZIP code? – If they’re not in your location, the lead wouldn’t be qualified
- How soon are you looking to move? – If someone was ready to move right away, they might be a high-priority lead
Let’s take a look at some examples:
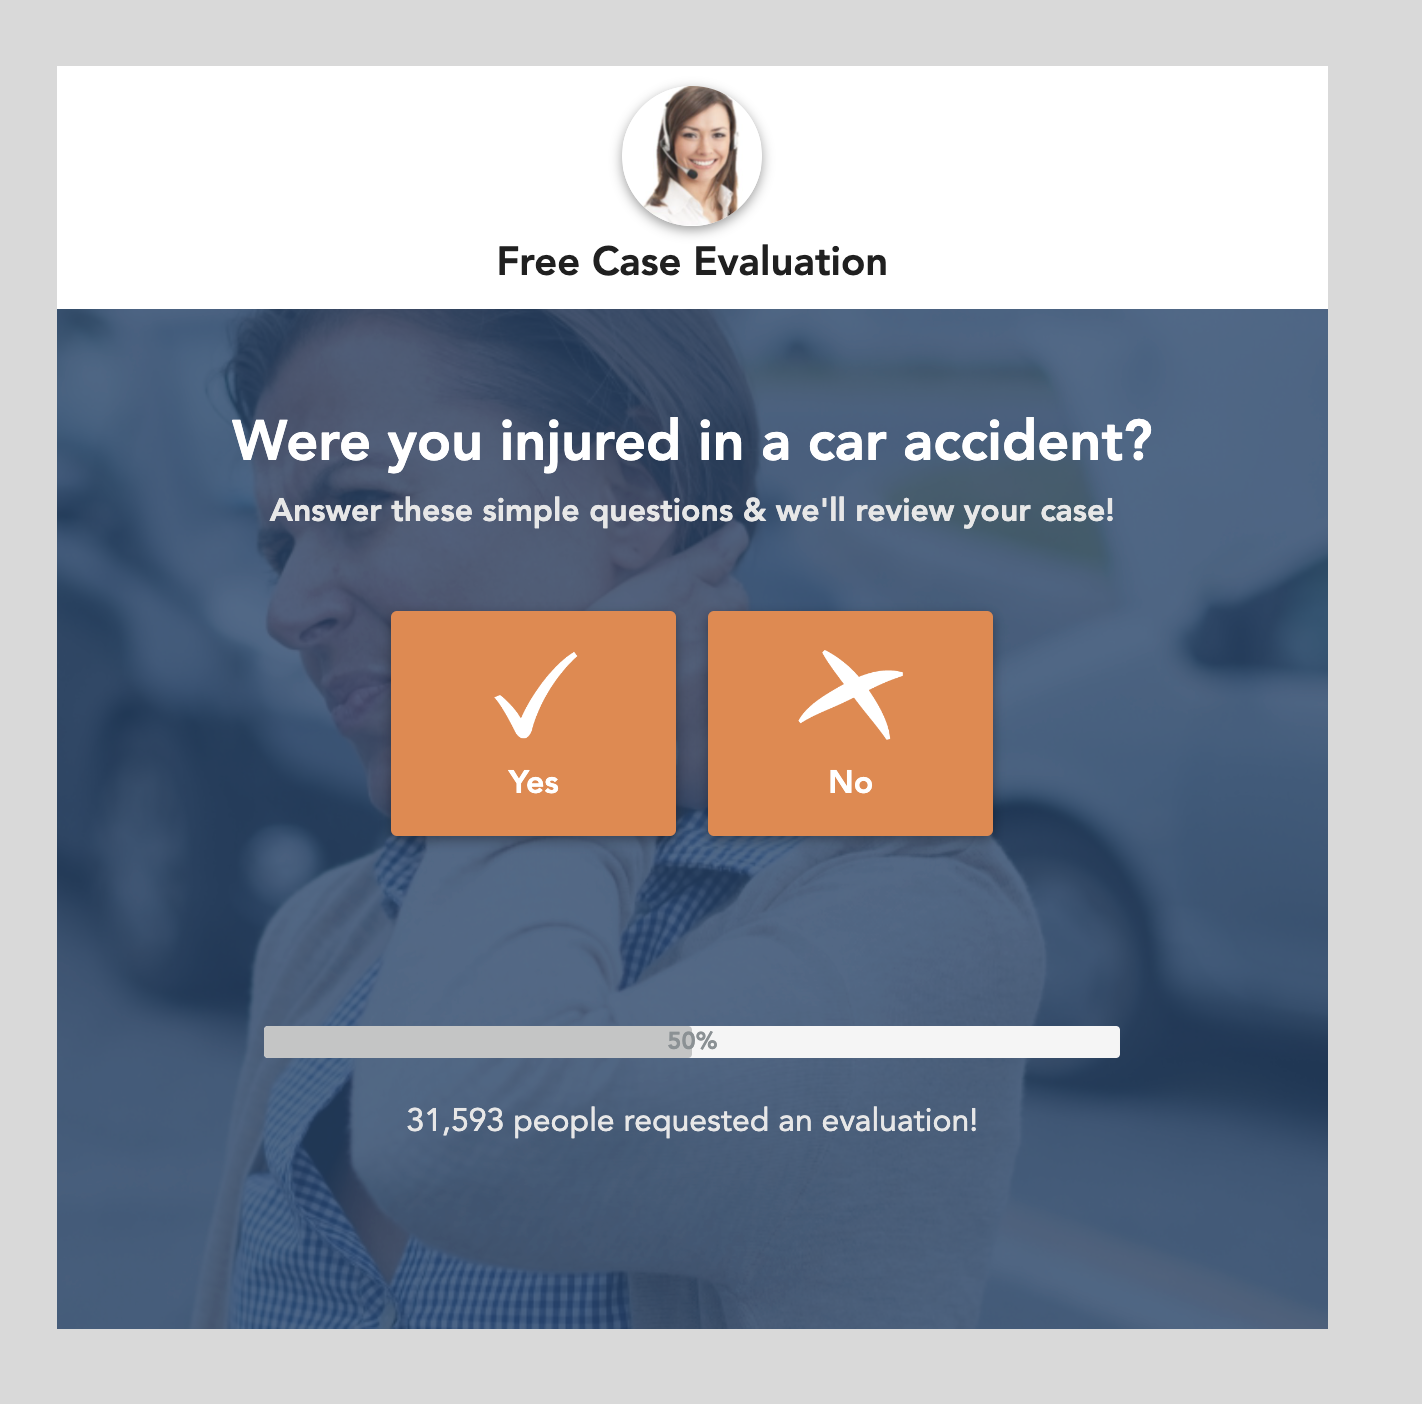
When generating personal injury leads, you could use the Personal Injury with Icons template to ask questions like, “Do you currently have a lawyer?”…
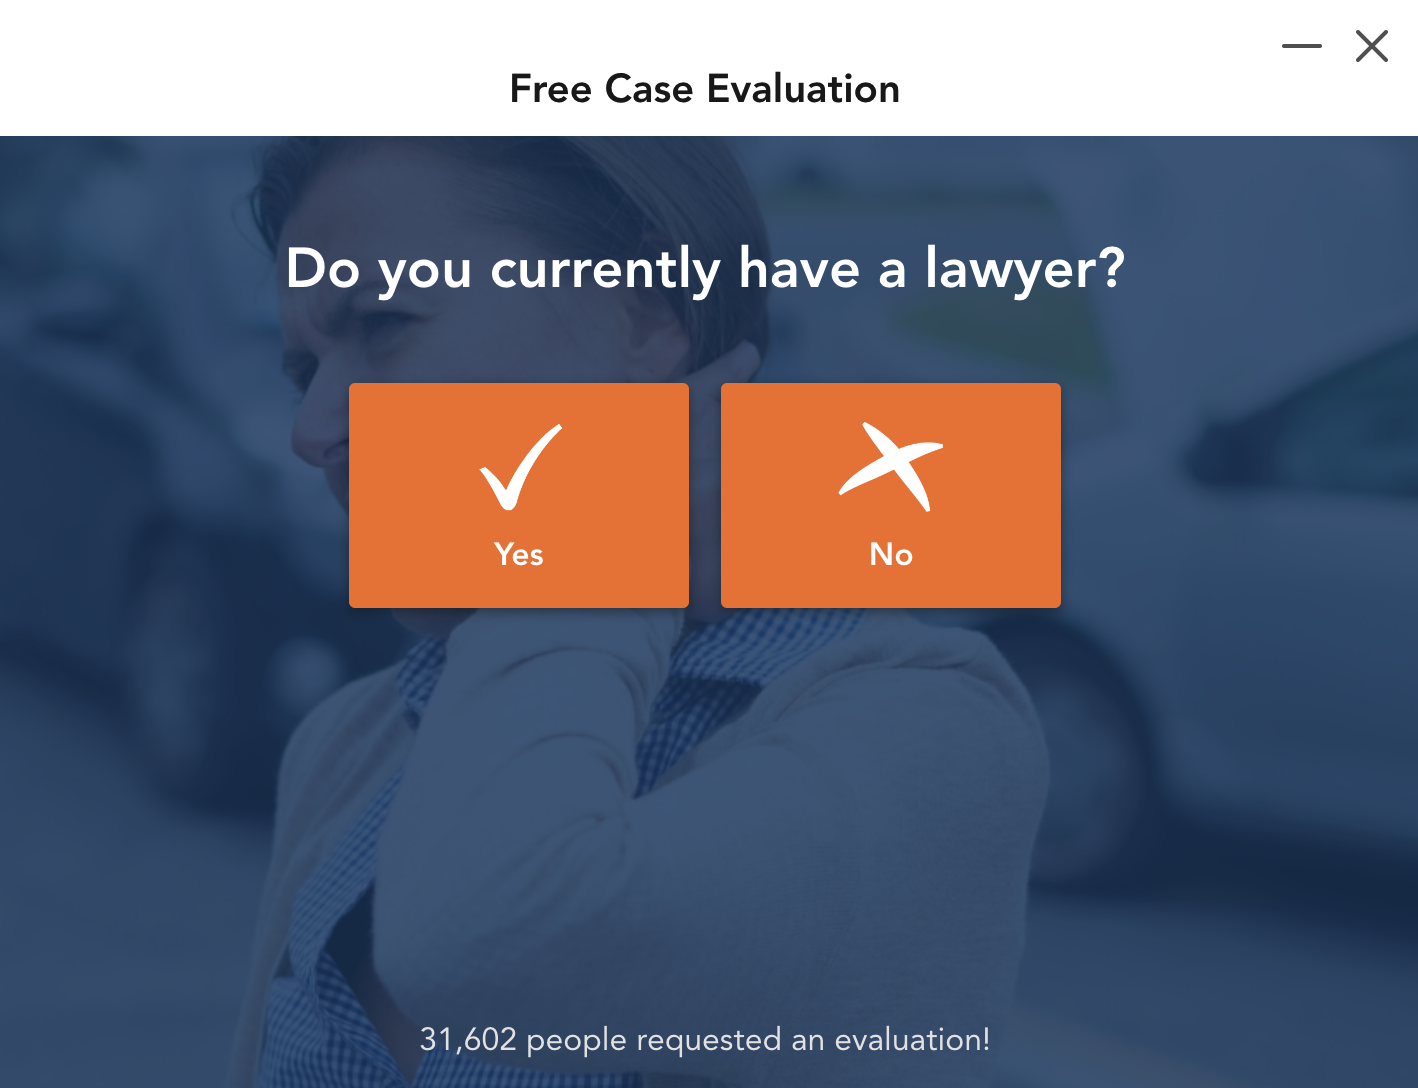
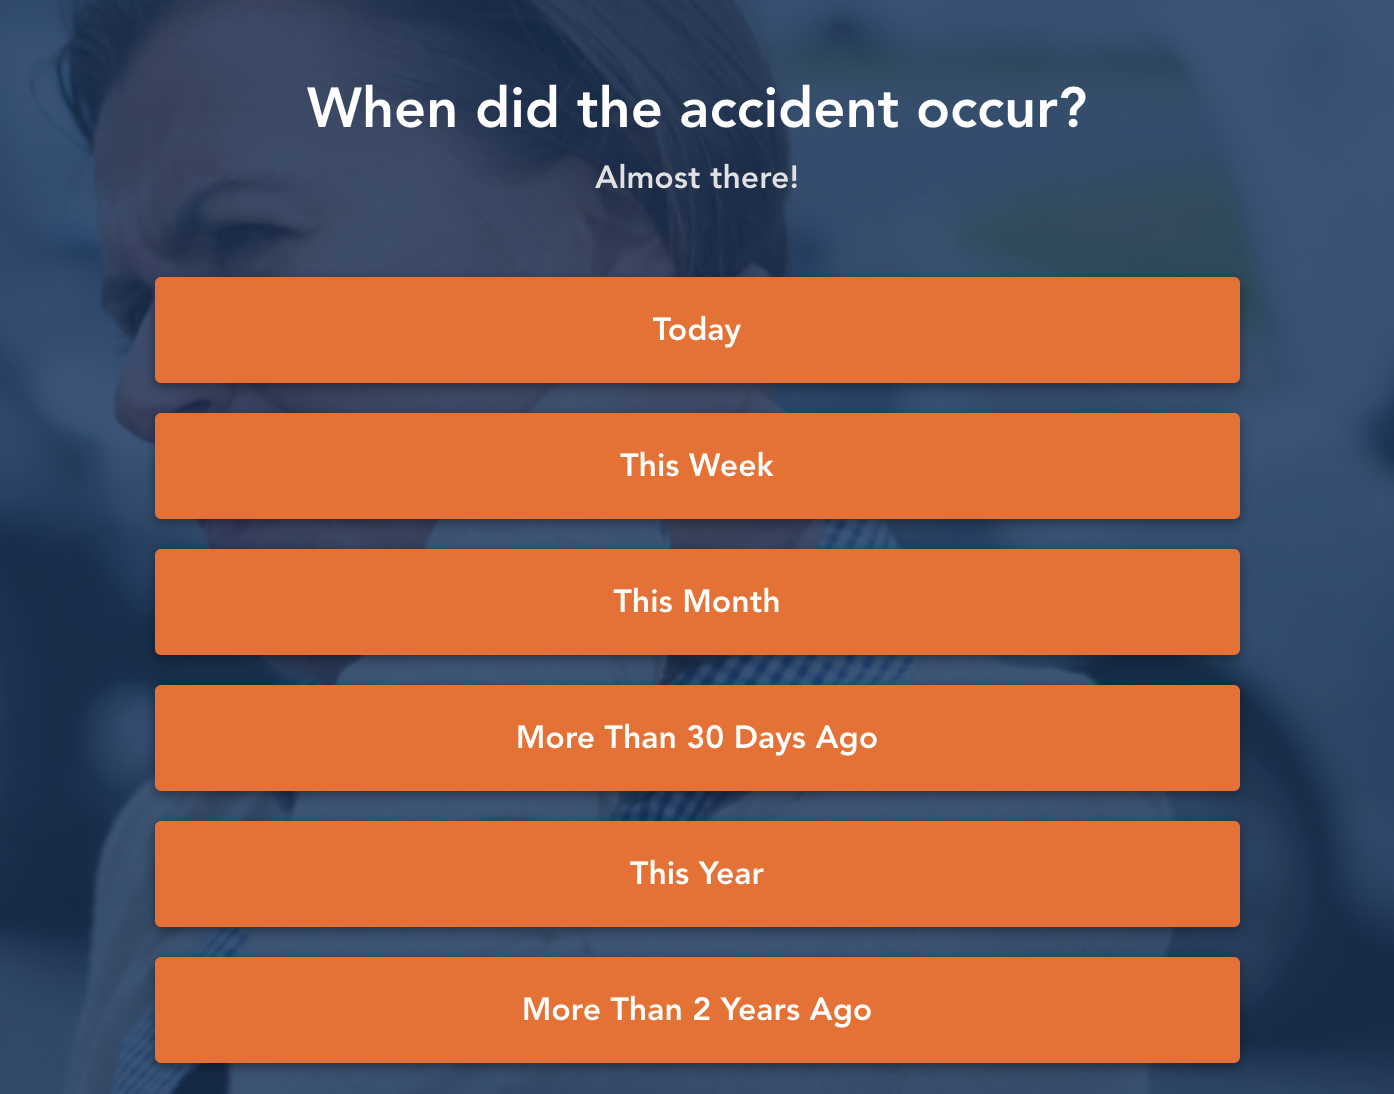
…and if the prospect says ‘Yes’, you can ask a second question like: “When did the accident occur?”
You can grab this exact template here.
For the moving industry, you could use the Moving Company with Icons template to ask questions like “Where are you moving from?”…
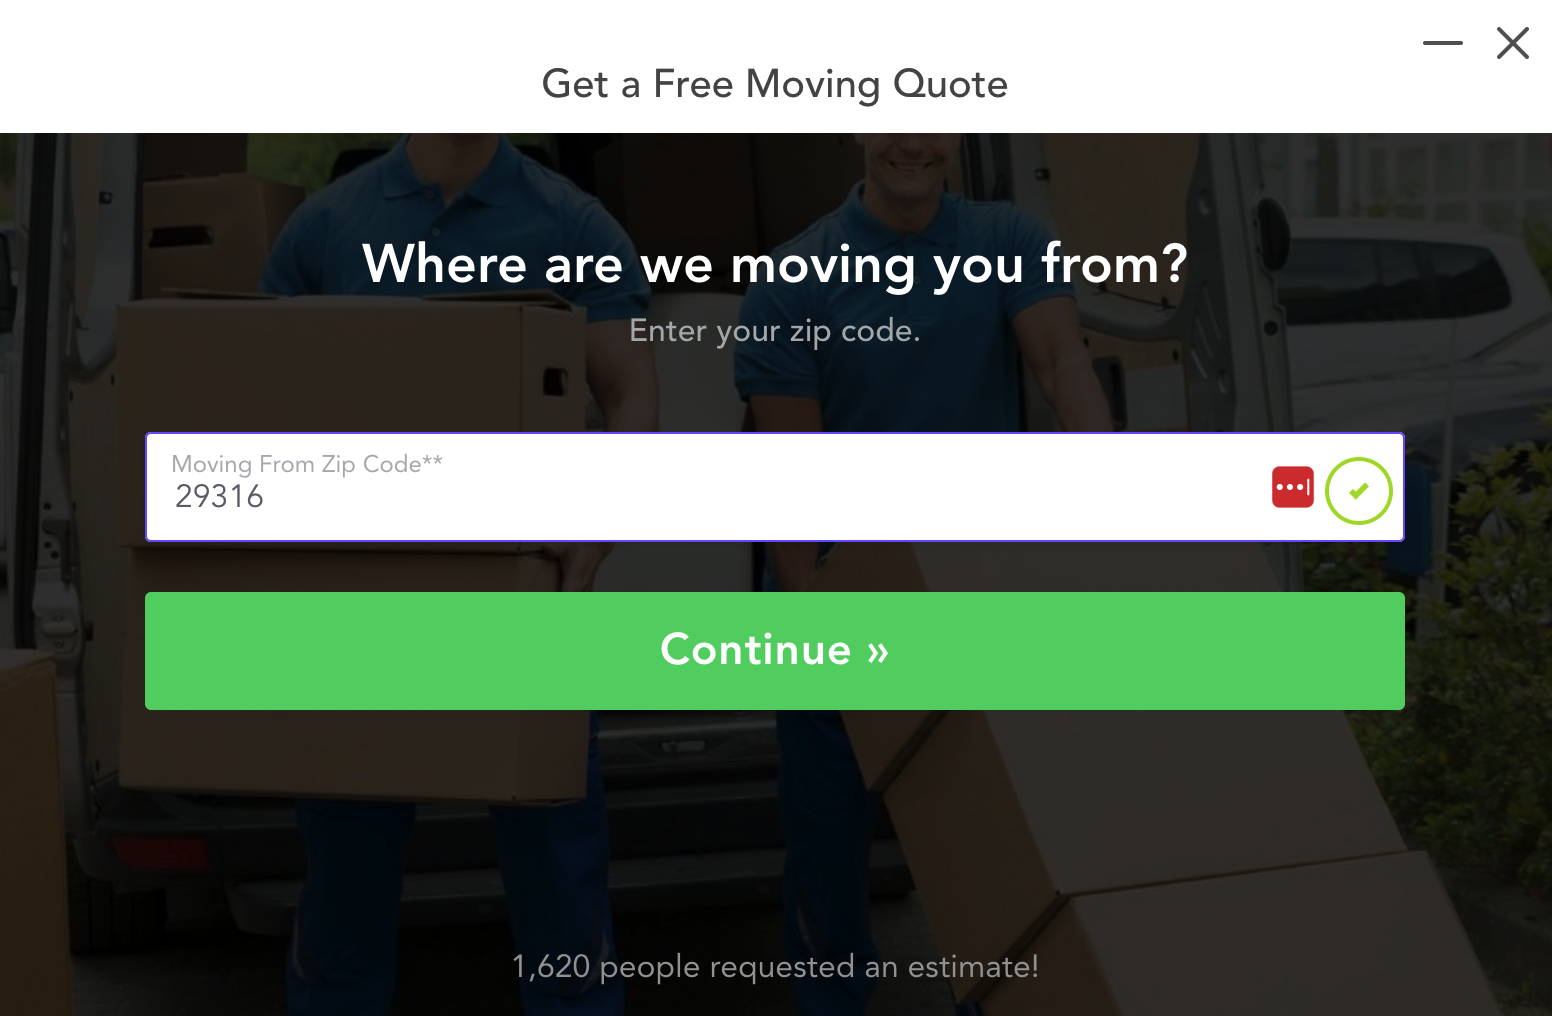
…and “How soon are you looking to move?”

When it comes to deciding which specific questions to include in your forms, I recommend spending some time brainstorming ideas on essential questions you want to ask before someone submits.
Write down everything you think could be of value during the qualification process, and then trim it down to 1-3 key qualifying questions.
This brings us to the next item in my checklist.
2) Break forms into multiple steps to prevent cognitive overload
Getting critical information by asking 1-3 additional questions, along with the basics like name, email address, and phone number is the perfect way to qualify leads.
There’s just one problem.
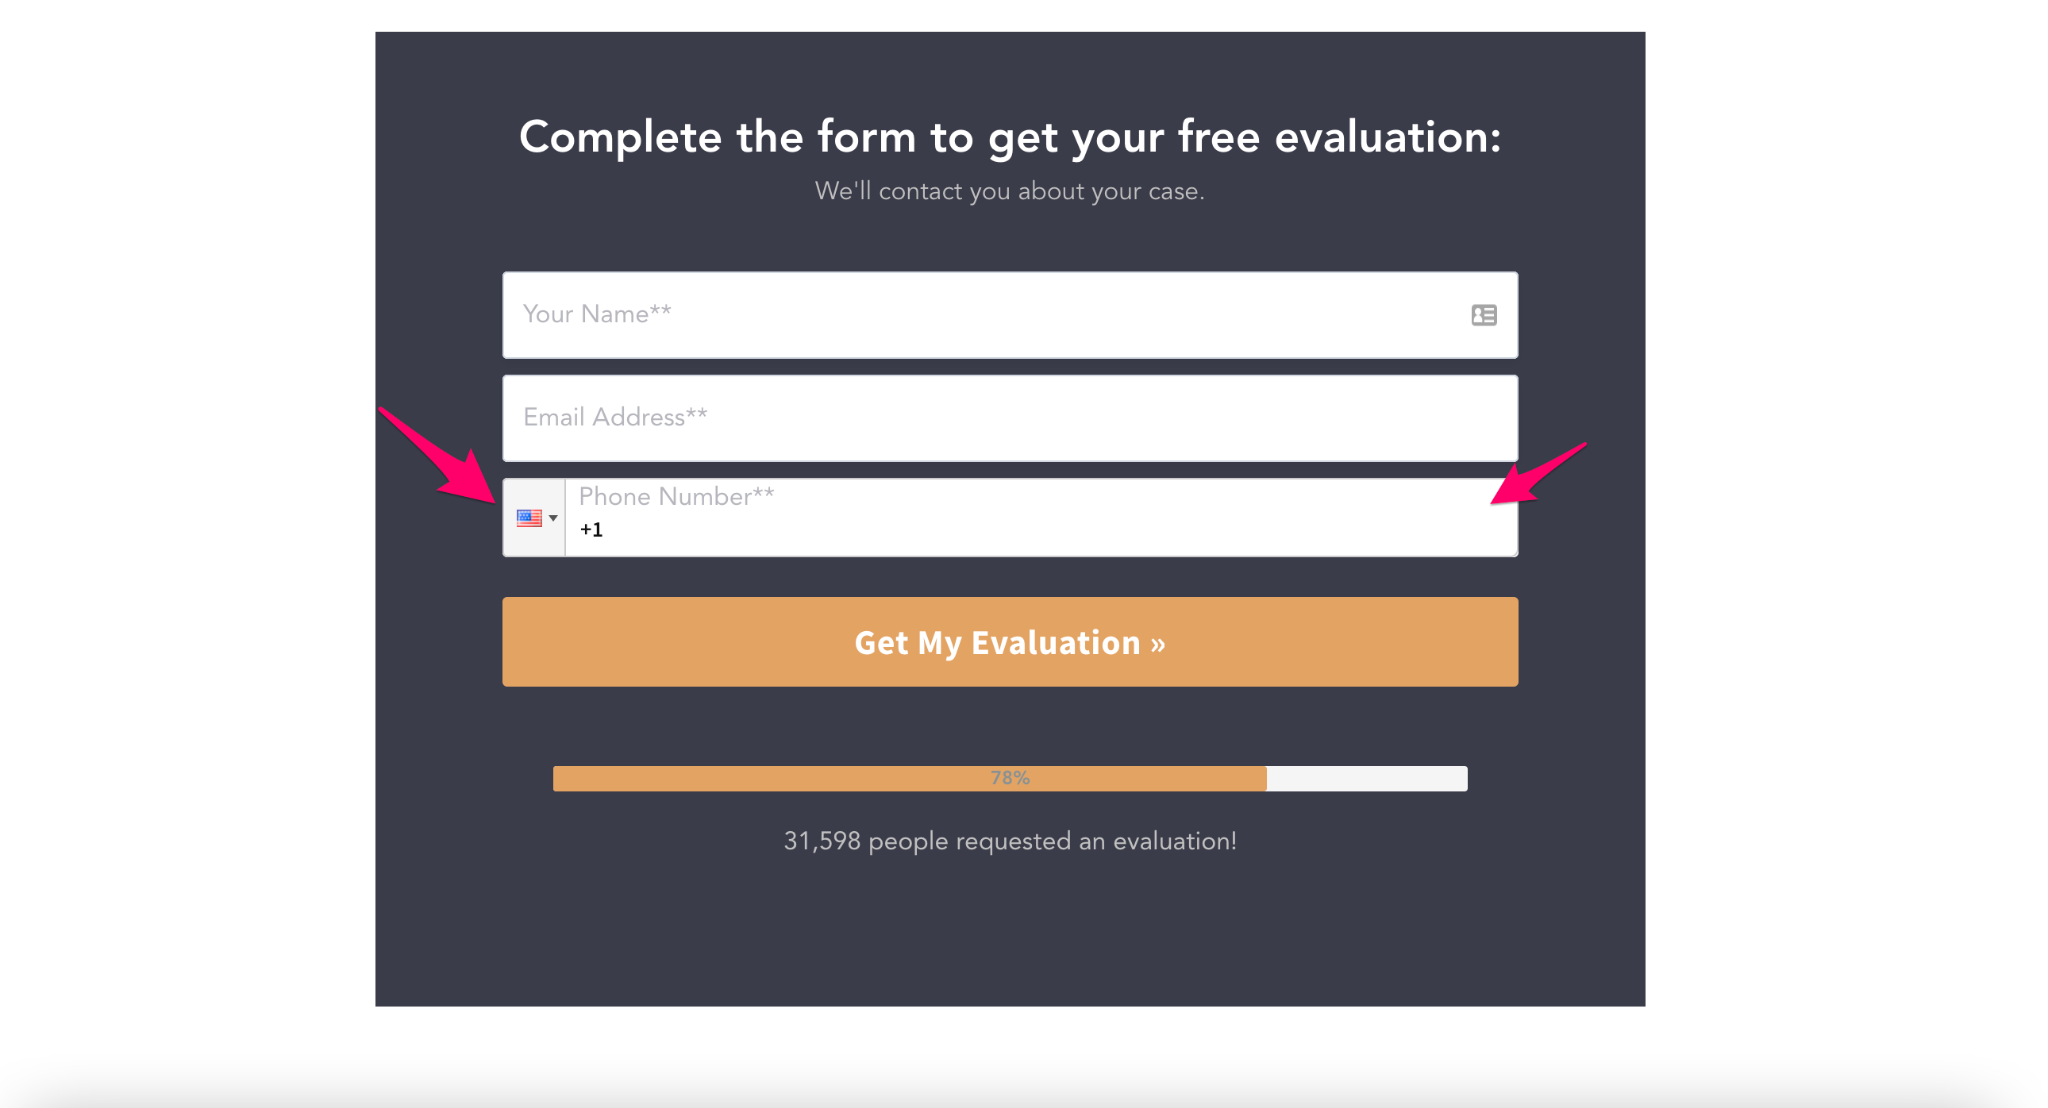
Adding more questions results in longer, more intimidating forms that often end up looking like this:
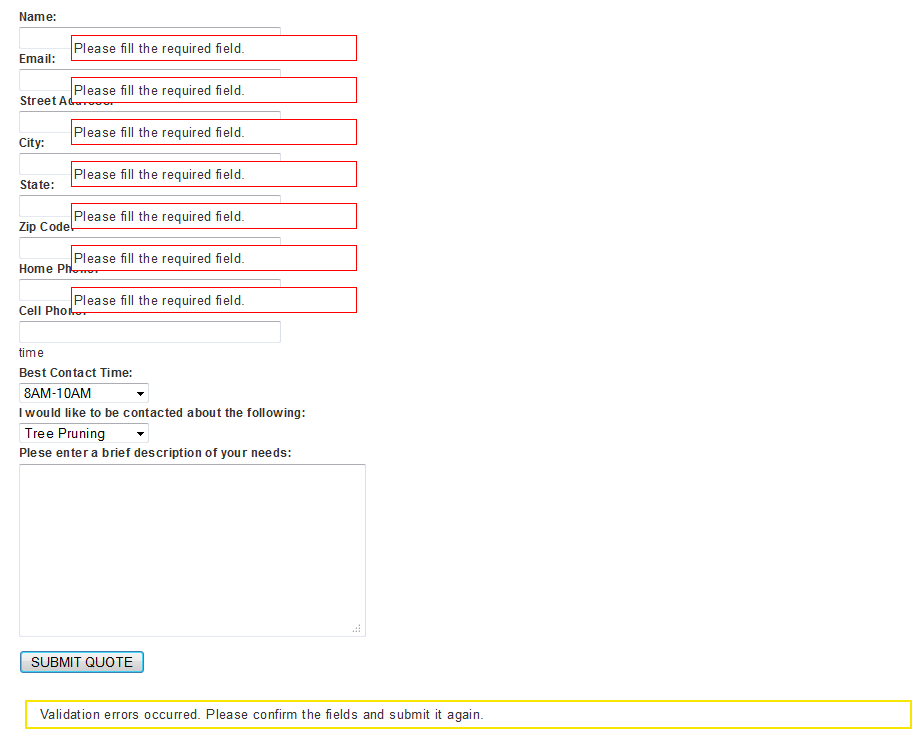
And the longer the form, the more likely it is to result in cognitive overload, leaving prospects overwhelmed.
So the next item in our lead qualification checklist is to break questions down into multiple steps, rather than hitting prospects with every question at once.
In the sections above, you saw a glimpse of what multi-step forms look like in the two examples above.
A multi-step form simply involves asking your prospect one question at a time, in a frictionless way.
An insurance company, for example, could set up a multi-step form that starts by asking a prospect what type of insurance they’re looking for.
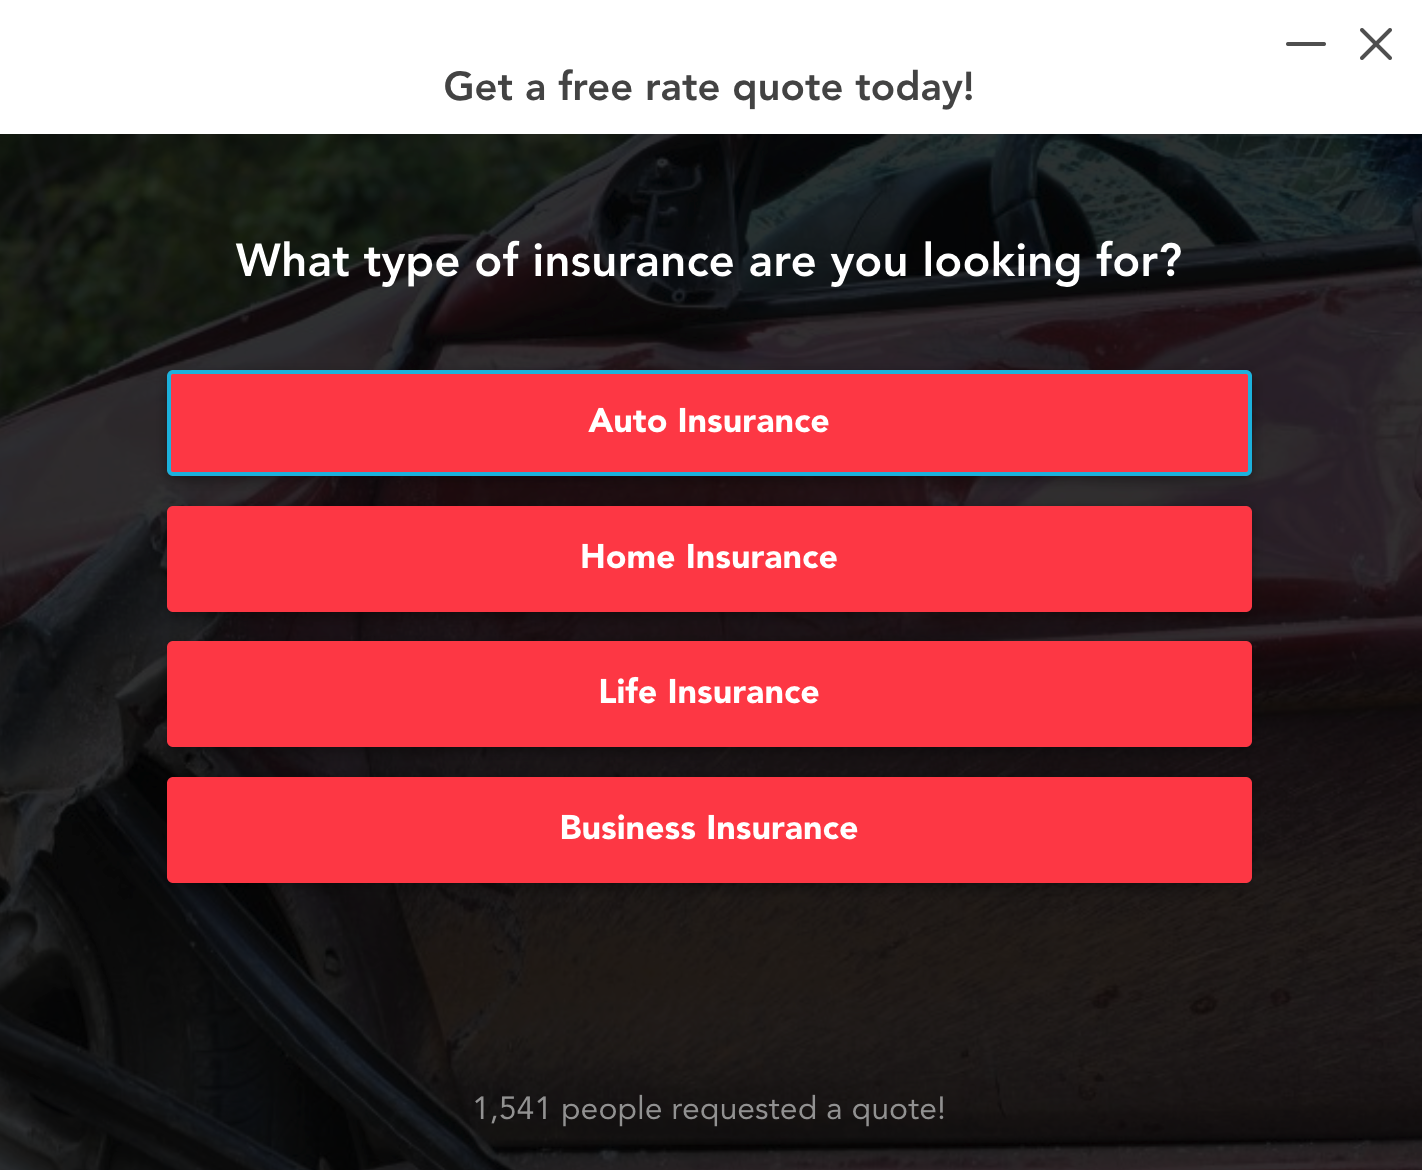
If the prospect indicates they are looking for auto insurance, the company could then ask why they were looking for auto insurance.
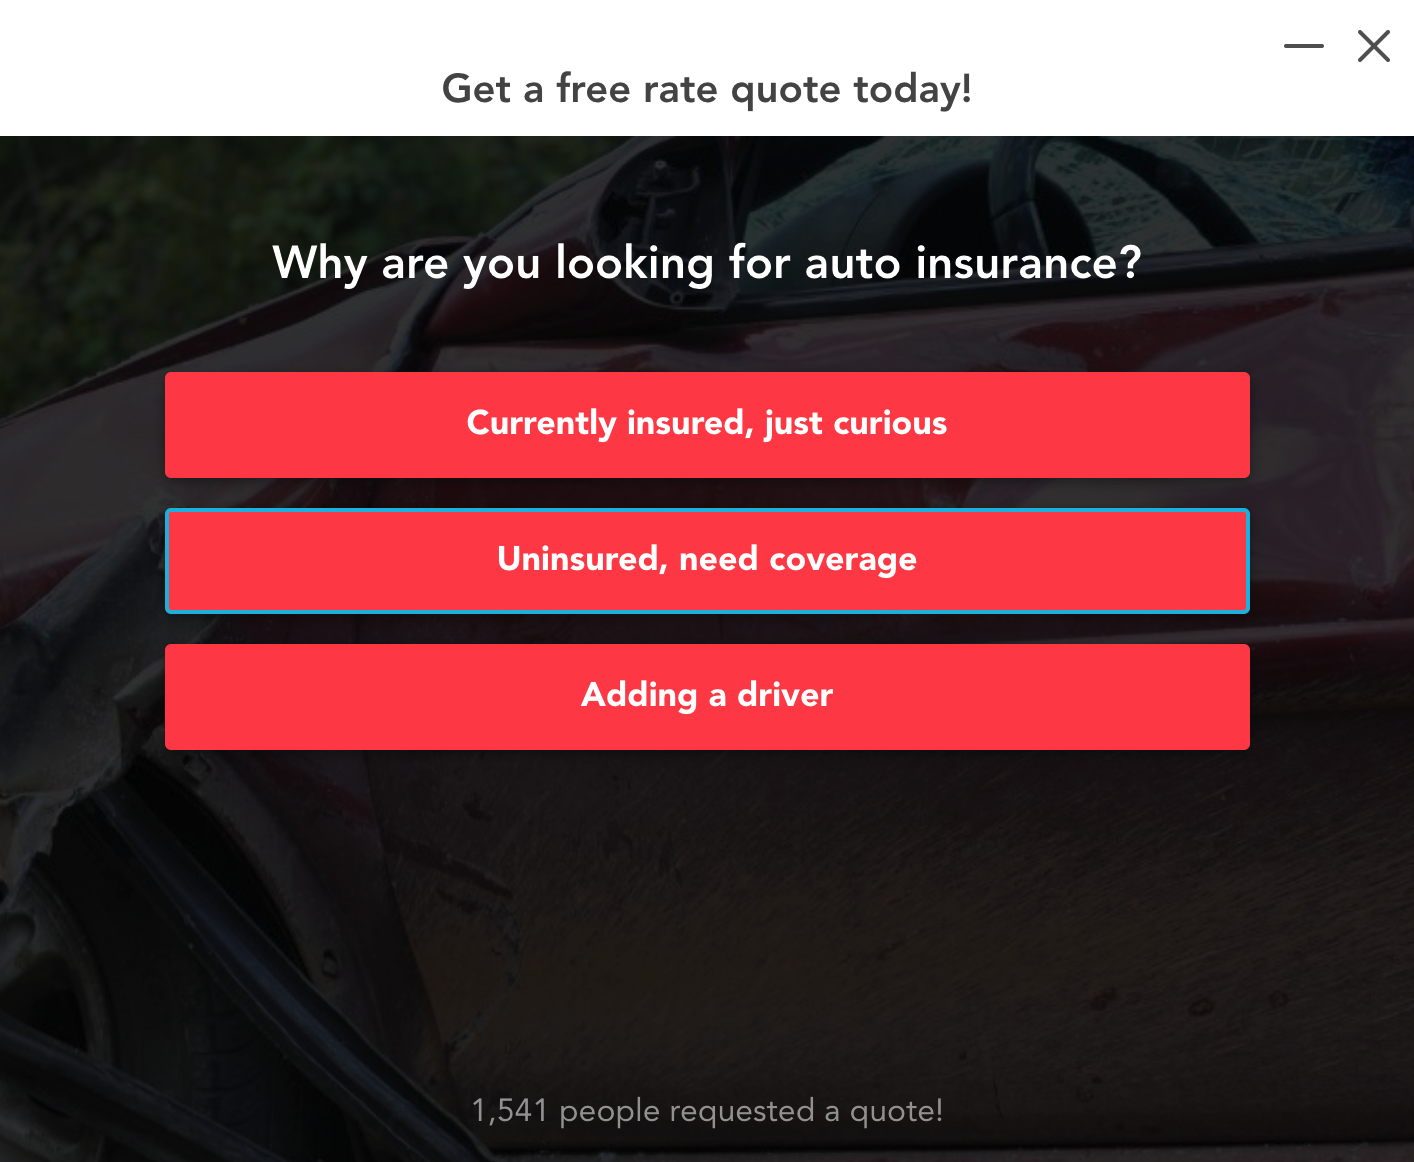
If the prospect said they were uninsured and needed coverage or were adding a driver, this would be great qualifying info to have.
From there, the insurance company could ask other key questions like what’s the primary age of the driver, and so on.
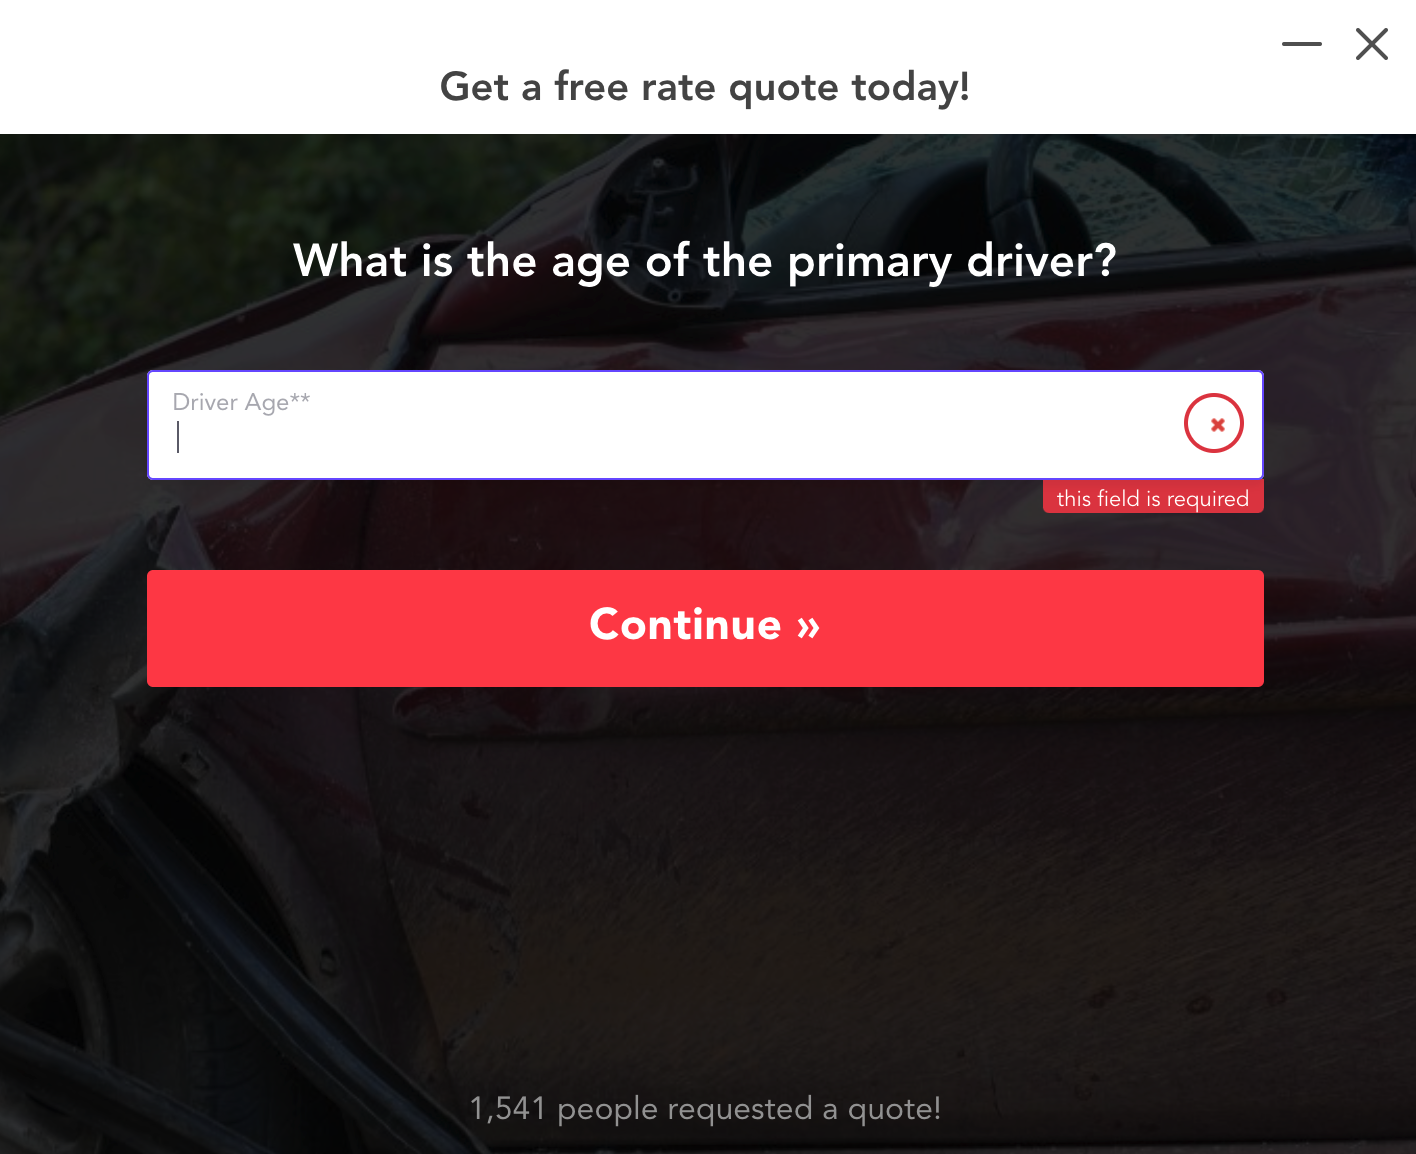
With multi-step forms like this, you can get the key info that you need to determine if the prospect qualifies for your offering, without barraging prospects with too much at once.
Want to see more examples of multi-step forms? Check out this post: 9 different multi-step form examples by industry.
If you need help creating a multi-step form then I highly recommend checking out our multi-step form builder
3) Simplify high-friction fields with auto-fill features
Some questions in your forms come with a higher perceived ask than others.
For example, at GetLeadForms our drop-off data shows that asking someone for their home address results in a higher bounce rate than asking a prospect for their first name.
This is why the next item on our checklist is identifying “high-friction fields” — the fields that are common sources of frustration — and fixing them.
A good example is the moving space where a company needs to get the address a person is moving to.
In this example, a high-friction area of the form is asking the prospect to manually enter their address, which, as most of us know, can be irritating.
Rather than forcing the prospect to meticulously type their address in the form, you could use Google address auto-complete where by entering just a few characters Google provides a list of relevant locations to choose from.
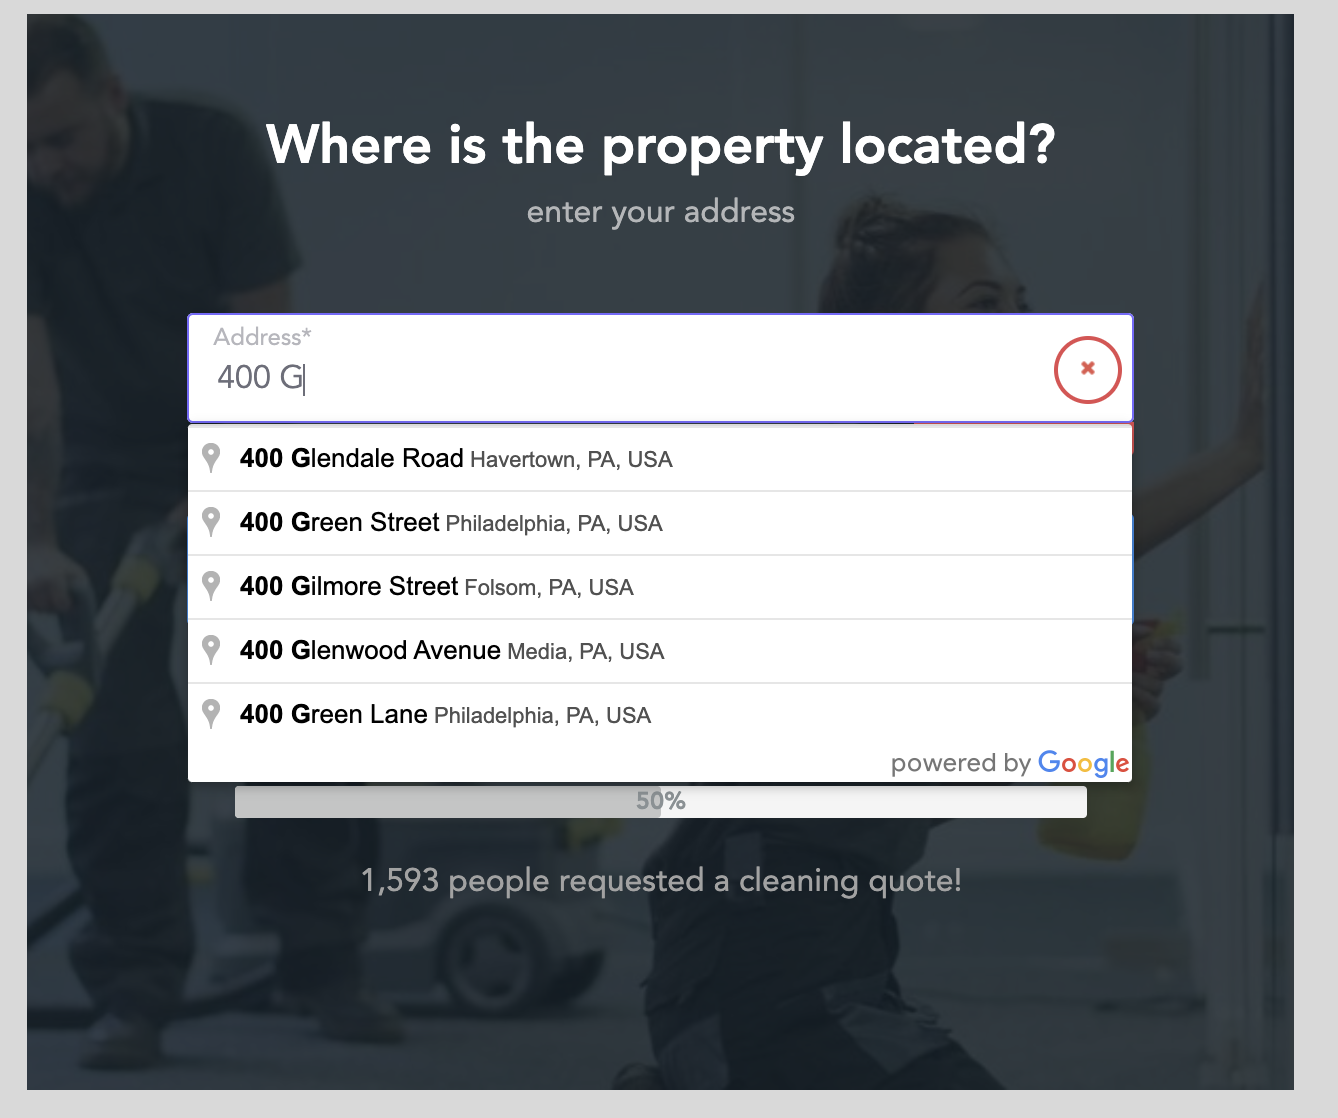
Autofilling fields alone will greatly improve the UX of your form and help move prospects through forms more fluidly, thereby boosting conversion rates and helping you get more qualified leads.
And here are some other ideas.
- Distinguish fields that are required to be filled out with an asterisk (*)
- Use placeholder text in fields where there may be confusion
- Explain why you need certain information, such as a person’s birthday
Also, be sure to pay close attention to your form analytics and look for areas with high drop-off rates, as these should indicate points of friction.
As you accumulate more data over time, you’ll know which specific areas need to be adjusted, which should help continually improve your UX.
4)Route unqualified leads to a disqualification step
Up until now, I’ve explained things you can do to filter prospects and generate more qualified leads.
But what about unqualified leads that you don’t want to send to your sales team or client?
For instance, a personal injury lead isn’t qualified. There’s no reason to send them to your sales team or client.
In this situation, what you can do is send that prospect a message, saying something like,
“We’re sorry, but you’re not qualified right now.”
From there, you can send them to another place like a blog post for nurturing. Or, you can simply do nothing.
So, how do you go about routing leads to a disqualifying step?
With GetLeadForms, you can set one up by creating flows with conditional logic.
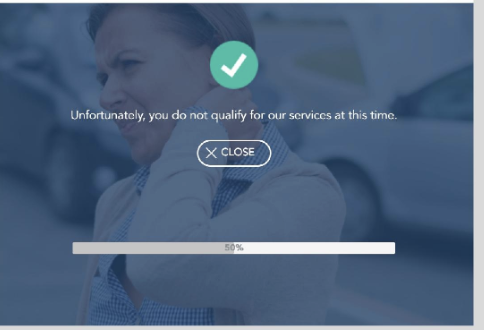
Simply choose a question where a “No” response is a disqualifier, such as someone selecting “No” when asked if they were injured in a car accident.
If someone selects ‘No’ in the step above, then you might show the a step like this.
If someone chooses “Yes”, they’ll continue with the next step in the multi-step form
You can find a step-by-step tutorial for creating a disqualifying step here.
5) Create a quiz or survey
Turning your form into a quiz or survey is another excellent way to generate more qualified leads.
This format lets you quickly determine a person’s level of interest and need while using a convenient, user-friendly format.
Let’s look at an example of an HVAC company where a prospect is interested in heater repair.
First, the company could ask how many repairs the person needed in the last year.

If they answered “No repairs needed!” this wouldn’t be a very qualified prospect. In fact, the HVAC company may even disqualify them.
But let’s say the person chose “2 repairs” or “3+ Repairs.”
This would be a highly qualified prospect and likely a lead they would want to prioritize.
Next, the company could ask, “How old is your heating system?”
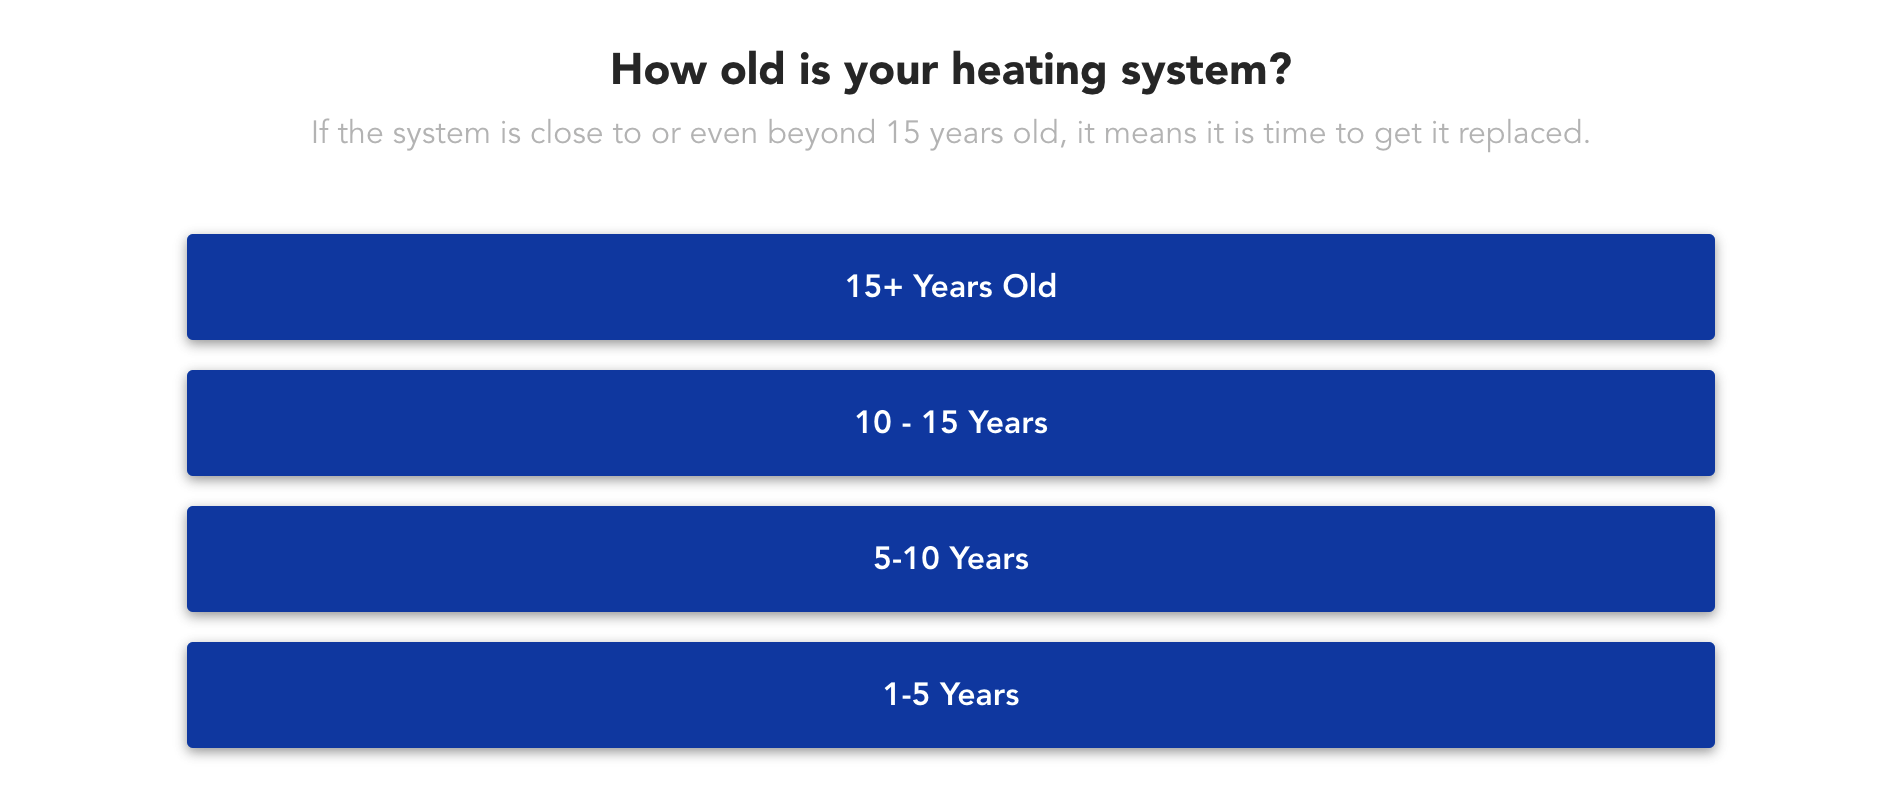
If the prospect never had a newer heating system, they probably wouldn’t be a very qualified lead.
But if they had an older heating system, they would be a much more qualified lead.
So, if a prospect said they had 3+ repairs in the last year and their heating system was 15+ years old, this would be a super-qualified lead and one to prioritize over all others.
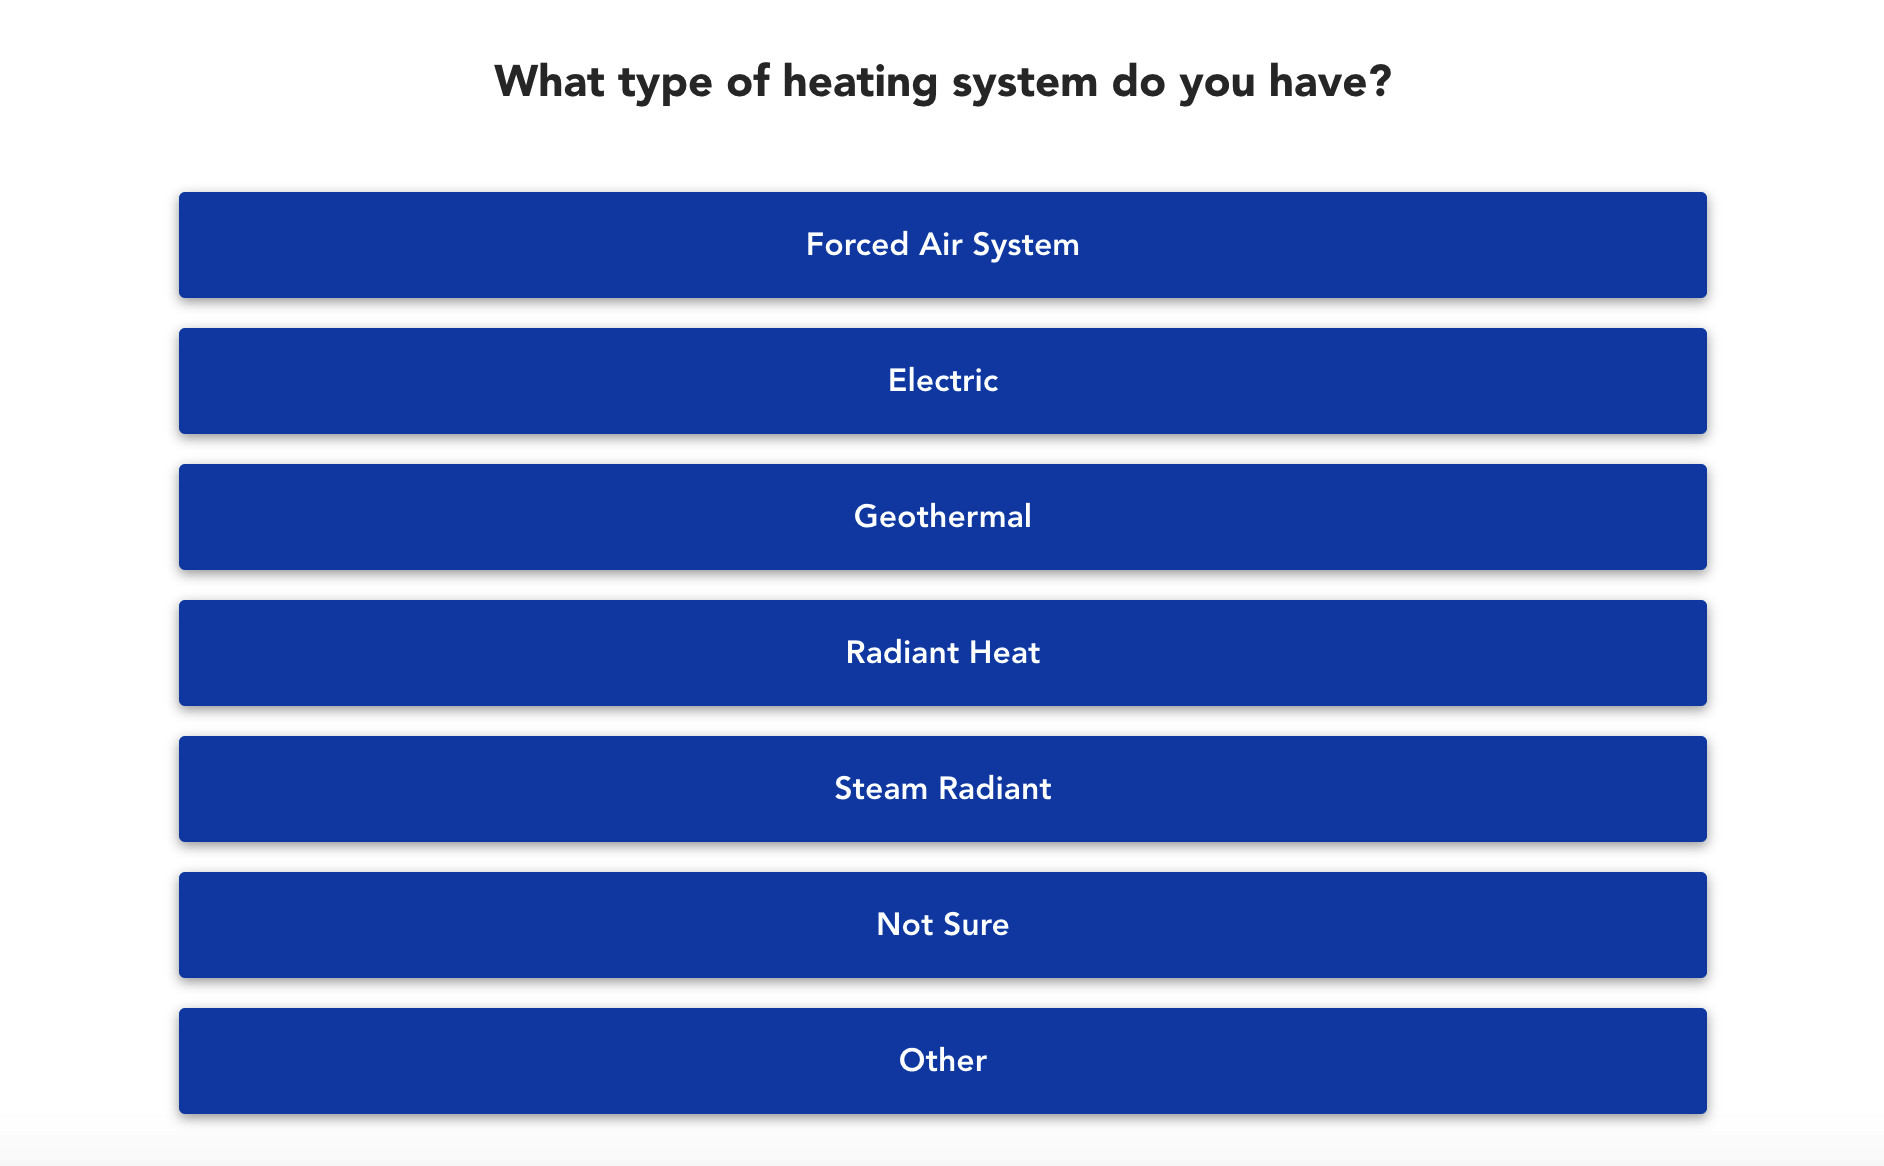
From there, additional questions could be asked to grab other important information like what type of heating system they have, and so on.
By using a quiz/survey format like this, you can quickly learn what you need about a prospect and qualify them while still maintaining a positive UX for a win-win.
6)Verify your prospect’s phone and email
Many people assume all the information you receive from leads is 100% factual and accurate.
Unfortunately, that’s not always the case. And studies have found that more than 25% of all leads processed are invalid.
Of those invalid leads, about 30% are due to a phone number and 28% are due to email.
Sometimes, an incorrect phone number or email address is entered by accident. Other times, it’s intentional.
The good news is that this is an issue that can often be fixed by verifying your prospect’s phone number and email.
And GetLeadForms makes it super simple with one-time passcode (OTP) phone verification.
Here’s how it works.
First, a prospect enters their phone number to complete a form.
They’re then sent a one-time passcode.
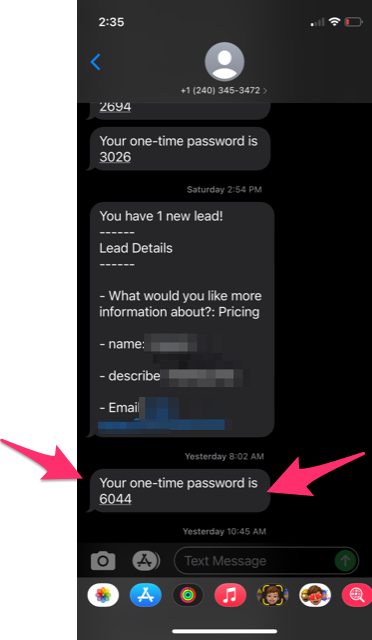
At that point, they enter the passcode into the LeadForm.
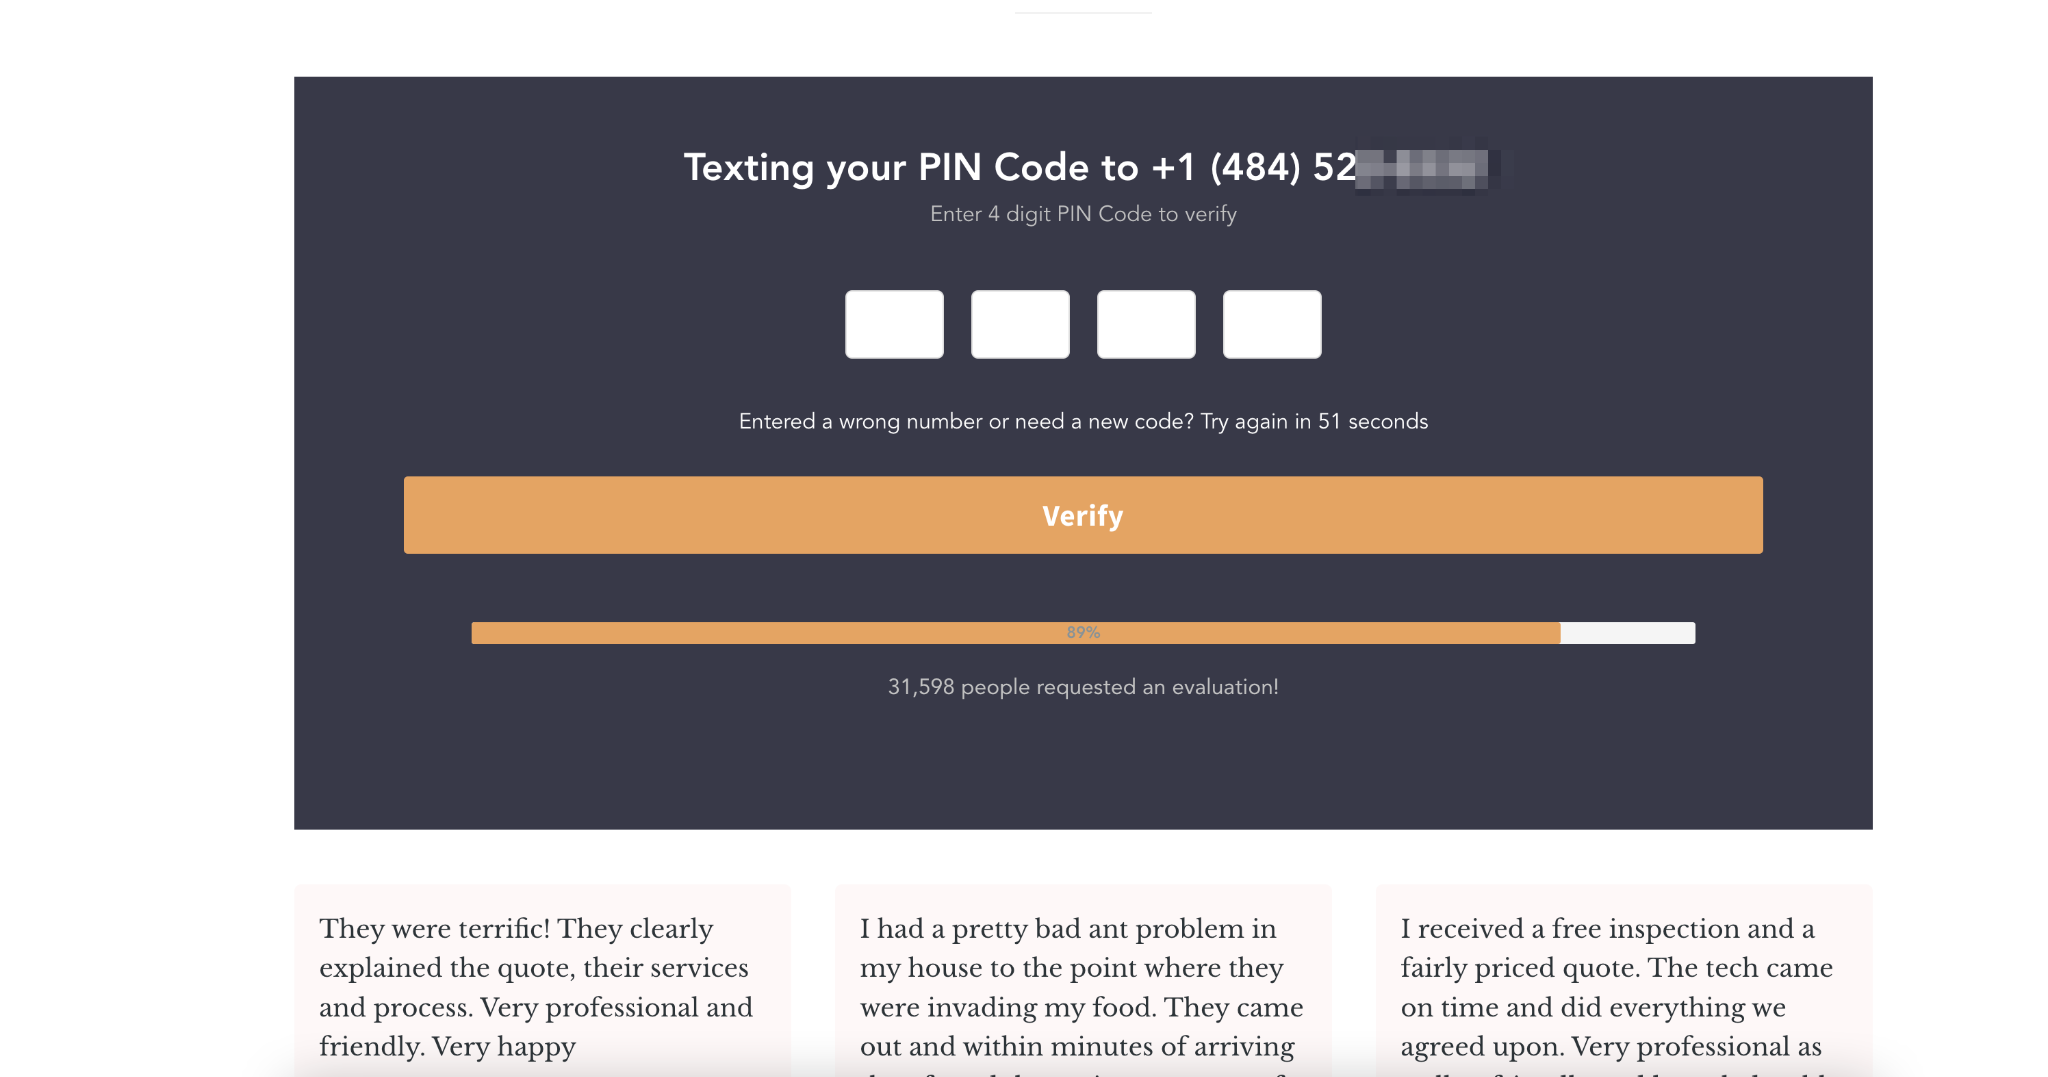
As long as the number is correct, the prospect is verified and they can complete the rest of the form.
However, if the prospect enters an incorrect passcode or no passcode at all, they won’t be able to move forward with the form.
In the event that they enter the wrong code, they can easily go back and re-enter their number to re-generate a new code.
This makes it a great way to verify leads without adding unnecessary friction to the process.
If you’re sending leads directly to a sales team, this is a great way to boost lead quality.
Or, if you’re selling leads to a client, this gives you an additional value proposition where you can say all your leads are verified.
Final thoughts on pre-qualifying prospects with your forms
To wrap things up, there’s no doubt that there are tons of ways to qualify leads at different stages of the sales process after they submit your form.
But keep in mind when you break it all down, there’s no better time to pre-qualify leads than when they’re submitting your forms.
By striking at this opportune moment, you can get all the information you need to qualify your prospect before you potentially waste time with bad leads.
This way you can send more leads to sales or your client that will show a high intent of buying.
Next steps:
Continue reading about lead qualification. Here are my top three recommended lead qualification tools to help you get more qualified inbound leads.
Or check out some of our top lead gen form examples, by industry to get your creative juices flowing.